
BlockBuilder
Contents
BlockBuilder
Important Note
You need a modern browser to use BlockBuilder. Please review this information to ensure that your browser version is up-to-date.
There's also a link to check for the most recent version if you're using an older one...
Whether it's your home page, a Tier 2 page, or a Tier 3 page that you want to publish, you build them all here, exactly the same way, with the same tools.
BlockBuilder has two parts...
-
The four tabs just above the gray bar, and the seven buttons and one menu sitting in the gray bar...
-
The four tabs let you select the SiteBuilder module to work with...
-
BlockBuilder, which is what you're using now
-
Libraries, where you select a library to go to
-
Site Navigation, where you set your navigation order and create Nav Headers
-
Site Designer, which you used to select and customize a design
These four tabs are common to BlockBuilder, Site Designer, and several of the libraries.
As you scroll down the BlockBuilder page, those four tabs, and the links in the top right corner, will slide under the builder area. This will give you more space on your screen to add blocks and content.
-
-
The two buttons on the left that allow you to change the page you're working on (New and Change buttons).

The file name that you gave the page displays next, as plain text.
To the right of the file name is the number of words. The starting number is always 12, as that number counts the pre-entered H1 headline and the text in the first two Text Blocks.
If you're editing the page, just to the right of the Change button is a page icon. This tells you that you haven't changed anything on this page. A red dot instead of the page icon tells you that you've made some changes to this page.

To the right of the page icon or red dot is the file name of the page you're currently working on. This name is the file name you entered in the Page Information overlay window when you first built the page.
After the file name is the Last Saved amount of time.
To the right of Last Saved is the word count for the Headline and Text blocks on the page. This number will vary depending on the number of words you added to each page.
In the screenshot above, you see the page file name as a link. When editing an existing page, you can click the link to open the page in a new window/tab.
Unpublished pages display the file name in plain text.
-
-
The icons and the five buttons that display or affect the page you're currently working on (Screen Size icons, Head, Page Info, Preview, Analyze It! and Save).

-
Your template, and the tools to work on it...
-
The gray bar at the top, which is initially empty. As soon as you click on an existing block, or drag a block over to your page, that block's toolbar appears.

-
The various Block options, aligned vertically, which you'll find in the block palette (the left column).

Click on any of the links below for quick access to the help and strategies for that block...
Page Content Blocks
-
Image Block, including captioning options
-
Elements Block, which lets you add a button, embed a YouTube video, add an exit intent modal (overlay) "on top of" the page, or add an FAQ Block to the page
-
Container Block (includes the Callout Box and Reminder Box, plus Stripes)
Visitor Interaction Blocks
If you drag over any of these five blocks before you set up the associated element (RSS/Blog It!, social buttons, MailOut Manager, an FBI! form or a C2 invitation), you'll see a message advising you that you need to set it up before using the block.

-
Social Block, which lets you add Like and Follow buttons, FB comments boxes, a Social Sharing Bar, and a Social Destinations Bar to your pages
Navigation Block

-
Navigation Bar Block, where you can select vertical or horizontal navigation for your site
-
The design you customized with Site Designer. It appears every time you start a new page, with some filler text (headline and first paragraph) already added.
There's also a set of 18 orange dots for a 3-column site (15 for a 2-column site, or 12 for a 1-column site), which become Sitewide Dots after you add content to them (more on dots, below).
-
Building Pages
This is where you create the visible content of each page of your site (more below on the "invisible" content of your pages).
You build each page by dragging blocks to the page, and then adding content or specific interaction tools (e.g., a contact form or a Content 2.0 invitation).
Click here to read an overview of the various blocks (listed above) that you'll use in the page-building process. You'll find links to the help for each block. It also has an in-depth discussion of Sitewide Dots, including how to create and use them.
Remember to come back to this page to learn more about the other actions available to you in BlockBuilder.
BB1 to BB2 Conversion Helper
If you have no BB1 pages, skip to this section.
If you have BB1 pages, you can use the BB1 to BB2 Conversion Helper to convert all of your pages. However, you must know how to use BB2 first if you want your conversions to go smoothly.
Therefore, before you begin converting your pages, read this help page, and the help for the various blocks available to you in BB2 (listed just above).
We highly recommend that you update your site design with a responsive template (one that will change how it formats text, the header, navigation, and other page parts, depending on the size of the device viewing your pages).
You'll also need to read all the Site Designer help files, especially for customizing your new design for the different viewport sizes.
When you're comfortable with how BlockBuilder's tools work, then you're ready to start using the BB1 to BB2 Conversion Helper.
Click here for the BB1 to BB2 Conversion Helper help.
Screen Size
- Click on the icon to view the tablet breakpoint or the phone breakpoint.
- Make any changes to the content (except images) or in-line styling based on what you see in that view.
Click on any icon. You'll see the content layout and the design change to fit the width of that breakpoint's "screen."
Scroll through the content with your mouse or by dragging the scroll button on the right side of the device.
(In Safari, you will not see a scroll button until your mouse is over the device "screen.")
Make any design tweaks for the two screen sizes. Once you're happy with the content and layout, build the page.
The available options are...
-
Desktop (computer icon)
-
Tablet (tablet icon)
-
Mobile devices (phone icon)
You cannot pre-set image sizes for each screen size. The system resizes images on the fly depending on the screen size (which is determined by the device size and the orientation -- horizontal or vertical).
Most screen size customizations should be done in Site Designer, so that they affect every page on your site.
Head
- Click on the Head button in the top right.
- Add any code you want on every page in the Sitewide text box.
- Add any code you want on one particular page in the This Page Only text box when creating or editing that page.
If you need to put something into the <head> section of a page, or into the <head> section of every page of your site, this is where you add it.
It could be an ownership verification meta tag on the home page only, or some JavaScript code that has to go on every page.
See the Head help for details about more things you can put into the <head> section of your pages.
Page Info
- Click on the Page Info button in the top right.
- Change any of the information that you entered for this page earlier in the building process.
- Click on Advanced Options to choose one or more of the options there.
- Click Change Page Information to save the changes.
If, after adding the content, you decide that you want to change the Keyword, Description, or Title, you can do that.
Or you may decide that you want to switch the page from a Tier 3 to a Tier 2, or from Tier 2 to Tier 3. You can do that as well.
Note
Do not create more than 25 Tier 2 pages. Having more than 25 navigation links on your home page (what makes a page a Tier 2 page) dilutes the importance of all the links on the home page.
Restrict your navigation to 20 Tier 2 pages, 25 at most. Make it even fewer if you'll be using horizontal navigation.
If you don't want this page in the search engine results, or you don't want the engines to follow the links on the page, you can choose those Advanced Options. You can also password-protect the page.
After building the home page and at least one other page, you can edit the home page and create a Pop Under that opens that second page underneath the home page whenever a visitor lands on it.
Do any of the above by clicking on the Page Info button in the top right.

Once the Page Information overlay window appears, revise the information you entered earlier, or select an advanced option, and save your changes.
Note
If you're editing the page, be aware that changing the Page Information's Title or Description could affect your search engine rankings for that page.
Changing the Keyword could affect the reporting for that page in Search Engine HQ.
Preview Your Page
- Click on the Preview button in the top right.
- In the new window, carefully examine the Content Column and anything new that you've added to this page. If this is the home page, also check any common content in Sitewide Dots.
- If this page is a Tier 2 page, also check that it has been added to the navigation on the left or at the top.
- Close the preview window.
Finished adding the content to this page, along with any images and the links to other pages?
It's time to preview how it will appear live on your site after you publish it.

Focus on the Content Column.
-
Are paragraphs too long? Are there some sentences that are too long (run-on sentences)?
-
Are there enough headlines, and enough white space?
-
Did text wrap around images the way you wanted it to? Are the images all working?
If you're using Reusable Blocks or Sitewide Dots anywhere on this page, check that the content of those blocks is what you expect to be there.
Also check that your What's New Box, Newsletter Form and other visitor interaction tools that you set up display correctly.
If you made this a Tier 2 page and named the navigation button/menu item (in the Page Information overlay), check that a link to this new page appears in the navigation. You can re-order the navigation in Site Navigation.
Analyze It!
- Click on the Analyze It! button in the top right to view recommendations about this page.
- Move the new AI! window to the side and use its recommendations to improve your page.
- Close the Analyze It! window.
Once you've previewed the page to ensure that there are no formatting problems, it's time for Analyze It!.
Click on the Analyze It! button in the top right. This opens a new window with a list of things to consider fixing.
The shorter the list, the better your page has been search engine optimized.

Read through each reported issue. Some have links to help for that particular issue. Once you've read it all through, move the window to the side (resize it if necessary) and leave it open while you work on improving your page.
When you're done, close the Analyze It! window and repeat the process. Your goal is to have no issues reported.
Practically, you'll probably have one or two, since it's always more important for your page to read well for humans than to be perfectly optimized for search engines.
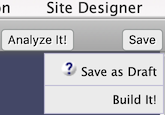
Save Button (Save Draft / Save Revision)
- Click on the Save button in the top right to save a new page as a draft.
- Click on Save as Draft to save the page without publishing it.
- For a published page, click on the Save button in the top right to save edits as a revision.
- Click on Save Revision to save the changes without publishing them.
As you're putting together a new page, you may want to save it without publishing it.
You can do that by clicking on the Save button, then clicking on Save as Draft.
If there are any warnings (e.g., you haven't assigned a breadcrumb to the page), an overlay appears. Review any warnings, then click on Save as Draft.
In the second overlay, read the message about making changes to Sitewide Dots and Reusable Blocks on the draft page.
Click on Save as Draft to save the page as a draft. The file icon in Page Manager will show that it's a draft. Giant Page Manager will also show it as a draft.
Important Note
If you know you will be saving the page as a draft, do not add a check to add the page to your RSS feed. If you do add a check, the page will be added to the feed, even though you haven't published it yet.
This will result in a broken link on your Blog It! page, in your What's New Box, and in your visitors' RSS readers.
You can edit any published page and save the edits without publishing the page again. Click on the Save button. Click on the button to Save Revision.
The changes you made will be saved on the server. The published page will not be changed. It will still show the pre-edit content.
Build It! Button
- For a new page, click on the Build It! button to build the page and publish it to the web.
- Click on Build It! in the overlay.
- For an existing (published) page, click on the Build It! button to rebuild the page with your revisions.
- If rebuilding the page, (if desired) add a check to update your RSS feed and Blog It! page.
- Click on Build It! in the overlay. Click on Cancel if you do not want to rebuild the page.
If this is a new page, click on the Build It! button to build the page. Add a check to add the page to your RSS feed (if desired). Then click Build It! in the overlay.
If you're editing an existing page, click on the Build It! button to rebuild the page. Add a check to update your RSS feed (if desired). Then click Build It! in the overlay.
If you do publish the page, you'll see a success window. Choose your next action. You can go to Site Central, create a new page, change the page, or return to the page you just built.
If you're not ready to publish the changes, you can save the current revision. Click on the Save button, and then on Save Revision to save the revision.
If you're editing the page (rather than building it for the first time) and you added the page to your RSS feed, you'll see an option to Update RSS/Blog It! on the overlay (if you selected to add it to the RSS feed in Page Info).
Add a check if you want to update the RSS feed and your Blog It! page. Then click on Build It!.
If you're making major edits to the page (e.g., you added a new section or important contact information), add a check to the checkbox.
If you're making minor edits to an existing page (e.g., fixing typos), leave the checkbox unchecked.
Want to remove the page from the RSS feed (and on your Blog It! page, if applicable)?
Click on Cancel to close the overlay, then click on Page Info and uncheck the RSS/Blog It! option in the overlay. Then continue building the page.