Text/Image Block
The Text/Image Block is a hybrid block. It's a container that contains both a Text Block and an Image Block. So why use it instead of the two individual blocks?
When you use the Text/Image Block and want to wrap text around the image, you'll see the text wrapping around the image (in BB2 itself), unlike with an Image Block followed by a Text Block.
This makes it much easier to picture the layout of your page as you're putting it together, so there will be less tweaking you have to do after previewing the page.
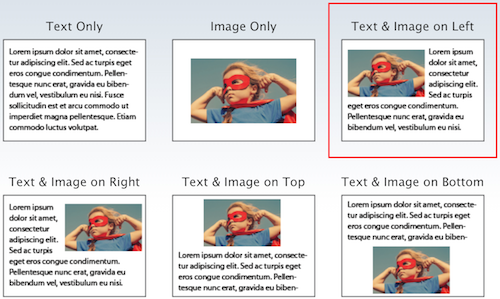
The Text/Image Block has six different options. These include...

-
Text Only -- this is a regular Text Block (offered here as we may remove the Text Block from the block palette at some point.
-
Image Only -- this is a regular Image Block (offered here as we may remove the Image Block from the block palette at some point.
-
Text & Image on Left -- the image "floats" to the left of the column, and all text that follows it wraps around the right of it until the bottom of the image, at which point it returns to full width wrapping (see the selected option in the screenshot above).
-
Text & Image on Right -- the image "floats" to the right of the column, and all text that follows it wraps around the left of it until the bottom of the image, at which point it returns to full width wrapping.
-
Text & Image on Top -- the text will always appear below the image, which is centered by default (with options to align the image to the left or the right)
The Image Block already has a Caption option, so use the text below the image for a more in-depth discussion of the image.
-
Text & Image on Bottom -- the text will always appear above the image, which is centered by default (with options to align the image to the left or the right)
Use this option to introduce an image to your visitor.
Using the Text/Image Block
- Drag the Text/Image Block over to the page.
- Select the content option you want in this block, from the 6 options.
- In the Text/Image toolbar, select the clearing you want for the image on left and image on right options.
- Change the image position, if desired.
- Click anywhere on the dummy text. It will disappear. Paste or type in the text you want in the block. Customize the text using the Text Block options.
- Click on the image. Customize it via the Image Block options, including changing the image itself.
Click and drag the Text/Image Block to where you want to add the image and/or the text.
An overlay appears, showing the 6 options. Select the one you want, based on your needs at this point in the page. A red outline appears around your selected option.
Click on the Add the Selected Text/Image Format button. If you selected one of the five options that include an image, the Image Selector overlay will open.
Select an existing image, then click on Add Selected Image to Page. Or upload a new image, give it a Descriptive Name, then click on Upload to Image Library and Add Image to Page.
The overlay will close. The image and some filler text will display in BB2.
Click on the image to access the Image Block tools to add alt and title text, etc. If you need a reminder on the Image Block tools, click here.
Click on the filler text. It will disappear. Paste or enter the text you want on the page. Use the Text Block tools to add bold, italic, etc. If you need a reminder on the Text Block tools, click here.
Text/Image Block Toolbar
The Text/Image Block toolbar has two options, Clearing and Image Placement.

Clearing

Clearing is only necessary for the image on left and image on right options, so that, if you have a large image and not much text, you can ensure that the content of the next block doesn't (or does, if desired) wrap around the image.
The default is both, which ensures that the content in the next block will not wrap around the image. If you want the content to wrap (e.g., a headline), set the clearing to none.
Image Placement

This tool lets you change the alignment of the image, instead of deleting the block and adding another one. The current placement (float left, centered (if you select image on top or image on bottom), or float right) has an outline around its indicator button. Click another to select that one. The image will now have that placement.
