
Blocks Overview
Contents
Blocks Overview
- Building a Page
- Dragging and Dropping Blocks Onto Your Page
- Page Content Blocks
- Visitor Interaction Blocks
- Navigation Bar Block
- Editing and Deleting Blocks
- Sitewide Dots
Breadcrumb Block
Headline Block
Text Block, including lists and links
Image Block, including links
Text/Image Block
Divider Block
Related Pages Block
Elements Block (Button, YouTube Video, Modal, FAQ)
Grid Block
Responsive Grid Block
Container Block (Callout Box, Reminder Box, Stripe options)
Reusable Block
Raw HTML Block
Author Bio Block
What's New Box Block
Social Block
Newsletter Form Block
FBI! Form Block
C2 Invitation Block
To build any page with BlockBuilder, drag blocks over to the page and drop them where you want them to appear.
Then add your content or a specific tool (e.g., a form or Content 2.0 invitation).
This help covers the following in this order...
-
the page-building process, and using blocks
-
each type of block, along with a link to the in-depth help for that block
-
editing and deleting blocks
-
how to create and use a Sitewide Dot. Be sure to read that before adding any block to a dot on your page.
Building a Page
- Click-and-hold on a block.
- Drag your mouse to the page and release the mouse button where you want the block to appear.
- Add content, an image, HTML, or other blocks, to the block.
- Use the block's toolbar to make changes inside the block.
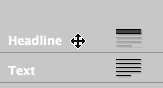
Each block in the block palette has a name in white text and an icon to represent it.
Moving your mouse over the palette changes your mouse arrow to a selector tool.
Clicking on a block turns that block's background to red, and the text to black.
A semi-transparent black rectangle (a block) appears. This is what you drag across to the page.
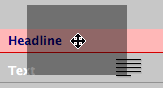
To add the block to your page, click-and-hold on the block name. With your mouse, drag the rectangle over to your page, to where you want the block to appear.
Every location where you can drop it will display a red horizontal bar as you drag over that location (see the screenshot below for an example of the red bar).

Release the mouse button when you reach the desired location. The block will appear on the page, with a raised appearance (shading gives it a three-dimensional look).
The currently active block will always have this 3D look.

The toolbar at the top of BlockBuilder will change to that block's tools. For example, if you drag-and-drop a Text Block, you'll see...
![]()
Use the tools to select or modify the contents of that block. Note that not all the blocks are editable. A list of which can be edited and which can't is below.
When you're done with one block, move on to the next block, and then the next, until you're satisfied with the page.
Dragging and Dropping Blocks Onto Your Page
BlockBuilder uses blocks to build your pages. You drag the blocks from the block palette (the left column).
 You can collapse the block palette, to show only the icons. Doing this gives you more room to add content in the columns of your template.
Collapse the palette after you've built a few pages and know what each icon represents.
You can also move the palette anywhere in the builder area of the screen.
Drag it so that the most commonly used blocks display near the bottom of your screen. Or drag the palette over to the far right.
Moving also makes each column a bit wider.
You can combine the two actions, collapsing the palette, and moving it wherever you want on the screen.
The three screenshots below illustrate three destinations between the H1 headline and the first paragraph. The first one is just below the Headline Block and just above the Below H1 Headline dot...
In the screenshot below, the red bar appears on top of the dot. Dropping the block there creates a Sitewide Dot, discussed in the last section, below.

In this next screenshot, the red bar appears just below the dot and just above the default first paragraph in the Text Block...

Moving Blocks
You can also move blocks that you've already dropped onto the page.
Click-and-hold on the gray header for the block that you want to move. The red indicator bars will appear. Drag the block to its new location. The red bar indicates where the block will land. Release the block to drop it there.
Cloning Blocks
In addition to moving blocks, you can clone them. There are two ways to clone a block.
-
At the top of the block is a gray bar. On the right of the gray bar are two icons. The first one is the cloning icon. Click on it to clone that block. Click on it (see the screenshot below).
Confirm that you want to clone the block. An exact copy of that block (including all styling to text or images) will appear immediately below the cloned block. Drag it to the new location and drop it there. Then edit the content of that block.
-
To the right of the cloning icon is the Reusable Block icon, which allows you to make this block available to other pages of your site (or other locations on the same page).
Once you have created a Reusable Block, you have the option to clone the content of that block on any page of your site. This, in effect, turns the Reusable Block's content (blocks, text, images, etc.) into a "content template."
Once you drop the Reusable Block onto a page, select the block to use, then click on the cloning button. This takes all of the blocks from the Reusable Block and adds them directly to the page. You can then change any of the content in those blocks without affecting the Reusable Block.
Page Content Blocks
Page Content Blocks are blocks that allow you to add content to your pages, or do things with or to that content.
These blocks include...
-
the Breadcrumb Block, for adding breadcrumb trails to your pages
-
the Headline Block, for adding headlines throughout your page
-
the Text Block, for adding text, lists and text links to your page
-
the Image Block, for adding images and aligning them on your page
-
the Text/Image Block, to quickly add an image with some text associated with that image
-
the Divider Block, to separate different sections of thought on a page
-
the Elements Block, which lets you add a button, a YouTube video, a modal (an overlay that floats above the content) to the page. Or add an FAQ section to a page, or create an entire FAQ page
-
the Grid Block, which allows you to split a column into two or more narrower columns of content, and to add additional rows
-
the Responsive Grid Block, which allows you to split columns into smaller, responsive columns, ideal for image galleries
-
the Container Block, which allows you to hold other blocks as a single unit, to create a Callout Box or Reminder Box, and to use stripes on your pages (if you selected a stripe-ready responsive template in the Site Designer Gallery)
-
the Reusable Block, which lets you place common content on multiple pages with a few mouse clicks, or add a content template to a page, and
-
the Raw HTML Block, which lets you add videos, audio, JavaScript, certain affiliate links, and other code to your page.
Headline, Text, Image, Reusable and Raw HTML blocks let you add content, and Breadcrumb, Divider, Related Pages, Elements, Grid, Responsive Grid and Container blocks let you do something to or with your content.
Tips
-
Always start each page with a headline. The Headline Block is already there waiting for you to add your own words. It's already set to H1, the main headline size. (Do not change this size.)
-
You can add Headline, Text, Image, Text/Image, Divider, Reusable and Raw HTML blocks within a Grid Block, a Responsive Grid Block, and a Container Block.
-
A Tier 2 page and its associated Tier 3 pages can form a virtual "mini-site" within your site. Create one by adding links in the content of the Tier 2 page to each of your Tier 3 pages, including the Specific Keyword of the destination page in the link text.
And use the Related Pages Block to link between related Tier 3 pages.
-
You can use special characters inside Headline and Text blocks, and add HTML with Raw HTML Blocks. See this TNT HQ article for special characters you can copy-and-paste directly into a Text Block or Headline Block. And if you need non-English characters, copy-and-paste them from this TNT article.
Important Note: Support does not provide help for HTML issues. See this forum for help.
-
For additional help from other SBIers on BlockBuilder techniques, visit this forum.
Visitor Interaction Blocks
A Visitor Interaction Block is a block that allows your visitor to take an action on (to interact with) your site.
These blocks include...
-
the Author Bio Box Block, which will display a short (max 80 words) bio about you, which you can create with the Author Bio Builder Tai Agent
-
the What's New Box Block, which converts your RSS feed into small blocks of content to show your visitors your newest content
-
the Social Block, where you can choose from X (formerly Twitter) Follow and Pinterest Follow buttons, the Socialize It! button bar (horizontal or vertical), and the Social Destinations bar.
-
the Newsletter Form Block, so visitors can subscribe to your newsletter
-
the FBI! Form Block, so that they can contact you or request more information
-
the Content 2.0 Invitation Block, where they can create content for your site, or comment on content created by other visitors
You cannot use any of these blocks in the block palette until you have set up the corresponding tool (RSS/Blog It!, Socialize It!/Face It!, MailOut Manager (or Mailchimp or AWeber via Connected Services), Form Build It!, Content 2.0).
Navigation Bar Block
The Navigation Bar Block allows you to choose either vertical navigation (normally added to the Nav Column) or horizontal navigation (added at the top of the page).
Most responsive templates have horizontal navigation as their default navigation type.
Editing and Deleting Blocks
Not all the blocks are editable. Only content in the Headline, Text, Image, Divider, Newsletter Form and FBI! Form blocks can be edited.
The blocks that cannot be edited hold...
-
Another block or blocks (Container Block, Responsive Grid Block and Grid Block)
Note: The Container Block has a toolbar, but using it affects what the Container Block creates, or it affects the blocks that are dropped into the container
-
Common content (Reusable Block), although the content inside a Reusable Block can be edited
-
HTML code for a video, AdSense code, etc. (Raw HTML Block)
-
Functions created elsewhere (What's New Box Block, Social Block, C2 Invitation Block)
-
A combination of the above (Elements Block, which can place a Button Block, YouTube video, a modal, or an FAQ Block)
-
Navigation
To edit a block, click inside the block. Make your changes (e.g., fix a typo, change a link destination or add a new link, change an image, shorten a divider). Save the changes by clicking on the Build It! button.
If you need to edit the content or function in a Reusable Block, click anywhere inside the block. A warning message will appear, informing you that any changes you make to the content/function of the block will appear on multiple pages of your site. If you want to continue with the changes, click on OK. To keep the content as is, click on Cancel.
Note: The above warning message does not appear if you clone a Reusable Block. A cloned block is a template that lets you add the same set of blocks (e.g., a 5 x 2 Responsive Grid Block with an Image Block and a Text Block in each cell) to multiple pages, and then change the content inside each block.
If you need to delete a block from your page, click on the X at the left edge of the gray header of that block. You'll be asked to confirm that you want to delete that block.
Deleting the content or function in a Sitewide Dot will remove it from every page of your site. For that reason, you must confirm that you want to do that. If you want to remove the content or function from every page, click on Delete. If you don't want to delete it, click on Cancel.
If you want to remove it from just the page you're working on, hide it instead of deleting it. Click here to learn how to hide a Sitewide Dot on a page.
Sitewide Dots
When you build your home page, you'll see as many as 18 dots, depending on the template you selected in Site Designer.
When you drag blocks (Headline, Text, Raw HTML, etc.) to one of these dots, the dot becomes a Sitewide Dot. This turns everything inside into common content in that location, on every existing and future page of your site.
You can create Sitewide Dots now, or add them when you need them (for example, add AdSense code after being approved by Google).
As you create Sitewide Dots, the content of those dots appears on the current page and all other pages of your site.
Important Note
If you change the content inside a Sitewide Dot while creating or editing a page saved as a draft, the content will change across all live pages as well.
The screenshots below show the dot at the bottom of the Navigation Column (it's called Bottom Nav Col, which you'll see in the second screenshot).

When you click on a block and drag your mouse, each Sitewide Dot's indicator (dotted lines) appears, the color changes inside the bar, and the name of the dot appears in the bar (see the screenshot below).

Clicking on, and dragging, any block in the block palette forces all of the dot indicators, and their names, to appear.
Click inside any indicator and it becomes the active block. The indicator changes color again and you'll see a small question mark on the far right. Each dot's question mark opens to a section of a help file that discusses what to put in that Sitewide Dot.

Drag a block to one of the dots. Whatever content you add there becomes a Sitewide Dot. That content will then be placed in that location on every page of your site.
If you don't want the content or function inside a Sitewide Dot to display on a particular page (for example, you don't want an AdSense ad unit just below the first paragraph on your Privacy Policy page), click on the red minus symbol ( – ) in the Below First Paragraph Sitewide Dot for that page only. The content or function in the block will disappear from the page (and only that page).
If you change your mind, you can add the content/function back onto the page by clicking on the red plus symbol ( + ).
Here's how the dots work, using the Newsletter Form Block as an example...
Click and hold on the Newsletter Form Block. Drag your mouse to a dot (in the screenshot below, the dot is at the bottom of the Nav Column).
The red location bar appears inside the dot's indicator, to let you know that the Newsletter Form Block will be added there.

Drop the block by releasing the mouse. The form overlay opens, and you select which mailing options you want to use. Once the overlay closes, the form appears in the Sitewide Dot...

Note the red minus symbol (on the left) and the help question mark (on the right) in the screenshot above.
Click on the question mark for recommendations about what content or function to add to that particular Sitewide Dot. And click on the minus symbol to remove this sitewide content from the current page only without affecting any other page of your site.
The screenshot below (which has a border around it) shows the same column real estate with the content hidden. Note the red + symbol, which will allow you to put the sitewide content back onto this page...

The Breadcrumb Block -- A Magical Block
As noted above, dragging a block to a Sitewide Dot adds the content of that block to every page of your site.
The Breadcrumb Block works slightly differently. Dragging the block to a dot adds a breadcrumb trail to a page only if you have assigned a trail to that page.
If you have not yet assigned a breadcrumb trail to that page, nothing will appear there.