FBI! Form Block
Contents
FBI! Form Block
Use only one form per page, and make it front and center. This will improve your chances that a visitor will complete and submit the form.
Add some PREselling content before the form. If relevant, provide your visitor with some incentive to submit.
For example, offer a free report, or a discount on your product or service, or anything else that attracts participation.
If you do offer an incentive, provide the link to it on the thank you page that you customized for the form in Form Build It!.
Do not turn an FBI! Form Block into a Sitewide Dot, as you do not want the same form on every page of your site.
For example, do not put a contact form on every page. Create a contact page and add the form to that page. Then link to that page from your navigation.
You could, however, create a Reusable Block that holds a Container Block with some text, a form, an image, etc.
For example, if you have a form for a special 5-day autoresponder course, add a brief PREselling introduction to the course and an image that shows a benefit of reading the course.
Then easily place the entire autoresponder content package on any page where it's relevant to the page's content by selecting the Reusable Block.
Using the FBI! Form Block Toolbar
The FBI! Form Block allows you to add a Form Build It! form to your page.
You must have created at least one FBI! form to use this block. Click here for help setting up a form.
- Drag the FBI! Form Block to the location you want it on your page.
- Select the form you want to have in this location.
Adding a form is as simple as dragging the FBI! Form Block to your page. Drop it where you want the form to appear.
When you drop the block onto your page, a selector overlay window opens. Select the form you want to place on this page.
The form will appear on the page, and the toolbar will switch to the FBI! Form Block's tools.
Note: You can't test the form or do anything with it from within BB2. For that, you'll need to preview the page or build it, and then test the form.

The toolbar has four sections...
-
Align
-
Border
-
Width
-
BGColor (Background Color)
Align
- Click on the Align Left, Align Center or Align Right button.
The three alignment options for your form are...
-
Align Left
-
Align Center
-
Align Right
Click on the button for the alignment you want to use.
To change the alignment, click anywhere on the form, then click on the new alignment button in the toolbar.
Border
The Border section gives you the option of putting a border around any or all of the four sides of your form.
Border Width
- Click on the + button to make the border wider. Continue clicking on it to increase the width.
- Click on the – button to make the border narrower. Continue clicking on it to decrease the width.
The + and – buttons increase and decrease the width of the border. Continue clicking on a button to keep increasing or decreasing the width.
The initial click on the + button will activate all four border buttons (see below).
Border Color
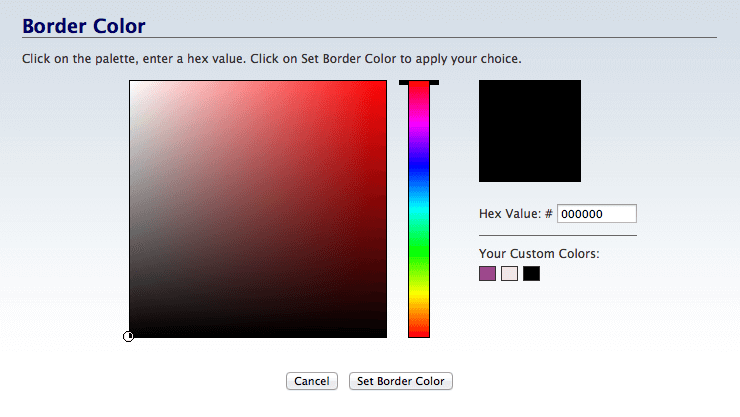
- Click on the Color Palette button.
-
Click on the palette to select a color. Use the rainbow slider to reach the color base you want to use in the palette..
Or enter a 6-character hex value.
Or click on one of Your Custom Colors. - Click Set Border Color to save this selection. Click Cancel to close the tool and make no change.
You can make the border any color you want.
Click on the Color Palette button. An overlay window will open.
Select the color you want from the palette. Click on the rainbow slider to change the color base of the palette.
Or enter a 6-character hex value in the text box. (Do not add the # symbol, as the system adds that automatically.)
Or click on one of Your Custom Colors. Note that you can't add new colors here. The available colors come from your selections in Site Designer.

Individual Borders
- Click on any of the 4 border buttons to turn on that border.
- Click on the button again to turn the border off.
You can give any of the four sides of the form a border.
When you add a border to the form, its corresponding toolbar button will have a dark outline around it, indicating that the border is active.
You can set the width of active borders (see Border Width, above), but all the borders can only have the same width.
Width
- Click on Width and select a percentage from the menu.
Width refers to the width of the FBI! Form. A width of 100% will make the form as wide as the column it's in (we recommend that you only put forms in the Content Column).
Click on the Width menu and select a percentage from the menu.
The FBI! Form you chose will then appear on the page at your selected width.
BGColor
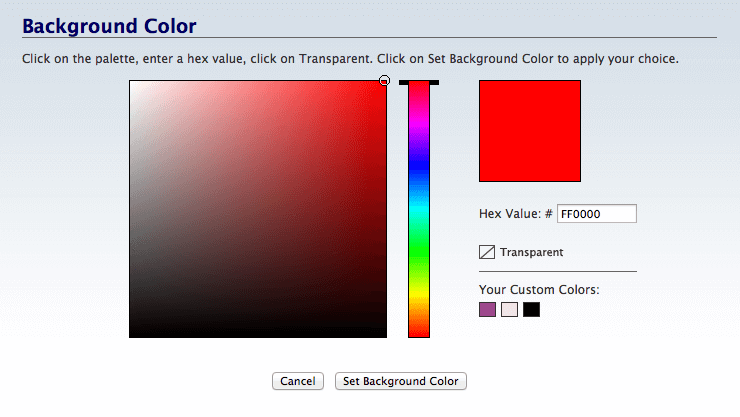
- Click on the Color Palette button.
-
Click on the palette to select a color. Click on the rainbow slider to change the color base of the palette.
Or enter a 6-character hex value.
Or click on one of Your Custom Colors. - Click on Set Background Color to save this selection. Click Cancel to close the tool and make no change.
The BGColor tool (short for Background Color) allows you to select a background color for the form's text to sit on.
Click on the BGColor Color Palette button. An overlay window will appear.
Select a color in the palette. Drag the rainbow slider to change the color base of the palette.
Or type in the 6-character hex value for the color you want to use (don't include the # symbol, as the tool adds it automatically).
Or click on one of Your Custom Colors. Note that you can't add new colors here. The available colors come from your selections in Site Designer.
You may decide later that you prefer the color you saved in Site Designer. Click on Reset to Template Default to switch back to that color.
Click on Set Background Color to save your selection. The overlay window will close, returning you to your page, where you'll see the FBI! form's background with the new color.

