
Image Block
Images have an important place in a good content site, especially visually oriented niches (e.g., gardening, travel, fashion, photography).
People come to your site for information, so if photos (or graphics, or screenshots) will provide information to your visitors (e.g., what an exotic flower looks like, or an elaborate computer tip), be sure to add them to your pages.
Before you add an image, make sure it fits these criteria...
-
it adds to your visitor's experience
-
it looks high-quality
The maximum file size you can upload to the Image Library is 1.5 MB. Keep your image dimensions in keeping with the content of the page.
To keep file sizes as small as possible, be sure to optimize all images for the Web. Most graphics applications have a save or export feature that will do this for you.
If you use a browser-based app for your editing your graphics, be sure to use TinyPNG to reduce the file size of your PNG and JPG images. Or use squoosh.app.
Finding Images
Where do you find images?
-
Create them in a graphics application.
-
Download graphics from a clipart site such as this one.
-
Download images from a photobank (e.g., iStock or Dreamstime).
-
Shoot your own photos.
-
Take screenshots of your computer display.
You can create a Reusable Block with one or more Image Blocks, along with other blocks. Click here to learn how to create a Reusable Block.
You can also use Image Blocks in a Sitewide Dot. Click here to learn how to create and use a Sitewide Dot.
And click here for a discussion of what to put in each of the 18 Sitewide Dots.
Using the Image Block Toolbar
Whenever you drag an Image Block to your page, you don't immediately see the toolbar. You first have to select the image you want in that block. You do that with the Image Selector, which opens in an overlay.

This tool allows you to select an existing image from the Image Library to place on your page, or to add one to the Image Library, while also placing it on your page.
Once you add the image, the overlay window closes and you have access to the Image Block toolbar.
You can also resize images after adding them to the page. This is not part of the toolbar, so you'll find instructions on how to do this at the bottom of the page.
Some SBIers like to have extra white space before and/or after images on their pages. Here's how to do that...
At the end of the previous Text Block, press Shift-Enter/Return on your keyboard to add one line of white space. Repeat until you're happy with the result when you preview the page.
To add white space after the image, at the beginning of the next Text Block, before you add any text, press Shift-Enter/Return. Repeat until you're happy with the result in the preview.
If you want to add white space between another type of block and an Image Block, add a Raw HTML Block and type in <br> for each line of white space that you want.
Select Image
- Drag an Image Block to your page.
- Select an image from the Image Selector.
- Or add a new image to the Image Library and add it automatically to your page.
- To change an image, click on the Select Image button in the toolbar and choose a new image.
Clicking on the Select Image button opens the Image Selector, which gives you access to the images in the Image Library, so that you can change any existing image on the page.
This section also tells you what the file name of the current image is...
![]()
If you want to change an existing image on a page, click on this button to open the Image Selector. Then select the replacement image. Remember to preview the page to ensure that everything looks the way you want it to.
Width
The image will appear at the actual width (in pixels) of the version that you uploaded to the Image Library. If you want the image to be larger or smaller, click on the + or – button to set the width you want, or type in the width you want.
![]()
You can also use the sliders to resize the width. See Resizing at the end of this help file for more on resizing images, including what to watch for when making images larger.
Important Note
If you set the width for an image, then switch to another image (using Select Image), the new image will take the size that you set for the first image. If you want the new image to appear at its default size, delete the block, drag over a new Image Block, and select the image you want. It will display at its default width.
Align
Aligning an image to the left will force any following text to wrap around the image to the right. Aligning the image to the right will force following text to wrap around the image to the left.
Centering the image forces any following text to appear below the image. Depending on the width of the image, there may be white space on either side of the image.
![]()
The default image alignment is centered alignment. To change the alignment, click on the Align Left or Align Right button.
If you want the image to the left without the following text wrapping around it, click on the active button (the one with the border around it). When no button has a border around it, the alignment is set to None (left-aligned, with no wrapping).
You can also create a gallery of images across the Content Column. Each image aligns properly across the page, one after the other.
Drop a Responsive Grid Block onto your page. Select the number of columns you want. Check that the display for mobile phones and tablets is acceptable to you. When you have the desired effect, save the setting to close the overlay.
Once you have enough columns and rows, drop an Image Block into each cell.
Link
You can turn any image into a link that takes your visitors to another page on your site, or a page on another site.
You can also use it to link to another image on your site. For example, upload a larger version of the image using Quick Upload It!, go to Special File Manager and copy the URL for the large image, then use the Link Selector tool to add that link to your Link Library.
The Link tool offers options for turning your images into links, removing links from them, adding a "nofollow" attribute, and having links open new windows.
![]()
Adding a Link
- Click on the Chain button.
-
Choose a link from the Link Selector, including a telephone number or Skype name. Type or paste in an Anchor word, if desired.
Or, type or paste in only an Anchor word to link to another part of the same page.
- Click on Add Selected Page/Anchor.
- Or add a new link to the Link Library and automatically add that link to the page. Click on Add This Link to Library and to Page.
To add a link to your image, click on the Chain button (first button in the screenshot above). This opens the Link Selector overlay window.
(Note: for images, the default here is always the second button -- no link.)
Select an internal URL (My Pages), an existing outbound URL, a telephone number, or a Skype name (Link Library), a SiteSell Affiliate Program URL (Product Links -- remember to make the link "nofollow"), or a PDF or media file (Content Files) to add to your page.
You can also type or paste in an anchor word to go along with the internal URL. Or add only the anchor word to link to another location on the same page.
Click on Add Selected Page/Anchor to add the link to your image.
Or add a new outbound URL (a URL to another site) to the Link Library and have the link added automatically to your page.
Click on Add This Link to Library and to Page.
It's very important to remember to add the "nofollow" attribute to any SiteSell Affiliate Program link. If you don't, Google may penalize your page(s) that have this link.
Removing a Link
- Click on the image from which you want to remove the link.
- Click on the chain button with the diagonal line through it.
If circumstances change and you no longer want to link to another page of your site or on the Web, click on the image.
Click on the chain button with the diagonal line drawn through it (second from the left in the screenshot above).
Adding rel="nofollow"
- Click on the image for which you want to add rel="nofollow".
- Click on the nofollow chain button.
Search engines consider links to other sites as "votes" for those sites. But some sites, like affiliate sites, don't need your vote, and Google prefers that you not "vote" for them.
You can eliminate the vote by adding the rel="nofollow" attribute to the link code.
You do that by clicking on the image and then clicking on the button third from the left (second from the right) in the Links toolbar.
You will not see any change on your page, since the change occurs in the HTML code. If you want to check that BlockBuilder added the attribute, build the page and view the source code.
The button will have a border around it to indicate that the attribute has been added to the image's link.
You can remove the attribute by clicking on the button again. The border around the button will disappear.
Important Note
Some affiliate companies provide link code that contains image tags (<img>) or JavaScript.
You cannot add those links to the Link Library, so you will have to add them to a Raw HTML Block (the company should provide the code ready for pasting directly into the block).
After you've pasted in the affiliate code, add rel="nofollow" inside the link tag if it's not already there.
Opening a New Window/Tab
- Click on the image for which you want the link to open a new window/tab.
- Click on the New Window button.
If visitors click on links to outside sites, they leave your site. If they spend a fair bit of time on an outside site, they may forget that they were visiting yours.
You can ensure that they remember your site by making outside links open in a new window (or a new tab, depending on the visitor's browser settings), leaving your site available in the other window/tab.
Click on the image. Click on the red, blue and white New Window button (the fourth button) in the Links tool.
You will not see any change on your page, since the change occurs in the HTML code. If you want to check that BlockBuilder added the attribute, build the page and view the source code. You'll see target="_blank" inside the link tag.
The button will have a border around it to indicate that the attribute has been added to the image's link.
You can remove the attribute (have the link open in the same window) by clicking on the button again. The border around the button will disappear.
Tip
-
Banners ruin the moment. Except as advertising at the top of a page (where it's clearly and acceptably tucked away out of sight!), stick at most to button images to enhance the clickability of one or two of your text links.
Even here, be conservative. If your reader senses that she's supposed to click, your click-through rate (CTR) may fall!
Anchor
- Click on the Image Block where you want the anchor.
- Click on the Anchor button.
- Enter the name you want to use as an anchor.
- Click on Add Anchor ID.
- To remove an anchor name, click on Remove Anchor ID.
Anchors allow you to link to parts of a page from other parts of that page, or from other pages of your site.
You can also link to those anchored parts from other sites, such as Facebook.
This tool lets you add the anchor's name to an image. You'll use that name again when you create links to the anchored image. You'll do that with the Link Selector tool in a Text Block, Headline Block or Image Block.
![]()
Each anchor name cannot be longer than 30 characters. It cannot have any spaces. You can use uppercase and lowercase letters, numbers, and the - and _ characters.
Tips
-
Stay consistent with your anchor names. Use ALL CAPS or all lowercase to easily remember how to type the anchor names months later.
-
Keep a record of all anchor names on all pages, and what headlines, content or images they're connected to on the page. Keep this information either in a text file or in a notebook.
When you want to link from one page to another, simply look up the anchor names for the destination page and the headlines, content or images they're attached to. Then click on the Link button. In the Link Selector, select the destination page, then type in the anchor characters.
If you want to add a link from the page to a page on another site, use the absolute URL along with the anchor. The URL will look like this:
https://www.yourdomainname.com/file-name.html#anchor-text(you'll change the domain name, file name and anchor text to suit your needs).
Border
The Border section gives you the option of putting a border around any or all of the four sides of your image.
By default, every image you add to a page comes without a border.
![]()
Border Width
- Click on the + button to make the border wider. Continue clicking on it to increase the width.
- Click on the – button to make the border narrower. Continue clicking on it to decrease the width.
The + and – buttons increase and decrease the width of the border. Continue clicking on a button to keep increasing or decreasing the width.
The initial click on the + button will activate all four border buttons (see below).
Border Color
- Click on the Color Palette button.
-
Click on the palette to select a color. Use the rainbow slider to reach the color base you want to use in the palette..
Or enter a 6-character hex value.
Or click on one of Your Custom Colors.
- Click Set Border Color to save this selection. Click Cancel to close the tool and make no change.
You can make the border any color you want, by selecting a color from the color palette or entering a 6 character hex value.
Click on the Color Palette button. An overlay window will open.
Select the color you want from the palette. Click on the rainbow slider to change the color base of the palette.
Or enter a 6 character hex value in the text box. (Do not add the # symbol, as the system adds that automatically.)
Or click on one of Your Custom Colors. Note that you can't add new colors here. The available colors come from your selections in Site Designer.

If you add a link to an image, and then add a border, it may display as a blue border in some browsers. This indicates that the image is a link.
If you don't want the blue border, click on the – Border Width button in the toolbar until the border disappears.
Individual Borders
- Click on any of the 4 border buttons to turn on that border.
- Click on the button again to turn the border off.
You can give any of the four sides of the image a border.
When you add a border to the image, its corresponding toolbar button will have a dark outline around it, indicating that the border is active.
You can set the width of active borders (see Border Width, above), but all the borders can only have the same width.
Alt Text
- Click in the text box. In the overlay that opens, type in the text you want to use as alt text.
- Click on Edit Alt Text to save the text.
Search engine optimization for images uses the alt attribute in the image tag.
That attribute also helps visitors with vision impairments, who use screen readers, to learn what an image is about.
This improves the user experience, and helps make your site more accessible.
For example, the alt text for an image of a sunrise from Anguilla might say "Anguilla sunrise."
This section of the toolbar adds the alt attribute text to the image's HTML tag, for better optimization. Add the Specific Keyword for the page to the alt text.
If you have multiple images on the page, be sure to add the keyword to only one image on the page. This could be the best image, or the first one, or the one that you want to add a Save button to (see below for details about the Save button).
![]()
Click on the text box. In the overlay that appears, type in a brief description of the image. That description will then be added to the HTML code in the image tag.
Important Note
If you forget to add some alt text, SBI! will use the Descriptive Name you gave the image when you uploaded it (via the Image Library, or the Image Block's selector tool).
Title Text
- Click in the text box. In the overlay that opens, type in the text you want to use as the title text.
- Click on Edit Title Text to save the text.
Title text is for those visitors using a conventional browser. When they hover over an image, the title text will appear as a tooltip.
Title text is usually longer than alt text, because it's more descriptive of the image. For example, the alt text might say "Anguilla sunset" while the title text might say "Sunset over Anguilla the night before a tropical storm blew in."
Given that title text is not used for optimization, aim to use synonyms for the Specific Keyword of the page, rather than the Specific Keyword itself, when writing the title text.
If you leave the title text box empty, the system will use the alt text you just created. While this is better than no title text at all, it's best to create one for each image you add to the page.
Invest an extra minute or so to craft a great one so that your visitors have a better experience on your site.
![]()
Click on the text box. In the overlay that appears, type in a description of the image. That description will then be added to the HTML code in the image tag.
Lazy Load
- Remove the check to disable lazy image loading for that image.
- Add a check to enable it.
![]()
If lazy image loading is active for your site (check the Sitewide Settings tab in the Site Central preferences -- click on the gear icon in the top right of Site Central to access it), you can disable lazy loading on an image by image basis).
You can also turn it off for all images on a page by disabling lazy loading in the page's Page Information Advanced Options.
To disable lazy loading, remove the check from Lazy Load for that image.
Pin It! (Pinterest Save Button)
- Click on the checkbox to add a Save button to the photo.
- Click on the desc link to add a description of up to 250 characters.
With the strong popularity of Pinterest, making it easy for your visitors to pin your photos to their boards can mean more exposure and more traffic for your site.
Only pin photos that your visitors will love to add to their boards. That means unusual/intriguing photos, or beautiful ones, or ones that help fulfill a want or desire.
Do not add a Save button to photos that you purchased from iStock, Dreamstime or any other stock photo agency. You bought the right to display those photos on your pages, not the right to encourage others to display them on Pinterest boards.
And do not add the Save button to every photo on every page. Add it to one photo, two at the most, on a page, and only on those pages where photos meet the criteria mentioned above.
See the Pinterest Action Guide for more about using Pinterest to drive traffic to your site.
![]()
Add a check to the checkbox in the Pin It! section of the toolbar to add the Save button below the image.
The "desc" link will become active. Click on it and type in your description, up to 250 characters. Create paragraphs in the description by pressing Enter/Return on your keyboard twice.
Many Pinterest users do not change the description included with images that they pin from websites.
By providing what you want an image's description to show when they pin the image, you increase the chances of other Pinterest users finding and visiting that image in Pinterest searches. And finding your image can lead to more traffic (targeted traffic) to your site.
The button includes a count of the number of pins. That count is for all images on that page.
When a visitor clicks on the Save button, a small window opens. This has a thumbnail of the image, along with the description that you added to the Save button.
Gallery
- Click on the checkbox to add this photo to a gallery.
- Click on desc to add a description for the gallery image.
You can unite all of the images on any page into a gallery for that page.
(Note: the same image can be in more than one page gallery, if that image is on multiple pages.)
![]()
The gallery will open as an overlay on a dark background on top of the page.
To add an image to the gallery, add a check to the checkbox. Then click on desc to add a description that will appear with the image in the gallery. The maximum length is 250 characters.
Important Note
If you add a link to the image (the Links section, above), you cannot add the image to a gallery. The option to use the gallery is deactivated by the system.
This is to avoid conflicts between the linked image and the JavaScript that creates the gallery.
The gallery displays only on computers. It does not display on mobile devices. You'll see the individual images on mobile.
Tip
-
You can make the gallery image larger than the one on the content page. Upload a large version of the image, then add it to the page. Use the resizing tool (discussed next) to make the image smaller on the content page.
A click on the page's image will display the full size version of the image in the gallery.
Caption Alignment
You can align individual captions to the left or to the right, or center them. Global alignment of all captions is done in Site Designer.
![]()
- First enter a caption. The alignment buttons will become active.
- Click on the Left Align, Center or Right Align button.
To align the caption, click on one of the buttons.
The Left Align button places the caption even with the left edge of the image.
The Right Align button places the caption even with the right edge of the image.
The Center button centers the text between the two edges of the image.
Caption
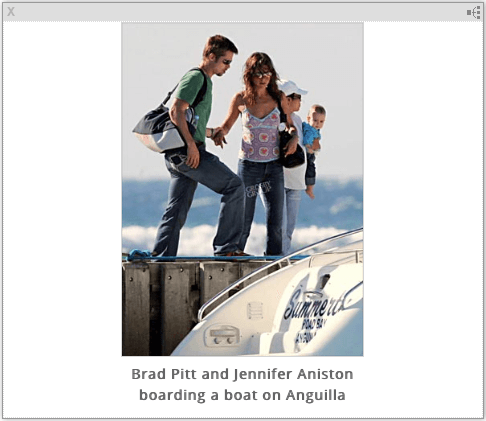
A caption is text that appears below an image. The text usually describes what a visitor sees in the image.
![]()
- Click in the text box.
- In the overlay that appears, type in your caption. You can add HTML for a link, or for a break tag.
- Click on Edit Image Caption Text to add the caption to the image and close the overlay.
You can add a link to the caption, although you will have to hand-code the link, using this code...
<a href="https://destinationdomainname.com/destination-
file-name.html">caption text</a>
(Add target="_blank" if the link goes to another site.)
The simpler way of making the caption a link is to make the image and caption together a link. Simply click on the Link button in the toolbar and select or add a URL to link to.
You can also force the text to wrap onto two or more lines with <br> tags. However, be sure to size the width of the image before deciding where to wrap the text to another line.
Also keep in mind that manually wrapping may display oddly on smaller screens (tablets and phones). So you may want to leave the wrapping untouched.
Be sure to design the look of the image and caption for the mobile phone view before adding captions to images. That will ensure that there are no display issues when visitors view your site on their phones.
To add a caption, click on the text box in the Caption section. An overlay will open. Type or paste up to 200 characters (including any HTML code) into the text box.
Click on Edit Image Caption Text to save the caption and close the overlay.
You'll now see the caption display directly below the image, in the Image Block...
Dragging to Resize Images
- Click on any image.
- Click and hold on a white square in the bottom left or bottom right corner.
- Drag your mouse to resize the image. Release the mouse.
You can resize any image on your page.
You do that by clicking on the small white square in the bottom corner of the image. Or by using the Width tool in the toolbar, discussed above.
If the image is left-aligned, the dragging option is to resize to the right. So the only small square is in the bottom right corner.
If the image is right-aligned, the dragging option is to resize to the left. So the only small square is in the bottom left corner.
If the image is centered, you can resize it to the left or to the right. So there's a small square in the bottom left corner and another one in the bottom right corner...

Note the arrow in the small square in the bottom right corner of the screenshot. This appears when you hover over the square. It indicates that you'll be using this square to resize the image.
Click and hold on the square, then drag your mouse to resize the image. While dragging your mouse, a number appears in the top left corner, telling you what the width of the image is.
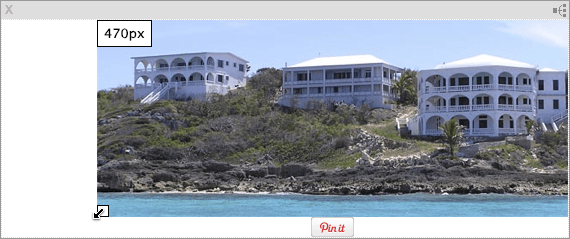
You can make the image smaller or larger (if it hasn't already reached the width of the column. When you reach the desired size, release the mouse button.
Note that the proportions remain the same. The height will keep the same ratio to the width, regardless of the width of the image.
Important Note
While making images smaller does not usually cause any display issues, making small images larger may.
Depending on how small the image is and how much larger you want it, the image seen on the page will begin to "pixelate" (jagged edges will begin to appear in the image)...
Keep this in mind when making small images larger.