
Newsletter Form Block
Contents
Newsletter Form Block
- Select Your Newsletter Block
- Orientation
- Alignment
- Background
- Email Label
- Subscribe Button
- GDPR
- GDPR Text
- Show Name Field (MOM option)
- Name Label (MOM option)
A visitor to your site may only ever visit once. So you need a way to visit her... over and over again. The way to do that is through your own newsletter.
Use the Newsletter Form Block to place an invitation to subscribe to your newsletter...
-
in any of your pages where it would naturally fit or...
-
on a special page that's dedicated to "selling" your newsletter.
If you use a dedicated signup page, add a Text Block before this block to create the proper context for your subscription form. Then add your Newsletter Form in the Content Column.
Important
If you plan to put the form in your Extra or Nav Column, also add some text in a Text Block just above the form.
Include the name of your newsletter (providing the name here gives subscribers something to recognize when they receive the double opt-in emails and, later, when they receive the newsletter itself.
Tip
-
Simplify your life by choosing one location for the newsletter form for all of your pages.
Add the form once and don't worry about it again by dragging its block to one of the Sitewide Dots on your page.
Learn how to create and use a Sitewide Dot.
Click here for a discussion of what to put in each of the 18 Sitewide Dots.
If you want the form in the Nav Column, select one of the dots in that column. If you prefer the Extra Column, choose one of its dots.
Do not put the form in the Content Column unless you plan to make a dedicated sign-up page, where you'll write about the benefits of signing up for your newsletter.
If you do make a dedicated sign-up page, do not drop the block onto a dot there. You do not want this version of the form to appear on every page of your site.
You can choose from MailOut Manager, Mailchimp or AWeber for your opt-in form.
Important Notes About Mailchimp and AWeber
You must have added a Mailchimp API key to Connected Services, which you can reach from the BusinessCenter in Site Central. Or click this link to go there now.
You must also set up your first Mailchimp list before you can use the Newsletter Form Block, as you'll need to select a list when you choose the Mailchimp option.
If you use this connected service, your Mailchimp list will use the SBI! opt-in form, not Mailchimp's opt-in form. If you prefer to use Mailchimp's form, you will have to add the code manually using a Raw HTML Block.
To comply with GDPR and Mailchimp's policies, you'll need to add this (or something very similar) to the purpose statement...
We use Mailchimp as our email marketing automation platform. By clicking below to submit this form, you acknowledge that the information you provide will be transferred to Mailchimp for processing in accordance with their privacy policy and terms of use.
You must set up your first AWeber list before you can use the Newsletter Form Block, as you'll need to select a list when you choose the AWeber option.
If you use this connected service, your AWeber list will use the SBI! opt-in form, not AWeber's opt-in form. If you prefer to use AWeber's form, you will have to add the code manually using a Raw HTML Block.
Select Your Newsletter Block
- Drag the Newsletter Form Block to the location you want it on your page. If you want the form in the same location on every page, drag it to a dot.
- Click on the block you want to use, MailOut Manager, Mailchimp or AWeber. A red border will appear around it.
- If you selected Mailchimp or AWeber, and you have more than one list there, select the list you want for this form.
- Click on the form you want to use, Horizontal (Content Column) or Vertical (narrow columns). A red border will appear around it.
- Click on Add Newsletter Form to add the form to the page.
Adding a newsletter opt-in form is as simple as dragging its block to your page. Drop it where you want the form to display.
An overlay will appear. Select the block you want from MailOut Manager, Mailchimp and AWeber. A red border will appear around it.
Mailchimp and AWeber allow you to have multiple lists (or one list, segmented into various subgroups within that list). The Newsletter Form Block allows you to have a different list attached to each opt-in form.
So you can have one that gets new visitors to sign up for your main newsletter, and have another one on a sales thank you page, where new buyers can sign up for a newsletter with occasional tips or advice on using the product or service they just bought.
If you add your main list's opt-in form to a Sitewide Dot, ensure that you hide that form on a page where you want the second list.
If you have more than one list, choose the one you want to use for this opt-in form.
Then select the form you want to use, Horizontal (for the Content Column) or Vertical (for the Nav or Extra column). A red border will appear around it.
Click on Add Newsletter Form to add the form to the page.
You can now edit various elements of the form, using the toolbar.

Orientation
- Click on the menu to change the orientation of the label(s) and input box(es) inside the opt-in form.

If you want the label(s) to display above the input box(es), set the orientation to vertical. Setting to vertical will make your form more compact, which will make it display better on mobile devices.
Set it to horizontal to have the label(s) to the left of the input box(es).
Align
- Click on an alignment button to change the alignment of the label(s), input box(es) and Subscribe button.

By default the label(s)/input box(es) and the Subscribe button are left-aligned. You can have them display right-aligned or centered.
Click on the desired button to make the change.
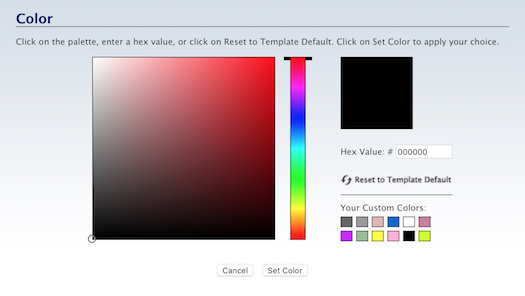
Background
- Click on the Color Palette button.
-
Click on the palette to select a color. Use the rainbow slider to reach the color base you want to use in the palette.
Or enter a 6-character hex value. Or, if you've already saved colors, choose one from Your Custom Colors. You can also select Transparent.
Or click on Reset to Template Default to go back to the original background color. - Click Set Color to save this selection. Click Cancel to close the tool and make no change.

One way to make the newsletter box stand out is to give it a different background color. You do that here.
But more important than making the form stand out is making the form's text easy to see and read.
If you do select a different background color, ensure that there's a high contrast between the text and the color.
Black text on a white or light background is the easiest to read.
As you make the background color darker, ensure that you lighten the text color to maintain the contrast.
Click on the Color Palette button to open the color picker overlay.
Select your color by clicking on the palette or dragging the small circle around the palette. Click on the rainbow slider to reach the desired palette of colors.
Or you can enter a 6-character hex value for the color you want to use.
You can also choose from a color in Your Custom Colors, which is available after you've selected at least one custom color in any of the color pickers. Hover over any color to see where else in your design that you've used that color.
Do not choose Transparent if you want the newsletter box on a stripe or other background. This will make the form's background the same color as the section of the page beneath. People may not be able to read the text.
Click on Set Color to save your change. The overlay window will close and your new background color will appear.
Email Label
- Click on the edit label link to edit the text of the Email Address label.
- In the overlay, replace the default text with the text you want to use. Click on Save New Email Address Label to save the change.
![]()
By default, the address label says "Email." You can change that to "Email Address" or have that word in another language.
To do that, click on the edit label link. In the overlay that opens, replace the default text with your own text. Click on Save New Email Address Label to save the change.
Subscribe Button
- Click on the edit button text link to edit the text of the Subscribe button.
- In the overlay, replace the default text with the text you want to use. Click on Save New Button Text to save the change.
The default button text is "Subscribe."
![]()
If you want to make it a better call to action, click on the edit button text link.
In the overlay, remove the default text and add your own. Use this also if you want to change the text to another language.
GDPR
The checkbox to add the three statements to your newsletter form is ticked by default. If you don't want the statements added, you can untick the box and rebuild the page.

Removing the statements from the form will make it non-compliant with GDPR demands, and will put your business at risk. We highly recommend that you leave the box as is, that is, ticked.
GDPR Text
You can edit the text for all three GDPR statements. However, unless you need to translate the first two statements into another language, we recommend that you leave them as is.

If you do edit the Privacy Policy statement, do not make any changes to the <<PRIVACY_POLICY_LINK>> tag. This tag generates a link to your site's privacy policy, which is a requirement of GDPR.

-
Age Consent Text -- do not edit unless you're translating it into another language
-
Privacy Policy Text -- do not edit unless you're translating it into another language
As noted above, if you do edit it, do not change the <<PRIVACY_POLICY_LINK>> tag.
-
Purpose of Information Text -- Edit the Purpose statement, if desired, to include the name of your newsletter. Also include the frequency of mailings (weekly, monthly, etc.).
So that visitors know they're not "trapped" into receiving your newsletter forever, include something like "I understand that I can unsubscribe at any time by clicking the unsubscribe link at the bottom of any email."
So a completed Purpose statement might read like this...
I consent to you using my information only to send me your monthly Anguilla Beach Lovers newsletter. I understand that I can unsubscribe at any time by clicking the unsubscribe link at the bottom of any email.
-
Privacy Policy Link -- the default file name for the privacy policy page is privacy-policy. If yours has a different file name, you can edit the name here. Edit only the file name. Do not change any other part of the URL.
-
Privacy Policy Link Label -- the accepted term for this link is "privacy policy." Edit it only if you need to translate it into another language.
Show Name Field
- Add a check to the Show Name Field checkbox.
This option is only visible if you selected the MailOut Manager option.
![]()
If you want to add the Name Field (to ask for the subscriber's first name), add a check to the checkbox.
The new field will appear immediately in the opt-in box.
Name Label
- Click on the edit label link to edit the text of the Name label.
- In the overlay, replace the default text with the text you want to use. Click on Save New Name Label to save the change.
This option is only visible if you selected the MailOut Manager option.
![]()
By default, the name label says "Enter Your First Name (optional)." You can change that to remove the "(optional)" or have the text in another language.
Note that removing "(optional)" from the text may mean fewer signups to your newsletter. Some people don't like to give out their first name.
To change the label text, click on the edit label link. In the overlay that opens, replace the default text with your own text. Click on Save New Name Label to save the change.