
Image Library
Images have an important role to play on a content site. They can provide information to your visitors. They break up text. And they draw your visitors deeper into your page, and your site.
Images can also drive traffic to your site, from Google and Bing, as well as Pinterest.
Add images on your pages where you feel they'll enhance your content and your visitor's experience.
If you need to edit any of your images (resize, crop, etc.), Pic It! is a browser-based image editor, built in to SBI!, that lets you do just about anything you need to do to an image.
Click here for help on using the Pic It! image editor.
Important Note
If you upload .webp images to the library and edit them with the Pic It! editor, saving the images will convert them to .png images. If you need to edit any .webp images, do that first in an image editor that supports .webp, then upload the images to the Image Library.
For instructions on using the various tools in the Pic It! editor, see this TNT article...
https://sbitips.sitesell.com/customizing-images-with-pic-it.html
Get the Most Out of the Image Library
Use only high-quality images. Make a positive first impression.
Use only .jpg, .gif, .png and .webp formats. File names should be in lowercase. All extensions (e.g., jpg) must be in lowercase.
Keep images as small as possible, so your page loads fast. The maximum file size for any image file is 1.5 MB.
To keep file sizes as small as possible, be sure to optimize all images for the web. Most graphics applications have a save or export feature that will do this for you.
Or use TinyPNG to optimize JPG and PNG images. Squoosh is another option for optimizing images.
Note that SBI!'s built-in PageSpeed functionality also optimizes your images. Do the TinyPNG or Squoosh optimization first though, for best results.
Give each image a descriptive name that will help you identify it quickly. (For example, "view from window at Nat's" clearly jogs the memory of the owner of anguilla-beaches.com.)
The more images you place in your Image Library, the more important "fast recognition" will become.
(The Image Block's image selector also previews each image when you click on its name, which can help you narrow down to exactly the right image.)
Upload Your Images
-
Click on the Browse button (Choose File if you're using Safari) to find up to 10 images on your computer that you want to upload.
If the images are together, click on the first image name. Hold down the Shift key and click on the last image. Click the button to add the images. - Insert an easy-to-remember name in the Add a Descriptive Name text box for each image.
- Click on the X to the right of any descriptive name to remove that image from the ones to be uploaded.
- Click on Upload Image(s) to upload all the images in your list.
You can upload up to 10 images at one time to the Image Library.
Click on the Browse button (Choose File if you're using Safari) to select up to 10 images.
If you select fewer than 10, you can use the button again to add the balance, up to the limit. Once you've reached the limit, the button will disappear.
Your file must have a lowercase extension (e.g., .jpg).
Click in the box for each image to Add a Descriptive Name. If you forget to add a descriptive name, SBI! will use the file name.
SBI! will use the Descriptive Name you give the image when you upload it as the default alt text when you add the image to a page. You can replace it with custom alt text whenever you add the image to a page.
Click on Upload Image(s) to upload the images you included.
Tips
-
You can upload a new image to the Library via an Image Block during the process of building or editing any of your pages.
In general, though, make efficient use of your time. Plan ahead and upload several images to the Image Library before you begin building.
-
If your site's niche lends itself to people searching for images (e.g., a travel site), optimize for Google's Image Search by using one of your keywords in the image's file name.
See this article about Image Search for more information.
Don't do this to every image, however. Google may think you're keyword spamming. Use the keyword in the most important image, and use a synonym in each of the other images on the page.
Re-uploading Images
You can upload a new version of an existing image. Ensure the file name is the same. If you gave the original a descriptive name, the new version will use that same name. If you did not give the original a name, and SBI! used the file name, replace it with a descriptive name during the re-upload process.
Manage Your Image Library
The Image Manager allows you to manage the images you store in the Image Library more efficiently...
-
Use the filter tool to quickly find any image based on the letters and/or numbers in the file name.
-
Create "virtual" folders, including subfolders, into which you place images (e.g., one folder for each Tier 2 topic).
-
Show, view, and sort image file names and descriptions any way you want. Click on any down-pointing arrow to see the options for that functionality.
-
Preview the image, modify the description, or delete each image with ease.
-
Bulk delete images.
Folders
Create folders and subfolders for convenient filing of your images.
When you create a folder, you do not create a "real" folder on your site.
These are "virtual" folders, for visual organization only, to help you work with smaller, related groups of images (rather than one long list of all your images).
If you upload your own HTML, do not change how you organize your images and work locally. Folders are simply organizational aids for people using BlockBuilder and the Image Library.
Folder Rules
-
You cannot delete a folder that contains an image (all images must be deleted from that folder first, or they must be moved to another folder).
-
Folders don't move. You can create a subfolder, but you cannot drag one folder inside another one.
-
You can also rename a folder, should you save a typo or change your mind about the folder name.
Making Folders and Moving Images
When you first start building your site, a list of 5, 10, even 20 images is manageable.
But it becomes hard to deal with increasing numbers of images. So use folders to divide your images into groups of related images.
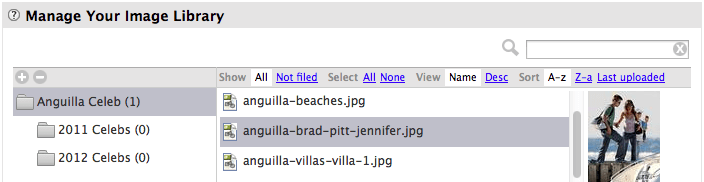
For example, the owner of anguilla-beaches.com has 10 images related to "Anguilla celebrities." Let's see how she creates the first folder...
She clicks on the + icon to create the new folder. She names it "Anguilla Celebs."
And then she moves all "Anguilla celebrities" related images into this folder.
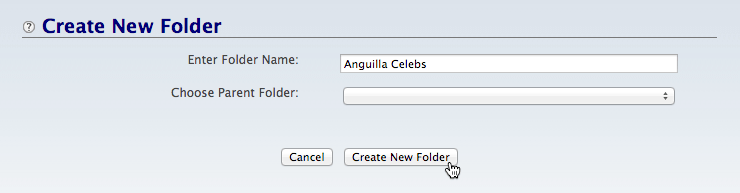
- Click on the + icon in the gray bar at the top of the left column.
- Enter the name of the folder. Click on Create New Folder.
- Click and hold on an image in the Library Images section. Drag the gray square to the folder where you want to store the image.
The process for moving an image into a folder is simple...
-
Click and hold on the image file name or name. A gray square will appear.
-
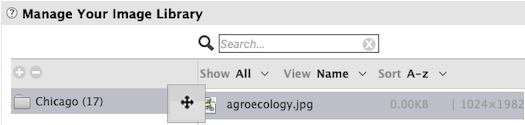
Drag the gray square into the folder of your choice as illustrated below...
This image "agroecology.jpg" is being dragged into the "Chicago" folder...
Move multiple images to one folder by holding down the Alt key (Windows) or Option key (Mac) and clicking on each image you want to move.
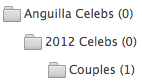
You can also create subfolders inside any folder. Each subfolder appears indented below its parent folder...
Tips
-
Move related images into the appropriate folder. Continue until all related images have been dragged into the folder (e.g., all celebs-related images are in the "Anguilla Celebs" folder).
Here's a good tip for doing this quickly...
Click on the Not filed link. This shows you all images not yet filed into folders. Then find image file names containing a certain word by pressing Control-F/Command-F and typing in that word.
You might find it easier to decide where images belong if you choose to view them by Desc (the descriptive name you gave each image) rather than by Name.
Continue by creating more folders, naming according to major categories or "sub-niches" of your site (e.g., "food," "real estate," "tours" and "hotels"). As you do this, the list of folders grows (listed alphabetically, A to Z).
-
How many folders should you have? As many as you need to work comfortably, allowing room for site growth, but no more!
Keeping the number of folders down will cut down on the length of the folder list (reducing the amount of scrolling).
More on Folder Organization
You may want to create a folder for each Tier 2 topic, one for your admin pages (About Us, Contact Us, Privacy, etc.) if you have images on them, and some for any other content-based categories that will help you organize your images.
And you may want to create one for images that you have not yet added to any page.
You can also use the drag feature to move images from one folder to another folder or subfolder.
You can rename a folder. Double-click on the folder name. A text box will display. Type in the new name, or fix the typo. Click on the checkbox button to save the change.
Do you have some images that just don't fit neatly into a group? Leave them as "Not Filed."
It's better to have 15 or 20 "miscellaneous" images as Not Filed than to expand your folder list by 10.
Images
Work with your images in this section, where you see the image file names or descriptions displayed...
-
Show Choose which images to display in the Library Images section.
Click on All and click on Not Filed to see all the images not filed in folders.
When you select a folder, you automatically see all images (displayed in the Library Images section) that are in that folder.
Clicking on All and selecting All always displays all images from all folders, even when a folder is selected (it becomes de-selected).
When you upload a new image, it will be Not Filed until you move it into a folder.
-
Select Select or de-select a group of images. Click on All to select all the images that are currently displayed.
That may be All your images (if you had clicked to Show All), or it may be all the images displayed in a selected folder.
For example, if you have 100 images on your site, clicking on Select All will select all 100 if you're also currently Showing All.
But if you had selected a folder containing 24 images, Select All will highlight only the 24 in that folder.
Click on None to de-select all highlighted images.
-
View Click on Name to see all the images by their file name (e.g., upper-shoal-stitched-high.jpg). Click on Desc to see the description you gave each image (e.g., Upper Shoal stitched).
-
Sort Display your images...
-
alphabetically from A to z or from Z to a
-
by the date Last Uploaded (you may see Last UL)
Last Uploaded displays the most recently uploaded images at the top of the list.
-
largest Size first (arrow pointing down) or smallest Size first (arrow pointing up)
-
tallest Height first (arrow pointing down) or shortest Height first (arrow pointing up)
-
widest Width first (arrow pointing down) or narrowest Width first (arrow pointing up)
-
Another way to quickly find the image you need is to use the filter tool. Type some characters into the text box to the right of the small magnifying glass.
As you type each letter, image file names containing that exact character string remain, and all other files drop off.
Soon you're left with just a handful or so of images whose file names contain the character string.
Tips
-
Can't remember in which folder an image resides? Click on the image. The folder background will turn gray.
-
When viewing by file Name, hovering your mouse over the name will display a tool tip window with the image's Desc. And vice-versa.
Preview, Modify Description, Copy URL, Delete, Edit in Pic It!, Upload Replacement Image
Click on the image's file Name or Description to preview it, copy its URL, modify the description, or delete the image. Or Edit the image in the library's Pic It! tool, or upload a replacement image.
Clicking on the file name will also display a thumbnail version of the image, to the right of the file listing.
After you click on the image, a small gray menu will open to choose your action...
Preview
- Click on the image's name in the list.
- Click on preview.
You can preview the image if the thumbnail doesn't give you enough clues about the content of the image.
Click on preview to view the image.
Modify Description
- Click on the image's name in the list.
- Click on modify description.
- Enter a new Descriptive Name and click on Modify Descriptive Name.
You can change the descriptive name you gave to the image when you first uploaded it. Do this if a quick glance at the name doesn't tell you what the image is about or what it's for.
Clicking opens the Modify Descriptive Name overlay window. Change the descriptive name you gave the image and click on the Modify Descriptive Name button.
Copy URL
- Click on the image's name in the list.
- Click on copy URL.
- Press Ctrl-C/Command-C to copy the highlighted URL.
If you need the full URL of an image, click on the file name and select copy URL. This will display an overlay window with the full URL already highlighted.
Simply copy the highlighted text (Ctrl-C/Command-C, or Edit > Copy from the browser's menu). Click Close. Then paste the image's URL where you need it.
Delete
- Click on the image's name in the list.
- Click on delete.
This opens the overlay window to delete the image. Highlight and copy the list of pages that will be affected by this deletion, and paste them into a text document.
If you want to continue, click on the Delete This Image button.
Edit in Pic It!
- Click on the image's name in the list.
- Click on edit in Pic It!.
This opens the Pic It! set of tools so you can edit the image.
Upload Replacement Image
- Click on the image's name in the list.
- Click on upload replacement image.
This opens the overlay window to upload an updated version of the image. Select the image to upload. If you want to edit the image in Pic It! after upload, click on the button.
Click on the Upload Image button to complete the upload process.
Bulk Delete
You can also bulk delete images. To do that, click on an image that you want to delete. The image will now have a gray background.
Ctrl-click/Command-click on another image to highlight it. Or use Shift-click to highlight all the images from the first click to the cursor's location.
Once two or more images are selected, the column headers bar (Show All, Not Filed, Select All, None) will have a gray background. To the far right, a Delete button displays.
Click on the Delete button to delete all the highlighted images. An overlay will appear, listing all the pages that will be affected by the deletion of the images.
Click on Delete These Images to make the final deletion.
Tips
-
The current selection always has a dark gray background, giving you a visual cue about the image you've chosen (especially important if you're deleting images).
-
If you delete an image that you currently have on a page, check the page for possible formatting or content problems. Edit if necessary and rebuild the page.