
Webmail Address Book
Contents
Address Book
Your address book is where you manage your email contacts.
You can add as many contacts as you want to your address book. You can also import contacts from another source.
You can move contacts into groups to make it easier to manage them. And you can move contacts from group to group via drag-and-drop.
Import
If you have email addresses from another mail app, or any other source that stores records as CSV (.csv) records or vCards (.vcf), you can import them into your main address book.
Click on the Import button to begin.
Import From File
Click on the Browse button (Choose File if using Safari). Select the file to import.
Import Group Assignments
If the import file has groups information, you can import all it, or import only the part that matches groups that you already set up in Webmail. The default is to import no groups information.
Replace the Entire Address Book
If you want to replace all existing contacts in the address book with the ones you will be importing, add a check to the box.
Very Important
This replacement action cannot be undone. If you replace the entire address book, the old contacts are wiped from the server and cannot be recovered.
When you're ready, click on the Import button to import the contacts. Or click Cancel to return to the Address Book page.
Export
You can export your contacts from Webmail, for use in another application.
If you want to export all of the contacts in the address book, click on the address book. Then click on the Export button.
If you want to export all of the contacts in a group, click on that group. Then click on the Export button.
If you want to export only some of the contacts from a group, click on the group, then click on the first contact to export.
Hold down the Ctrl key/Command key or the Shift key, then click on the next contact to export. Continue until all of the contacts you want to export are highlighted.
Click on the down-pointing arrow next to the Export button. Select Export selected from the box that appears.
Compose
You can create an email message from the address book. To begin, click on a contact. If you want the email to go to more than one contact, hold down the Ctrl/Command key or the Shift key, then click on the next contact.
After at least one contact with an email address is selected, the Compose button activates. Click on it. You'll go to the Compose page, where you can create the message.
Advanced Search
You can search for contacts from all of your groups.
To begin, click on the Advanced button. On the right are all of the criteria you can use to search for a contact.
Search by entering Properties (more work-oriented contact details), Personal Information (e.g., birth date), or Other (any notes you added to the contact when you created it).
When you're done entering the criteria to search for, click on the Search button.
All the contacts that match all of the criteria you entered will appear in the Contacts column. (Only those matching the criteria will display here. The others are hidden from view.)
To see all of your contacts again, click on Personal Addresses in the Groups column.
Save/Delete Search
If a search is useful to you (it finds the contacts you're looking for), you may want to save it for use again. Click on the gears icon at the bottom of the Groups column.
Select Save search. A text box will appear in the Groups column, left-aligned even with the Personal Addresses address book. Name the search and press Enter on your keyboard.
If you no longer want a saved search, click on it. Then click on the gears icon at the bottom of the Groups column.
Select Delete search to permanently remove it from the Groups column. This does not delete the contacts that this search found.
Groups
The Groups column is where the main address book (Personal Addresses) and all groups that you create or import appear.
Click on Personal Addresses to see a list of all the contacts you have. They display in alphabetical order in the Contacts column.
Click on a group name to see a list of all the contacts in that group. They also display in alphabetical order in the Contacts column.
Add Group
You can add as many groups as you want. Click on the + button at the bottom of the Groups column to add a new group.
A text field will appear below Personal Addresses in the Groups column, or below the last group already in the column.
Type or paste in the group name you want to use. Press Enter on your keyboard to create the group.
To add a contact to a group, click and hold on the contact name. Then drag the contact to the group. As you begin to move it, a dark gray bar with the contact name in it will appear. Move that bar to the correct group.
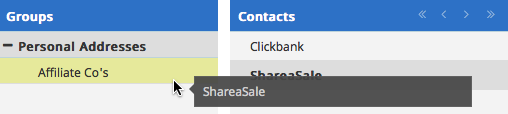
As you drag the contact over a group, the group's background color changes to yellow. If that's the correct group, let go of the click and drop the contact onto that group.
Confirm that the contact is in the group by clicking on the group name. The just-moved contact should appear there.
Move multiple contacts by selecting one and then holding down the Shift key while selecting the additional contacts. Note: the group background color does not change to yellow when moving multiple contacts.
Rename/Delete Group
You can change the name of a group, or delete it.
Click on the group that you want to rename or delete.
Click on the gears icon at the bottom of the Groups column. Select Rename in the box. A text box will appear, with the group name highlighted.
Delete the name and type/paste in a new one. Press Enter to save the new name.
To delete the group, click on the gears icon at the bottom of the Groups column. Select Delete in the box. Confirm that you want to delete the group from the address book.
Contacts
The Contacts column displays all of the contacts in the address book, or in the group you selected. The default name at the top of the column is Contacts, which is what you'll see when viewing the address book's contacts.
When you click on a group, the name at the top of the Contacts column is the group's name. Note, however, that clicking on a saved search in the Groups column does not change the name at the top of the Contacts column.
Next to the column name are navigation buttons for going through your contact list. From left to right, you can click to go to the first page, the previous page, the next page, or the last page of contacts.
To add a contact, click on the + icon at the bottom of the column. See the Add Contact help for details on adding a contact.
Delete Contact
You can delete a contact from your address book. Click on the contact you want to delete.
Click on the trash can icon at the bottom of the Contacts column. Confirm that you want to delete the contact.
Remove Contact From Group
If you added a contact to a group, but no longer want it in that group, you can remove it. Click on the group, then click on the contact you want to remove from that group.
Click on the "broken link" icon at the bottom of the Contacts column. The contact is immediately removed from the group (no confirmation required).
The contact will still be in the address book, and in any other group where you added it.
Next to the "broken link" icon is the current number of contacts in the address book or group, and the number showing on this page of contacts.
Contact Properties
When you click on a contact name in the Contacts column, properties (details) about the contact display on the right.
This section shows the photo of the contact (if you added one when you created the contact) and the person or company's name and other details.
If you want to edit any of the existing information, or add new details, click on the Edit contact button to the right of the photo and name.
Properties
This is the list of information about the person or company that you added when you created the contact.
Each contact's information will be different. Some may have two or more email addresses or phone numbers. One may have a website URL while another has a blog URL.
Groups
Click on the Groups tab to see which groups, if any, this contact is in.
If you no longer want the contact in a group, uncheck the box for that group. If you later change your mind, add a check to the box for that group.