
Styling the Image Caption
Clicking anywhere on the first image's caption text in your template allows you to customize the caption for all images on all pages.
(You can align individual captions using the Image Block's Caption option in BlockBuilder.)
The gray toolbar switches to the Image Caption editing tools.
Below is a screenshot of the toolbar...
![]()
If you're ever unsure what a button does, hover over it for a second. Its function will appear as a tooltip.
Text
With the Text tools, you can customize the following for all caption text...
- font type
- font size
- bold and italic
- text color
- text alignment
You can also customize the padding by opening the Advanced Styles overlay.
![]()
Font Picker
- Click on the A button.
-
Click on a tab to review the fonts available to you. Hover over a font to preview it. Click on a font to select it.
Or click on Reset to Template Default to return to the default font. - Click on Set Font to save this selection, Cancel to close the tool and make no change.
Click on the A button to change the font of your text. An overlay window opens on top of your template.
Click on a tab to see the fonts in that type of font. Be sure to scroll down to see the entire list. These font categories include...
- Sans Serif (Arial, Verdana, etc.)
- Monospace (Courier, etc.)
- Serif (Palatino, Georgia, etc.)
- Display (many of these make good fonts)
- Handwriting (handwriting and printing fonts)
- System Fonts (web-safe fonts from the Sans Serif, Serif and Monospace categories)
Preview each font by hovering over its name and viewing the preview text.
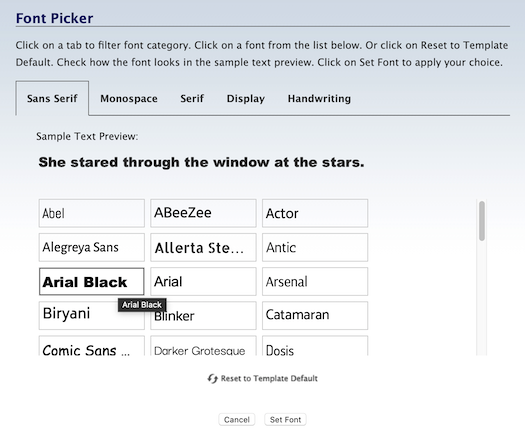
Select the font you want to use. It will now have a red border.
Click on Set Font to save your selection.
The overlay window will close and the image caption text will immediately appear with the selected font.
The system fonts load faster, and will create fewer reports (if any) in the Core Web Vitals section of Google Search Console and PageSpeed Insights.
The remaining fonts are Google fonts. They often look better than the system fonts, but they come at a price of issues that you may have to fix after you've published a few pages.
Font Size
- Click on the + button to increase the size of the text. Click on the – button to decrease the text size.
- Or click on the number to open the edit box. Double-click on the number and type in the new size.
Change the font size here to make the text for all captions on your site larger or smaller.
Click on the + button to make the text larger, or click on the – button to make the text smaller.
The text will immediately appear in a different size (one pixel bigger or smaller, per click) in the template. The size indicator will also change to the current pixel size.
Click on that button again to continue increasing or decreasing the font size. The size indicator will continue to change.
You can also click on the current size number (in the screenshot below, 14). This opens a small edit box. Double-click on the number to highlight it, then type in the size you want. Click anywhere in the toolbar to close the box. You'll see your new number there, and the text will display in that new size.
![]()
Bold and Italic
- Click on the B button to add bold.
- Click on the I button to add italics.
- Click on either button again to remove that styling.
Your image captions can be bold, or italicized, or both.
Click on the B to add bolding. Click on the I button to add italics. Click on both to have the captions bold and italicized.
To remove either styling, click on that button again.
Text Color
- Click on the Color Palette button to open the color picker.
-
Select a color from the palette. Click on the rainbow slider to choose another color base for the palette.
Or enter a 6-character hex value. Or, if you've already saved colors, choose one from Your Custom Colors.
Or click on Reset to Template Default to go back to the original text color. - Click Set Text Color to save this selection. Click Cancel to close the tool and make no change.
The color of your caption text should suit the overall look of your template.
But, more importantly, it needs to provide a good user experience for your readers. That means making it a high contrast color.
Black text on a white background is by far the easiest to read online, as that's what we're accustomed to reading offline. Dark gray on white is almost as good.
Using a dark shade of a color on a lighter shade of the same color will make your content hard to read.
White on black tends to be harder to read as well, although many sites directed towards younger audiences use this to good effect.
The most important factor here is readability. Choose a text color that your audience can read easily. If that means selecting black over a color that might fit the color scheme of your site, go with black.
Click on the Color Palette button. This opens an overlay window with the color picker.
Select the color you want from the palette, enter a 6-character hex value, or select a color from Your Custom Colors (color options are available here after you use them the first time).

You can also go back to the original color in your template by clicking on Reset to Template Default.
Click on Set Text Color to save your selection. The overlay window will close. You'll see the text with this new color.
Tips
-
The color inside the small circle is indicated in the hex value box. Alternately, entering a 6-character hex value changes the location of the small circle inside the palette.
-
Dragging the slider in the rainbow column leaves the small circle in the same position on the palette, as the colors change beneath it.
-
As you set colors in the various color pickers (text, border, background), those colors are added to the "crayon box" (called Your Custom Colors) for easy access when editing other parts of your template. Use Your Custom Colors to create a color scheme for your site.
Alignment
- Click on the Align Left, Align Center, Align Right or Justify button to choose the text alignment.
The default alignment for the image captions is centered.
Set the alignment to whatever looks best for your overall design. Remember that this setting is for all image captions on all of your pages, however, you can overwrite it in BlockBuilder for any individual image.
Advanced Styles
- Click on the Gears button to open the Advanced Styles overlay.
- Click on + or – buttons to change the padding. Or click on a number and enter a new number. If you want to use percentages, click on px and select % from the menu.
- Click on the x in the top left corner of the overlay to close it.
Advanced Styles for text allow you to change padding of the image captions.
Padding lets you add white space around the captions.
Left and Right make the caption line length shorter. Top adds more white space between the image and the caption.
Bottom adds white space below the image, forcing any text that wraps around the image and caption farther down the page, away from the image/caption.
Click on + or – buttons to change the padding. Or click on a number and enter a new number. If you want to use percentages, click on px and select % from the menu.
When you're done, click on the x in the top left corner of the overlay to close it and return to the Site Designer main toolbar.