
Face It! Commenting for BB1 Pages
Contents
Face It! Commenting for BB1 Pages
Facebook's Comments plugin allows your site's visitors to comment on your pages.
Visitors who are Facebook users have the option of having their comments appear on their timeline, which then spreads the comment, and links to your site, to their friends.
Visitors who aren't Facebook users can also leave a comment, by logging in with one of the services Facebook accepts -- Yahoo!, AOL and Hotmail/Outlook.com.
Face It! lets you select whether to have Commenting only on your Home page or on all the pages of your site, except Content 2.0 pages.
Google is now able to read the comments that you and your visitors leave on your pages. So it's important to moderate the comments to ensure that they're all related to your niche.
You do not have to use Facebook commenting on your pages. You can use Disqus or HTMLCommentBox if you prefer not to use Facebook.
Creating Your Comments Box Code
- Go to the Comments developer page.
- Enter your domain name, starting with http://, in URL to comment on.
- Enter 100% for the Width.
- Select your Number of Posts (comments) to display.
- Click on Get Code to open a small window with your code.
- Click in the second box to highlight the code, then copy it.
- Paste the code into a text document.
To make the Commenting work, you need to create and obtain code. Click here...
https://developers.facebook.com/docs/plugins/comments
You can customize your FB code, depending on the options you select (view the changes as you make them, below the options)...
-
Enter your site's full domain name into URL to comment on, starting with http://www. and ending with a /.
SBI! will then convert the URL to the full page URL for each page where you have Commenting enabled.
-
Select the Width. Enter 100% for a width that adjusts to the viewport of the visitor's device (computer, tablet, mobile phone).
-
Enter the Number of posts (comments) you want to display at one time. Start with 5.
You may want to change that later, increasing it or decreasing it to suit your circumstances. Remember, however, that this is a global change that will affect every page that has Commenting on it.
When you're done, click on Get Code. A small overlay will appear. Click in the second box and highlight the code there. Copy it and paste it into a text document. If you have not set up any Like buttons, copy the appID number from the first box and paste it into the text document.
If you've created buttons or commenting for more than one site, be sure to select the relevant site from the "Initialize the JavaScript SDK using AppID" menu at the top of the overlay.
Building Your Comments Box
- Click on Yes to open the tool for Facebook Commenting.
- Customize the introductory text so that you "get the comment."
- Copy the code for commenting from your text document and paste it into the text box.
- Select where you want Commenting to appear -- Home Page Only or All Pages.
- Paste in your Facebook comment moderation application's AppID number.
- Add the Facebook User ID of every person you want to allow to moderate comments, including your own.
- Click on the Face It! button to save your settings.
Now that you have your Commenting code, it's time to build that feature for your site's pages in Face It!.
-
In the Facebook Commenting section, click on Yes. That will open the rest of the tool.
-
In the first box, customize the default introductory headline and/or the text to entice your visitors to leave a comment. This text box accepts simple HTML.
The default is a bit of HTML for...
New! Comments
Have your say about what you just read! Leave me a comment in the box below.Remember that this text appears on every page with Commenting, at the start of the Commenting section of the page. So make it general enough so that it works on every page.
Your goal is to "get the comment."
Once your pages start receiving comments, you can send folks directly to the Comments section of a page by adding "#COMMENTING" to the end of that page's URL. For example...
http://www.anguilla-beaches.com/air-travel-to-anguilla.html#COMMENTING
-
Copy the Commenting code from your text document and paste it into the text box in Face It!.
-
Choose where you want Commenting to appear on your site. You can have it on the Home Page Only, or on All Pages (every content page of your site except C2 pages).
-
Paste in your AppID, being sure not to pick up any spaces before or after the character string.
-
Paste your Facebook ID, either your long character string or your username (if you created one after you received 25 friends to your profile page), into the last text box. You'll find one or the other as part of your profile's URL in your browser's address bar.
For example, https://www.facebook.com/nori.evoy, or https://www.facebook.com/profile.php?id=861025267
Or use this method to find your profile's ID: right-click on your photo in your profile. Copy the URL and paste it into a text document. It will look something like this...
https://www.facebook.com/media/set/?set=a.440593644254.216743.599854211
The last set of numbers (in italics above, after the last period) is your personal profile's ID number.
Also add the ID for any other Facebook user whom you want to have help you moderate comments (separate them with commas). Use the above profile photo tip to find the ID for anyone else who will be a moderator.
Be sure not to pick up any spaces before or after the character string(s).
-
Once done, click on the Face It! button at the bottom of the page to save your settings.
Don't have a username? The URL for your Facebook personal account is still that long URL that's impossible to remember? Once you have 25 friends, go to this page and choose a memorable username.
Note: This refers to your personal number or username, not that of your business page.
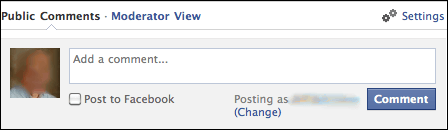
Managing Comments
There are two ways to manage comments...
-
On each page, by clicking on the Moderator View link at the top of the Commenting box. You do this page by page on your site.
-
By creating a Facebook app, adding the appID number in Face It!, and then going to your app whenever you want to manage comments. This app allows you and anyone else you designate (as either an app administrator or a moderator) to manage all the comments for all the pages of your site.
If you choose this option, you can quickly reach your moderation app by clicking on Settings in the top right of the Commenting box, and then clicking on the link to moderate comments.
Moderation from the Commenting box itself is very straightforward. However, it lacks a few options, such as a way to change your Commenting box's global settings, which includes creating a blacklist of words that will send a comment into a queue for moderation.
App-based moderation gives you more options, including the custom blacklist, but it's more difficult to set up.
Be sure to read the Very Important Note near the bottom of the article for a troubleshooting tip.