
Manage and Edit New Submissions
Contents
Manage and Edit New Submissions
There are 3 ways that you can reach each new submission, to review it, edit it and manage it...
-
You were notified that there's a new submission for your invitation. You may have clicked on the link in that message to go directly to the submission management tool.
-
Or you may have logged into Site Central, clicked on the Content 2.0 Library link, then clicked on the number link that indicated that you have submissions to approve for a particular invitation.
That brought you to either a page with a list of new submissions, or directly to the approval tool page if there was only one new submission.
-
Or you may have used Quick Approve, shortening the submission approval process, and clicked on a link to a particular submission.
The first step, before either editing or managing any new submission, is to read it. Read it at least twice, once for a sense of the content, then for typos, grammatical errors, spam, and other problems.
After reading this submission, you'll either delete it (and perhaps ban the author), or accept it. If you accept it, you have the option to edit it before building the page, and the option to include it in your RSS feed and on your Blog It! page.
You also have the chance to preview the page to see how it will appear live on your site.
If you receive a large number of submissions every day, you may soon become confused about which invitation a specific submission is for.
To reduce this confusion, we add as part of the headline the name of the invitation to which a submission is attached. At the top of the edit page for each submission, you'll find a three-part headline similar to this...
New Submission...
Title of Submission
Name of Invitation
Important Note
It may take up to 60 minutes before you'll see the photo on the newly built submission page. The invitation page also has to be rebuilt, so for up to 60 minutes you may not see the link to the new submission on the invitation page.
Managing New Submissions
Managing a new submission involves decisions around deleting or accepting (building) the submission, moving it, and whether to add it to your RSS feed/Blog It! page.
Before editing the submission, you may decide to move it. After reading it, you may think that it's better suited to a different invitation.
Or you may decide to merge it with one or more similar submissions about the same topic (e.g., submissions about one hotel in Cheap Anguilla Hotel Reviews).
Or you may want to delete the submission. Along with deleting comes the option to ban the contributor.
Types of submissions to delete can include...
-
a submission unrelated to your invitation, that you can't move to a more relevant invitation
-
a deliberate spam submission
-
a submission that's not original content (that is, a search for a snippet of text reveals one or more copies of the same content on other sites)
-
a submission with advertising, or
-
one with abusive language.
Reasons for banning a contributor include...
-
abusive language
-
use of spam
-
submitting content that's not original
-
continually trying to advertise a product or service
-
multiple submissions of very poor quality, and
-
multiple submissions that aren't related to the focus of the invitation.
Steps to Manage New Submissions
- Click Delete if you do not want to publish this submission. Choose whether to also ban the contributor.
- If you decide to publish it, add a check to Update Your RSS/Blog It! feed, if desired.
- Click on Preview to view the submission as a page on your site. Make changes until satisfied.
- If desired, add a comment to seed the Comments section of the submission.
- Click Build It! to build the page.
-
Decide whether to accept the submission. Click on the Delete button if you decide not to publish it.
On the Submission Deleted confirmation page, click on the Ban Author button if you also want to ban the author from making additional submissions.
-
If you decide to publish the submission, move it to a more appropriate invitation (if necessary) and edit it if necessary (see below for details).
-
Next, preview the page to determine that it will display the way you want it.
-
Click on the Yes button if you want to include this new submission's page in your RSS/Blog It! feed.
- If desired, add a comment to the submission.
-
Build the page to accept the submission and publish it live on your site.
Tips
-
If a submission sounds too perfectly written, maybe it was. Use Search It!'s Legalities section to determine if the content in the submission is original or not.
If it's not original, delete the submission. You may also want to ban the contributor.
-
Once you've banned someone, she will still be able to submit another contribution, but it will be deleted from the database immediately and you will not be notified. The visitor will see a thank you page, but no other notifications from you.
-
If you've asked for submissions about a product (e.g., a product review), you may end up with many or most of them containing the invitation page's keyword. This could be seen as keyword stuffing.
If you start to receive a lot of submissions, change the title of some of them, removing the product name (e.g., instead of "Proctor Silex Kettle Review," one of them could say "We Really Like This Kettle."
Moving New Submissions
- Click on the drop-down menu and select the destination invitation.
- If an invitation is on more than one page, select the one with the applicable page name.
- When you've made your selection, click on Build It! to rebuild the page in the new location.
- If you decide to keep the submission where it is, click on Cancel to escape without any changes.
If someone submitted a contribution to the wrong invitation (e.g., a submission about an Anguilla pizza place in the Best Anguilla Villas invitation), you can move it to that invitation.
If you have the invitation on more than one page, you'll see a listing for each page. You can then choose the new destination page for that submission.

Important Note
Only invitations that are on at least one page of your site will appear in the drop-down menu. New invitations, and any others that you haven't added to a page yet, will not be available in the menu.
Tips
-
You can move a submission and edit it at the same time. Then click on Build It! to build the submission page. This will publish the edited submission in the correct location.
-
Moving is useful for shortening very long invitation pages with dozens or even hundreds of links to submission pages.
Create a duplicate of the invitation, then add it to a page. Immediately deactivate the invitation. Then, from within C2, move the submissions you want on the new page to the duplicate invitation.
Editing New Submissions
- Edit the Title, if needed.
- Edit the By (author name), if needed.
- Edit the From (location), if needed.
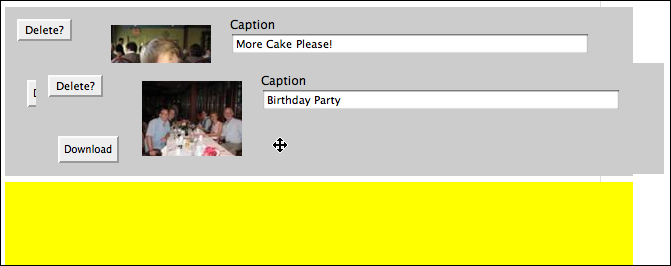
- Click on Delete? to delete an image, if applicable. Or click on Download to save the image to your desktop for editing.
- Upload an image if none was provided, or if you deleted or edited one. Add or edit a caption. Drag the gray bar for that image to a different location to change the image display order on the submission page.
- Edit the Entered text of the submission copy, if needed.
- Click on Build It! to build the page.
- If you're not ready to make editing changes or delete the submission, click Cancel to escape.
This is your opportunity to fix a contributor's typos, spelling errors, and serious grammar mistakes, and to make any other changes you want. All the edits are done inside the Submission Content section.
Steps to Edit New Submissions
-
Click on the Title edit box to make any corrections or changes.
The Title becomes the page's main headline, the clickable link on the invitation page, and the file name of the submission.
Analyze It! does not check C2 pages, so it's possible to go overboard adding your invitation page's Specific Keyword without realizing it.
For example, for a page of Anguilla Restaurant Reviews, you do not want to add "Anguilla Restaurant Reviews" to the title of every submission.
Leave the titles as is, or improve them using synonyms and related keywords.
"Review of Hibernia" and "Another Superb Anguilla Restaurant" and "Picante: Delightful Mexican" are all excellent titles that also suggest to the search engines that the invitation is about Anguilla restaurant reviews.
-
Click on the By (author name) edit box, if needed, and make any corrections. You should leave the author's name (or nickname) "as is" unless it's blatantly obscene or provoking. You may want to ban this contributor if that's the case.
-
Click on the From (city, state/province, and/or country) edit box and make any corrections/changes, if needed.
-
Click on the Delete? button if you don't approve of the image(s) submitted or if it doesn't suit the audience of your site, or its tone.
Or click on the Download button to download the image to your computer. Why would you want to do that?
To edit and re-upload the image. Say you have a photo of a dog with "green eye." You can download the image, remove the green eye with your graphics app, delete the old image and upload the new one in its place (see below).
Be sure to copy the caption text first before deleting an image, so that you can add the caption to the corrected version of the image.
If you need to rotate an image, click on the Rotate icon to rotate it 90° per click.
-
You can change the order of the images by dragging them to their new order. Click on the gray section surrounding any image and its caption text box.
-
If no image was submitted, or you delete one as inappropriate or unrelated to the submission, you can upload your own.
Click on Browse (Choose File if using Safari) and select the image (.jpg) or graphic (.gif) to upload. Then add a caption. The new photo or graphic can take up to 45 minutes to appear.

-
Click on any part of the Entered Text edit box to make necessary corrections and any changes.
-
If you have AdSense It! enabled, you'll see the Submission AdSense Aggressivity setting option here.
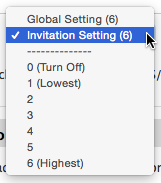
You can choose from...
-
The Global Setting (all submissions for all invitations, which you selected when you enabled AdSense It!). Click here to review the AdSense It! help.
-
The Invitation Setting, which you may have set using the Adsense Aggressivity Invitation Preference. Click here to review its help.
-
Turn Off, which removes all ad blocks from this submission only.
-
Lowest through to Highest, which changes the number of ad blocks, their sizes and their locations. Review the various options here.
-
-
Once you're done editing, preview the page. Make any other changes until you're satisfied with it. Then build the page.
Tips
-
Although you can edit anything you want, remember that this is your visitor's work. She offered it with the expectation that she'll recognize it as hers when she views it live.
If you edit too much, it may start to read like your work, instead of hers. If you need to edit, do it with a light touch, cleaning up typos and other errors. Let your contributor speak to your other visitors!
-
Don't edit the submission to optimize it for on-page criteria, other than to add the invitation page's Specific Keyword to the first 150 characters of the submission (if possible).
This page will become a "long-tail" page that's found for very specific keywords (likely four- or five-word phrases). It also supports the content page that holds the invitation.
If the Title your contributor submitted is long and rambling, shorten it (if possible) to about 5 words. You're not trying to pass Analyze It!. Traffic will come from the long tail of keywords, so don't worry about getting the Title exactly right.
The first 150 characters of the submission become the Meta Description and the "blurb" found just below the Title on the invitation page itself.
If the submission has fewer than 150 characters -- likely a question asked as part of a FAQ system -- consider answering the question inside the submission (instead of as a comment), to pad it to at least 1,000 characters -- about 100 words or so. This will give the search engines something to analyze to determine the content of the page.
-
If the visitor does not provide her name or location, there will only be the Title, images (if provided), image captions (if provided), and the text of the submission.
-
If an image is too large, the Content 2.0 system will resize it to a maximum width of 400 pixels (e.g., 800x600 pixels will be reduced to 400x300).
-
The Image Caption is deleted along with its deleted image. Once deleted, there is no way to restore the image to the submission unless you downloaded the image first.