
Author Bio Block
Contents
Author Bio Box Block
The Author Bio Block uses the same toolbar as the Container Block, with one addition. If you've already used the Container Block (e.g., for a Callout Box), then you're familiar with the Author Bio Block toolbar.
Fortunately, you can ignore some parts of the toolbar, since they don't apply to the Author Bio Box. These include...
-
To make parts of the page appear only on computers and tablets, and other parts only on mobile devices (smartphones). Ignore
-
Presets to add a Callout Box or a Reminder Box to your page, or to add "stripes" across the width of a Stripe-ready template. Ignore
To create your author bio box, drag the Author Bio Block from the block palette to the Above Socialize It! Sharing Sitewide Dot. This will put the box on every page of your site.
In the overlay that appears, select where you want the image to appear. Click on Add the Selected Author Bio Format to close the overlay.
In the Image Selector that appears, choose the photo of you that you want to display in your author bio. Click on Add Selected Image to Page.
If you need to upload a photo, click on the Browse button (Choose File in Safari) at the top of the selector. Select the photo to upload.
For the Descriptive Name, use your name. That will then become the alt text for the image.
- Drag the Author Bio Block to the Above Socialize It! Sharing Sitewide Dot.
- Select where you want the image to appear. (On the left is the recommended option.)
- Select the photo of yourself you want to use.
- Customize the box.
Click on Upload to Image Library and Add Image to Page.
The overlay closes and you'll be on the page, with the Author Bio toolbar displaying at the top.

Leave the box's width set to 100% to fill the entire Content Column. If your site uses a one-column template, and you have the Content Column set to full width (not recommended), you may have to set it to less than 100%.
Align
- Click on the Center button if the box width is less than 100%.
If the box is full width of the Content Column, you can ignore the Align options. If you set it to less than 100%, click the button to center the box.
![]()
Font
The Font section lets you customize all or part of the text in the Author Bio Block.

The tools available let you...
-
change the font of the text
-
make the font of the text bigger or smaller
-
change the color of the text
-
strip out any styling to text that you highlight
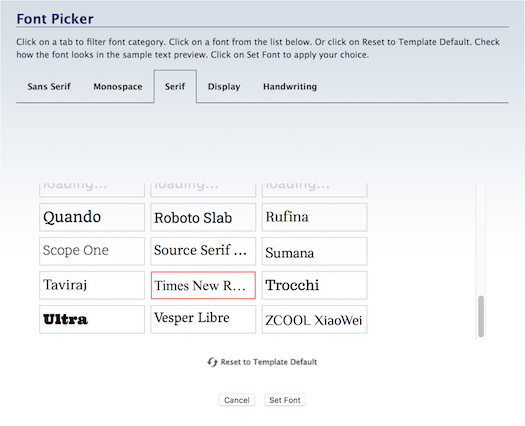
Change the Font
- Click on the A button.
- Hover over a font to preview it. Click on a font to select it.
- Click on Set Font to save this selection.
Highlight the text of your author bio. Then click on the A button.
Preview each font by hovering over its name and viewing the preview text.
Select the font you want to use, and click on Set Font to save the change.
The text will immediately display the selected font.
There's no border around this button after clicking because the font button is never inactive. There's always a font applied to the text.
The system fonts load faster, and will create fewer reports (if any) in the Core Web Vitals section of Google Search Console and PageSpeed Insights.
The remaining fonts are Google fonts. They often look better than the system fonts, but they come at a price of issues that you may have to fix after you've published a few pages.
Important Note: We do not recommend changing fonts here in BB2. Change them in Site Designer. If you change them here in BB2, and later decide to switch to a new template, you will have to edit each page individually to change the fonts again.
Make the Font Bigger/Smaller
- Click on the + button to increase the size. Click again to make the font larger.
- Click on the – button to decrease the size. Click again to make the font smaller.
- Or click on the number to open the edit box. Double-click on the number and type in the new size.
Highlight all the bio text to change the font size. Then click on the + or – button.
The text will immediately appear in a different size (one pixel bigger or smaller, per click). Click on that button again to continue increasing or decreasing the font size.
You can also click on the current size number (in the screenshot below, 16). This opens a small edit box.
Double-click on the number to highlight it, then type in the size you want. Click anywhere in the toolbar to close the box. You'll see your new number there, and the text will display in that new size.
![]()
There's no border around these buttons after clicking because the font size is never inactive. There's always a size applied to the text.
Change the Text Color
- Click on the Color Palette button.
-
Click on the palette to select a color. Click on the rainbow slider to change the color base of the palette.
Or enter a 6-character hex value.
Or click on one of Your Custom Colors.
Or click on Reset to Template Default to switch back to the text color you saved in Site Designer.
- Click on Set Color to save this selection. Click Cancel to close the tool and make no change.
You can change the font color of the bio text.
(Note: this does not change the background color on which the text sits.)
Highlight the bio text. Then click on the Color Palette button. An overlay will open.
Select the color you want. Drag the rainbow slider to change the color base of the palette.
Or enter a 6-character hex value (do not include the # symbol).
Or click on one of Your Custom Colors. Note that you can't add new colors here. The available colors come from your selections in Site Designer.
You may decide later that you prefer the default font color. Click on Reset to Template Default to switch back to that color.
Click on Set Color. The window will close and the text will immediately appear with that color.

There's no border around this button after clicking because the font color is always active. There's always a color applied to the text.
Tip
-
Select colors that complement, or match, your site design's colors.
Remove Styling
- Click in the block that has the text you want to unstyle. Press Ctrl-A/Command-A to highlight all of the text in the block.
- Click on the T button with the diagonal line through it.
If you want to remove any styling that you added to the bio text, highlight all the text using Ctrl-A/Command-A.
Click on the T button with the diagonal line through it. Confirm that you want to remove the styling.
Border
The author bio already may, depending on your template, already have a border around it to make it stand out. If you want to keep the border, skip to the next section. If you want to add a border, or change the border width, or remove the border, continue reading.
![]()
Border Width
- Click on the + or the – button to increase or decrease the width of the border.
You can select the border's width.
You can decrease the width to 0, in effect making the borders disappear.
Click on the + button to increase the width of the border. This affects all the sides that have a border. You cannot increase the width of an individual border.
Click on the – button to decrease the width of the border. This affects all the sides that have a border. You cannot decrease the width of an individual border.
The four buttons that indicate the left, right, top and bottom (discussed below) will also change. The dark edge around each button will disappear, indicating that the border has been turned off.
Border Color
- Click on the Color Palette button.
-
Click on the palette to select a color. Use the rainbow slider to reach the color base you want to use in the palette..
Or enter a 6-character hex value. Or, if you've already saved colors, choose one from Your Custom Colors.
Or click on Reset to Template Default to go back to the original border color. - Click Set Border Color to save this selection. Click Cancel to close the tool and make no change.
You can make the border stand out more by changing its color. Use a color that's part of your template's overall color scheme.
If your template is mostly green, or brown, choosing a brown or green will likely suit your colors. But hot pink or bright red would not.
Click on the Color Palette button to open the color picker overlay.
Select a color by clicking anywhere on the palette, or by dragging the small circle.
To reach the palette's color base you want (e.g., red, purple, green, etc.), click on and drag the rainbow slider.

The palette color you select appears in the square on the right.
If you know the exact color you want for the border, type in the 6-character hex value in the text box next to the # symbol. Enter only letters and/or numbers -- don't add the # symbol. The color you want will then appear in the square on the right, above the hex value.
If you've selected at least one custom color, you'll be able to select a color from Your Custom Colors as well.
If, after a few color selections, you decide that you don't like any of them, you can start over again by clicking on Reset to Template Default. This will give the border the original color specified in the template's CSS file.
Once you're satisfied with the border color, click Set Border Color to save that selection. Or click Cancel to leave the tool without making any changes to the border color.
Borders On and Off
- Click on the left, right, top or bottom button to add or remove that part of the border.
You can have borders around all four sides of the Author Bio Box, around just one, or around two or three sides.
Turn on a border, or turn an existing border off, by clicking on its button.
Background
You can make your author bio stand out by giving it a background color.
![]()
Background Color
- Click on the Color Palette button.
-
Click on the palette to select a color. Use the rainbow slider to reach the color base you want to use in the palette.
Or enter a 6-character hex value. Or, if you've already saved colors, choose one from Your Custom Colors. You can also select Transparent.
Or click on Reset to Template Default to go back to the original background color. - Click Set Color to save this selection. Click Cancel to close the tool and make no change.
If you do select a different background color, ensure that there's a high contrast between text and the color.
Choose a color that suits your template's overall color scheme.
Click on the Color Palette button to open the color picker overlay.
Select your color by clicking on the palette or dragging the small circle around the palette. Click on the rainbow slider to reach the desired palette of colors.
Or you can enter a 6-character hex value for the color you want to use.
You can also choose from a color in Your Custom Colors, which is available after you've selected at least one custom color in any of the color pickers. Hover over any color to see where else in your design that you've used that color.
Click on Set Color to save your change. The overlay window will close and your new background color will appear.
Position
The Position options include margin and padding.
![]()
- Click on the gears button to open the Advanced Styles overlay.
- Click on any of the Margin buttons to move the author bio box away from other page elements around it.
- Click on any of the Padding buttons to move the image and text of your author bio away from the edges of the box.
The Margin buttons will move the author bio box away from the elements surrounding it.
The Top button will move the author bio box away from the element above the box. The Bottom button will move the following element away from the bottom of the box.
The Left button will move the author bio box away from the element to the left of the box. The Right button will move it away from the element to the right.
The Padding buttons will move the content inside the box away from the edges of the box. If you want to see the padding changes, add a border or a background color to the container.
The Top button will move the content away from the top of the box. The Bottom button will move it away from the bottom of the box.
The Left button will move the content away from the left edge of the box. The Right button will move it away from the right edge of the box.
If you added a border or background color to see the padding changes, remember to remove the border or color if you don't want to keep it.
CSS Class(es)
Ignore this, unless you want to add some styling that's not already available in the Author Bio Block, or in the Image Block or Text Block inside the Author Bio Block.
![]()
Note: You must add class styling in Site Designer's Add Custom CSS box if you want to add any additional styling to your author bio in BB2.
If you do not add the styling in Site Designer, adding CSS classes to the Author Bio Block will have no effect.
- Click in the CSS Class(es) text box. An overlay will appear.
- Enter all the class names you want to style this particular container.
- Click on Edit CSS Class to save the class names.
Each class must be one word. That word can be a single word (e.g., authorbio1) or a hyphenated word (e.g., author-bio).
To add or edit class names, click in the CSS Class(es) text box. In the overlay that opens, type or paste in the class names you want to use to style the Author Bio Box. Click on Edit CSS Class to save the changes.
Image Placement
You selected where you wanted your photo when you added the Author Bio Block to the Sitewide Dot. If you want to change the location, you can do that here, by clicking on the other placement location.
Image Block
Click on the image to change the photo you selected to use in your bio. Clicking on it also activates the Image Block's toolbar. Review the Image Block's help if you want to make any changes, including to the size of the image.
If you're using a photo that you already uploaded to the Image Library, in the Image Block, be sure to enter your name as the alt text for the image.
Text Block
Click on the dummy text to activate the Text Block and its toolbar. Review the Text Block's help if you want to make any changes to how the text looks.
Clicking on the text removes the dummy text. Type in your author bio's text. It should be a maximum of 80 words.
If you used the Author Bio Builder (ABB) Tai Agent to create your bio, paste in the bio from the text document where you saved it.
Author Schema Added to Each Page
When you add the Author Bio Box to the Sitewide Dot, and add your bio information and image (with your name as the alt text), the system adds Author schema code to the page. This helps Google understand who you are and what you bring to that page.
Link to Your About Page
Once you have your author bio text in the box, highlight your name. Click on the chain button in the Links section of the toolbar.
Scroll to or search for your About page (about.html, about-me.html, or about-us.html). Click on that page to select it. Click on the Add Selected Page/Anchor button to add the link to your name in the bio.
This gives your visitors direct access to your About page from the end of the content of every page of your site (with a few exceptions, discussed below).
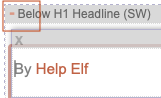
Your Byline
At the top of your page, drag a Text Block to the Below H1 Headline Sitewide Dot.
Type in By [Your Name], replacing [Your Name] with your name.
If you have anything in that Sitewide Dot (e.g., code for a search box), decide whether you want your byline above or below whatever else is there. You may need to view a page as a visitor will see it to decide whether you want your byline above or below.
Highlight your name. Click on the chain button in the Links section of the toolbar.
Highlight this text and copy it... authorbio
In the link selector that opens, click in the Anchor text box and paste in authorbio. Click the Add Selected Page/Anchor button to assign the anchor and close the overlay.
This tells your visitors that you wrote the page, and gives them a link to click down to your author bio before reading the content, if they want to do that.
Pages to Hide the Author Bio Box and Byline
Since you added the Author Bio Box and your byline to Sitewide Dots, they will show on every page of your site. However, you don't need them on a few pages. These are...
-
the home page
-
the about page (if you did the work above on some other page of your site)
-
the privacy policy page
-
the contact page
-
a disclosure page (if you have one -- if you do any affiliate marketing on your site, this page is a requirement)
-
a disclaimer page (which you need only if you provide information of a medical, legal or other professional nature)
-
all the templates located in the System folder (C2 templates, Form Build It! template, MailOut Manager template)
-
404 redirect page (no-such-url.html)
-
an advertising info page
-
a PayPal (or other payment provider) payment cancellation page
-
a PayPal (or other payment provider) payment confirmation page
On those pages, and only those pages, you'll hide the Above Socialize It! Sharing Sitewide Dot and the Below H1 Headline Sitewide Dot (where your byline is located).
To do that, hover over each Sitewide Dot. You'll see a red minus sign ( - ). Click on the minus sign.
The content inside the Sitewide Dot will disappear. This indicates that it will not display on that page (and only that page).
Important: You'll do this twice on each page, for the Below H1 Headline Sitewide Dot and the Above Socialize It! Sharing Sitewide Dot.
Repeat this process on each of the pages listed above that you have on your site.