Face It!
Face It! allows you to add up to three Facebook Like buttons on any page where you can have Socialize It!.
Click here for the help if you haven't yet activated Socialize It!.
Introduction
Each button you create in Face It! allows visitors to either...
-
Like your entire site ("Site Like").
or
- Like the page they're on ("Page Like").
Face It! also allows you to add Facebook comments (we call it Commenting in Face It!) to the bottom of those same pages, so that your visitors can comment on what they've read.
Note: Commenting does not display on Content 2.0 submission pages.
Face It! also adds an OG (Open Graph) Image (og:image) tag to the head section of your pages. The tag sets the image that will appear in the timeline of anyone who Likes your site, or a page. This same image will also appear when visitors leave a comment in the Commenting box.
Note: This image is the fallback image if there are no images on a page that are at least 300px wide and 300px high. Each image that meets or exceeds those dimensions also receives an og:image tag.
The default image will improve your site's branding across your own Facebook page, and throughout your visitors' timelines, for those pages with no other og:image tags.
Important Note for Uploaders
You'll be adding tags to the locations where you want your Like buttons to appear. You'll also be adding a tag for Commenting, if you want it.
But you must set up Face It! first, for both buttons and Commenting, before the tags will provide the correct code on your pages.
Proceed through the help below to set up Face It!. When that's complete, click here for the help on adding the tags to your pages, or to SBI! Includes.
Face It! settings take precedence over the settings you choose in Facebook for a Like button or comments.
It can take up to two hours for Like buttons and Commenting to appear on your pages (or if you make a change to your settings). Every page of your site must be rebuilt. The more pages your site has, the longer the site rebuild takes.
Please give it at least two hours before you begin testing or checking the buttons and Commenting.
The help for this module may appear lengthy. But Facebook's help is notoriously inadequate. We've added a great deal of simple step-by-step instructions, screenshots and explanations to ensure that you get the most out of this important module. Follow along carefully.
The help is spread over four pages...
-
This one is an overview of Like buttons and Facebook comments. It also discusses the Site Name.
-
The Face It! Like Buttons help covers how to create your Like button code at Facebook, and adding it in Face It! to build your button(s).
-
The Face It! Commenting help covers how to create your code at Facebook, and adding it in Face It! to build your Commenting box. It also covers setting up the Facebook App ID if you want to include Messenger as a Socialize It! option, or for commenting.
-
The OG Image help covers why and how to create and upload an image to maintain and grow your site's branding throughout Facebook, Twitter and any other social site that uses OG tags.
Let's get started...
Why Have Like Buttons and/or Commenting on My Site?
Are you wondering whether to add Like buttons or Commenting to your site? Here are a few things to consider...
Like buttons add credibility to your site. Facebook users (and non-users) see how many people have Liked your site, or your page. And every Like adds the following to that person's Facebook timeline...
-
A headline, usually the Title tag of your page
-
A short note, usually the page's Description
-
A thumbnail image (which you'll upload -- see below)
-
A link back to the page (either the home page for a Site Like, or to a Tier 2 or 3 page for a Page Like)
That person's friends see that timeline update and have the opportunity to click on the link and come to your site. That's another great reason to write compelling titles and descriptions for your pages.
Commenting allows people to interact with the content of your page. They can leave comments via their Facebook account. If they're logged into Facebook, those comments can appear on their timeline, where their friends will see it.
Some people who don't have a Facebook account can leave comments as well, so you don't have to exclude anyone from participating on your site.
And each comment has its own permalink, so you can notify people by email or even on your site about important or controversial comments, giving them the direct link to that comment. Right-click on the date and time (in gray text) and copying the permalink's URL...
![]()
Like Buttons vs. Socialize It! Sharing Buttons
The Like buttons that Face It! adds are just that, buttons that let your visitor's Like the page they're on, or your site.
Socialize It!'s Facebook button in the button bar is to Share. It allows visitors to share the content of the page, not just Like it. They have the option to share it on their own timeline, share it with a group they're part of, or share it on their own business page. They can also send it in a private message.
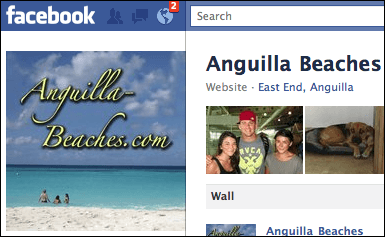
Site Name
One of the OG tags for your site allows you to tell Facebook and other services using an OG tag what the name of your site is.
- Type or paste in your Site Name.
- Click on the Face It! button to save the name.
Use the words from your domain name, each word separated from the others by spaces (e.g., Anguilla Beaches).
Bottom line? Your Site Name is one part of your branding. Ensure that it's consistent across the Site Name and OG Image.
For example, the owner of Anguilla-Beaches.com could use "Anguilla Beaches" as the Site Name because her OG Image shows her domain name, Anguilla-Beaches.com.