
Verify It!
Contents
Verify It!
Google and Bing both require you to verify ownership of your site if you want to access information and tools in Google Search Console and Bing Webmaster Tools.
You can do that with either the Meta Tag method, or the File Upload method, which uses Verify It!. We cover both methods in this help.
You'll need to add your site to both Google Search Console and Bing Webmaster Tools first, before verifying ownership.
Add Your Site to Google Search Console
- Log in to Google Search Console.
- Click on the down-pointing triangle just below the words "Google Search Console" in the top left. Click on Add a property. Click on Continue.
- In the overlay, click in the box for URL Prefix.
- In a new browser window, copy your home page's URL (e.g., https://www.yourdomainname.com) from the address bar when viewing your home page. Paste it into the text box in Search Console.
- Click on Continue.
Log in to Google Search Console and add your site using the Add a property option.
To do that, click on the down-pointing arrow just before the words "Google Search Console" in the top left corner of the page.
If you don't already have a Google account, create one (if you have Gmail, AdSense or Google Analytics, you already have one).
In the overlay, click in the box for URL Prefix. In a new window/tab, copy the URL of your home page from the browser's address bar while viewing the home page.
Back in Search Console, paste in the URL and click the Continue button.
Once you add your site, you'll be taken to the verification page.
Add Your Site to Bing Webmaster Tools
- Log in to Bing Webmaster Tools.
- Click on the Add a Site button. Enter your domain name, including https and www. (e.g., https://www.yourdomainname.com). Click on Continue.
- Add your sitemap's full URL. Copy it from the top section of Search Engine HQ.
- Click the ADD button.
Log in to Bing Webmaster Tools and add your site using Add a Site at the top of the page.
If you don't already have a Bing account, create one (if you have Hotmail or Outlook.com, you already have one).

To verify ownership, you can use the meta tag method or the file upload method. Both are discussed below.
File Upload Verification Method
This method requires that you download the file that Google and Bing each provide. You then upload them with Verify It! to prove that you own your site.
Solo Build It! takes care of the rest. It will build the Google HTML page and locate Bing's XML file in the root folder for you.
All you need to do then is return to the engines and verify/authenticate your ownership using the instructions discussed above.
Verify It! does not place the Google file in Page Manager, so there's no way to delete the file. If you need to change the file name (for example, you're the new owner of an SBI! site), simply upload the new version with Verify It!, or use the Meta Tag method, discussed below.
Each engine returns to its file occasionally to ensure that you still own the site. Since the file must be present, we eliminated the option of deleting the file.
- In the verification overlay, download the HTML file by clicking on the file name.
- In Site Central, click on the Verify It! button. Click on the Browse button (Choose File if using Safari), find the downloaded Google file, and select it. Click on Upload It!.
- Return to Google Search Console and click on the gray Verify button in the overlay.
After submitting your site, download the verification file by clicking on the file name (see the screenshot below).
The file is downloaded immediately to the default location set in your browser.
If you don't know where the file is located, search for files starting with google.
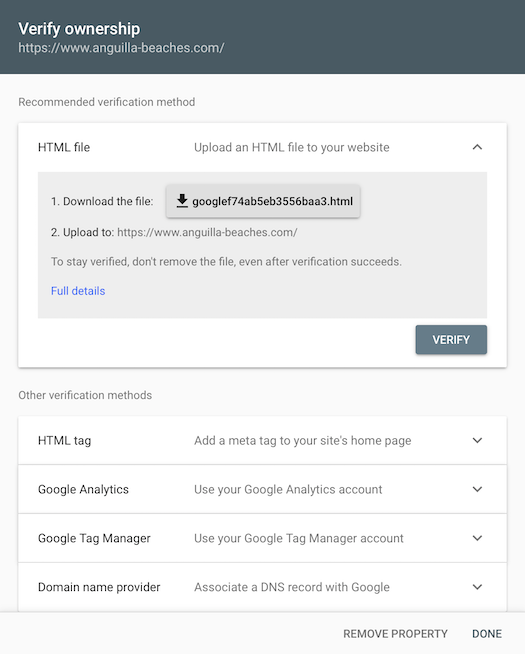
In Site Central, click on the Verify It! button. Click on the Browse button (Choose File if you're using Safari) to upload that file from your computer to your SBI! server. SBI! immediately builds the verification page for you.
Return to Google and click on the Verify button in the overlay.
To add your sitemap to Google Search Console now, see the sitemap help.
Important Note
Search Console provides a lot of information. Click here for an important discussion about the inaccuracies in the "Restricted by robots.txt" report that Google gives you.
Bing
- On the verification page, in Option 1, click on the BingSiteAuth.xml link to download the verification file.
- In Verify It!, click on the Browse (Choose File if using Safari) button, find the Bing file and select it. Click on the Upload It! button.
- Return to Bing Webmaster Tools and click on the Verify button.
In Option 1 on the verification page, click on the BingSiteAuth.xml link to download the verification file.

Use Verify It!'s Browse button (Choose File if using Safari) to upload the file from your computer.
Return to Bing and click on the Verify button at the bottom of the page.
Meta Tag Verification Method
The Meta Tag method involves copying the tag that Google and Bing each provide, and pasting it into the head of the home page.
- On the verification page, click on the HTML tag option.
- Copy the entire meta tag that appears on the page.
- In Site Central, click on the home page (index.html) in Page Manager. Click edit.
- Click on the Head button. Paste the meta tag into the This page only text box. Click on Add to Head to save the meta tag.
- Rebuild the home page.
- Return to Google Search Console and click on the gray Verify button in the HTML tag section of the overlay.
After adding your site, you end up on the verification page. Click on the HTML tag option. This opens a new part of the overlay.
The meta tag that Google wants you to use will display in the overlay. Copy the entire tag.
Go to SBI!. Click on index.html in Page Manager. Click on edit.
Click on the Head button in the top right. In the overlay that appears, paste the meta tag into the This Page Only text box. Click on Add to Head to save the meta tag.
Rebuild the home page. After it's rebuilt, go to Search Console and click on the gray Verify button in the HTML tag section of the overlay.
Bing
- On the verification page, highlight and copy the meta tag displayed as Option 2.
- In BlockBuilder, click on Return to This Page. If you returned to Site Central, click on the home page (index.html) in Page Manager. Click edit.
- Click on the Head button. Click in the This Page Only text box and at the end of the Google meta tag, press Enter. Paste the meta tag into the box. Click on Add to Head to save the meta tag.
- Rebuild the home page.
- Return to Bing Webmaster Tools and click on the Verify button at the bottom of the page.
The meta tag that Bing wants you to use will display on the page. Copy the entire tag.
Go to SBI!. In BlockBuilder, click on Return to This Page. If you returned to Site Central, click on the home page (index.html) in Page Manager. Click edit.
Click on the Head button. Click in the This Page Only text box and click to the end of the Google meta tag code. Press Enter on your keyboard.
Paste the meta tag into the text box. Click on Add to Head to save the meta tag.
Rebuild the home page. After it's rebuilt, return to Bing Webmaster Tools and click on the Verify button at the bottom of the page.