
RSS/Blog It!
Contents
RSS/Blog It!
RSS/Blog It! Help for Uploaders
Want to integrate a full, dedicated blog into your SBI! site? Click here for a complete discussion on the 3 levels of blogging.
RSS/Blog It! converts your SBI! site into a blog.
It's better than blogging, actually, because you have all of the advantages of rapid RSS distribution, all of the "evergreen advantages" of a content site, and none of the disadvantages of blogging. Here's how it works...
Every time you create or modify a web page, those changes are distributed through RSS, using a special file (called a "feed") that SBI! builds for you automatically), to the world.
Once you build or update a page, you have nothing to do. RSS/Blog It! automatically builds/updates your blog page and your RSS feed for you -- every time you modify your site!
If you're unfamiliar with RSS, or you're not sure how to best position your RSS feed and your Blog It! page, the RSS series in the TNT HQ will give you everything you need to use RSS/Blog It! effectively.
This help page is for SiteBuilder users. If you want to upload a Blog It! page to match your custom uploaded Look & Feel, click here for the help to do that.
Setting up Blog It! is as simple as answering a few questions and inserting a few "bloglets."
Blog Page
- Add a check if you want to Site-Blog.
- Select from the drop down menu the number of pages to list on your blog page.
- Add a check if you want to add the date to each page.
- Add a check if you want to add a thumbnail to each item.
This first section requires answers to some questions...
-
Do you want to Site-Blog?
-
How many web pages (or items) do you want your blog page to list?
-
Do you want to add the date to each item?
-
Do you want to add a Thumbnail image to each item?
-
Do you plan on using an uploaded page?
Question #1 -- Do you want to Site-Blog?
If you do not want to offer a Site Blog, uncheck the checkbox. Blog It! will still publish an RSS feed, distributing your site via RSS. However, no Blog It! page will appear on your site.
If you choose "Yes" (in most cases, you should), SBI! converts the RSS file into a blog page, a Tier 2 web page that appears as a button on your NavBar (unless you leave the NavBar button name blank).
Tip: Do not name the new button "Blog." Change the button's name to "What's New" or "News" if that suits your audience profile better.
When you create your blog page, you'll note that each item in the blog is followed by a link to the full web page or bloglet destination.
If you put a check in the checkbox to Site-Blog, the page expands to show several more fields. Complete those fields to set up your Blog It! page (there's a separate help file for those steps). At the top of the Site Blog Web Page section is the full URL for your Blog It! page.
Question #2 -- How many web pages (items) do you want your blog page to list?
Your RSS file automatically includes your last 50 pages (if you have that many) to maximize reasonable exposure to the search engines. What about the humans?...
When folks subscribe to the RSS feed, they see the number of pages they want to see, since they set the number of items in their RSS readers. But you set the number of items to show on your Blog It! page.
Set this to a reasonable number, based upon how many pages you have on your site, and how often you update your pages. For example, if your site has 20 pages and you update or create new content only periodically, set your listing to about 5.
Set to the higher range if your site is large and you build/edit at least 3-4 pages per week. Be realistic with this setting.
Keep your human visitors in mind with this setting. They do not want to see dozens of listings on your blog -- info overload! A smaller number of select items (10 and under) will very likely increase the likelihood that they'll investigate the page links in your Blog It! page.
Your basic choice boils down to...
1) User Focus -- Show a small number of items (5-10), for maximum human attention.
-or-
2) Search Engine Possibility -- List 30 pages. This might increase the speed at which your pages are spidered and listed when engines visit the Blog It! page. Experience has shown that the engines love SBIers' Blog It! pages, often spidering them within hours or a day.
It's your choice.
Question #3 -- Do you want to add the date to each item?
(Note: An "item" = a web page in your RSS file and on the Blog It! page.)
If you choose "Yes," the date will be added to the subject of each of your items. So a subscriber to your feed will see the Title and Description of each item, along with the date it was created or modified (for example, "Sept 29, 2015 Best Anguilla Hotels"). This is a good choice if you update or create new content on a regular basis.
Also, your blog page will be formatted to show the full date of each item (e.g., "September 29, 2015").
If you're only updating your site occasionally, leave this box unchecked. The last thing you want your Blog It! page visitors (and your RSS subscribers) to know is that your material is dated or not updated regularly.
Question #4 -- Do you want to add a Thumbnail image to each item?
If you choose "Yes," every page that has at least one image that meets the OG image criteria (at least 250 pixels wide, at least 250 pixels high) will have a thumbnail image appear along with the page's title and description in your Blog It! page.
The image is 150px wide. Its height is reduced relative to the width. The default is left alignment, so that the text wraps to the right.
Question #5 -- Do you plan on using an uploaded page?
Leave this box unchecked, as you are not uploading a custom page. If you have changed your mind and want to upload a custom page, click here for the help to do that.
You can style your blog items to give your Blog It! page a bit more flair. See this TNT HQ article for details and code that you can customize to add a box around each item, and add a background color, rounded corners and/or shadows...
NavBar RSS Box: Appearance
- Choose the width of your RSS box.
- Choose the background color of the box.
- Choose whether you want a custom headline. If you do...
- Enter the text of your optional custom headline.
- Select Yes if you want the headline in bold.
- Select the question mark you want to use.
- Add a check to each of the optional RSS buttons you want to add to your RSS box. Select from My Yahoo! and Feedly.
You can display up to two buttons to help people subscribe to your RSS feed. This section allows you to choose...
-
the background the buttons sit on
-
your headline and its style
-
whether you want a help icon or text link, and
-
how many buttons you want to display.
Width of Your RSS Box
Your RSS box can be 90% of the width of your NavBar, centered. Or it can be the Full Width of your NavBar. If you plan to customize the headline (see below), and use a long headline, go for the Full Width option. This will give you the most room for your headline text.
Background for Your RSS Box
Select Transparent to have the background the same color as your left margin. (If your left margin isn't as wide as your NavBar buttons, the RSS box may sit "on top" of two different colors.) Select White to have a white background. Or select Choose Color. A color palette will appear. Click on the color you want to use. In all three cases, the background is surrounded by a thin black border.
Do You Want a Custom Headline?
The default headline for your RSS box is...
Subscribe To
This Site
It also has a text link question mark for the help. If you would like to edit that headline, change it completely, or change the help link, click Yes. The page will refresh, displaying these three options...
-
Enter the text of your custom headline. Keep it short, as you don't have much room inside the RSS box. Or you can keep the default message, and add a different help link.
-
Choose whether you want the headline bold. If you make it bold, you may have to shorten a new headline. Always preview before making your final decision.
-
Select which question mark you want to show next to your headline...
-
A text link, without bold.
-
A text link, with bold.
-
A small image of a question mark.
-
A large image of a question mark.
-
Select the Optional RSS Buttons You Want
Add a check beside each button that you want to add to your RSS box, below the orange orange. Your options are...
-
Add To Feedly
 which lets your visitors add your RSS feed to their Feedly account.
-
Add To My Yahoo!
 which lets visitors add your RSS feed to their My Yahoo! account.
NavBar RSS Box: Behavior
- Decide on which pages you want the RSS box to appear.
- Decide whether you want the RSS box above or below your NavBar.
- Decide on what happens to the orange RSS button when clicked.
- Use a FeedBurner feed by adding a check and then entering the URL provided by FeedBurner.
The Behavior section lets you set how you want your RSS box to behave on your site. Your options here include...
-
on which pages you want the RSS box to appear
-
whether you want the box to appear above or below your NavBar
-
what happens when someone clicks on the orange RSS button, and
-
whether you want to use a FeedBurner feed instead of the SBI!-provided feed.
Your Feed URL
Once you have set up Blog It!, you'll see your feed URL here. It's provided for easy access if you want to create a FeedBurner feed.
On Which Pages Do You Want the RSS Box?
Blog It! will automatically add the orange RSS button (![]() ) to the pages that you indicate. Your choices are...
) to the pages that you indicate. Your choices are...
-
All pages (the default)
-
Home Page Only
-
Home and second tier pages
-
None
Recommendation
Choose either "Home page and second tier pages" or "All pages." Why? Because your Blog It! page is a Tier 2 page and you absolutely must include your "subscribe buttons" (RSS, My Yahoo!, and Feedly) on that page.
Orange RSS Button Action When Clicked
SBI! will add the RSS box either above your first NavBar button (and above your e-zine block, if you use one) or below the last NavBar button. Choose whichever option works best for your site.
Choose Neither if you do not want the RSS box to appear on any of your web pages.
Orange RSS Button Action When Clicked
(Left-)clicking on the orange RSS button delivers the URL of the RSS feed. Some newer browsers have built-in RSS readers, so clicking on the button will display the contents of the feed as a formatted web page.
Many visitors still have older browsers. They need to right-click this button so they can copy the URL of your feed and then paste it into an RSS reader. But many people do not know that they need to right-click on the button.
So we let you select what will happen if a visitor left-clicks on the link.
-
URL -- This delivers the URL of the RSS feed file. Use this if a large majority of your visitors are RSS-savvy, or if most of them use RSS-ready browsers.
-
Default New Window -- This opens a new window with a default RSS explanation.
Most people still do not know what that orange RSS button is for. So this option adds a help link just to the left of your RSS box headline. This link goes to a page that provides background information and instructions. It's an important user-friendly feature.
If your visitor right-clicks on the RSS button, that means he's savvy and will copy-and-paste the correct feed URL successfully. If the visitor left-clicks, however, an alert message intercepts and guides him through the correct process.
Unless your target market is composed of sophisticated Web marketers or other tech-savvy people, select this option to introduce, explain and "sell" RSS-subscribing to your visitors.
SBI! creates this explanation page for you, including clear instructions on how to subscribe.
-
Custom New Window -- This opens a new window with your own personalized RSS explanation.
Choose this option for the same reasons as choosing the default explanation. It all works the same way. The only difference here is that your personalized explanation page will open in a new browser window.
Create that page using your HTML editor, following these Reminder instructions. (Yes, you can also do this in the block-by-block SiteBuilder. However, if you know this much HTML, it may be simpler to follow these instructions.)
-
Create the page. You probably only want to make minor modifications (e.g., add a small logo and some text changes). If so... modify the wording and the source code of this sample default page according to what you want to say.
-
Now, upload it. Test its URL in your browser.
-
Then copy the full URL and paste it into the box that appears when you select Custom New Window.
-
Use a FeedBurner Feed?
Note: You will not see this option until after you have set up Blog It!. When you return to this tool page, you will see your RSS feed URL, and the option to add a FeedBurner feed.
You also must set up the feed at FeedBurner before using this option. This can only be done after you have set up Blog It!.
If you want to replace the SBI!-provided feed URL with one from FeedBurner (or AdSense for Feeds), add a check to Yes. Another text box will appear. Type or paste in the URL that FeedBurner provides.
Once you finish the Blog It! building process by clicking on the Blog It! button at the bottom of the tool page, SBI! will change the URL discussed above (in Your Feed URL), and change the URL for each of the buttons in your RSS box.
Using a FeedBurner Feed for Your RSS/Blog It! Feed discusses the steps to set up a FeedBurner feed, and why you might want to use one (including using AdSense for Feeds).
Special Inserts ("Bloglets")
Here's where Blog It! goes "one blog step" beyond site-blogging. Use "bloglets" to insert additional items into your RSS feed/blog without creating or modifying one of your content web pages. A few examples...
-
Make a brief comment about the news in your field, with or without an off-site link.
-
If you have journalistic instincts and are fairly well placed, report the news.
-
Make a time-sensitive announcement about a terrific new product related to your niche (including your affiliate link).
-
Talk about a great new site in your area, one that complements yours and that your readers would enjoy.
-
Insert any one of many possible mini-articles with monetization potential (e.g., new villas with introductory pricing, surprise announcement of land available for sale).
This is closer to traditional blogging... shorter, time-sensitive/perishable, journalistic additions. You may not have the time or inclination for full, "dedicated blogging," but what about a "cut-down" version?
Bloglets are quick, easy, and monetizable. So how do you create them?
Use the Special Inserts feature, AKA "Bloglets."
Inserted items "jump" to the top of your Blog It! page through your RSS feed, just like new or modified web pages.
They don't jump the queue if you edit them later. They rotate down the list until they disappear.
Tip
-
A bloglet is time-sensitive. It cannot and should not replace your page content. So if you have something to say that takes more than a few paragraphs and is not time-sensitive, turn it into a content page instead.
Why Use Bloglets?
Basically, bloglets give you terrific, simple, "mini-blog-ability." You're already feeding your site through RSS. Now you can "ad hoc" editorialize without creating a separate web page.
For example, if the owner of anguilla-beaches.com just read some hot news about Anguilla, she could add it to her feed by inserting an item. If she found a new site she loves, she could tell folks about it.
It's a great way to increase your feed's perceived activity if you only create one web page per week. And it provides you with the extra flexibility you need to add some running commentary and/or send folks to interesting spots outside of your own site.
Bloglets are the 80-20 feature that gives you superb personalization, customization and flexibility for your blog.
Another excellent use is to recycle your site's "greatest hits." Use a bloglet to bring back an oldie-but-goodie. Remember, most people never see your entire site, and they forget even if they do! So recycle your best efforts!
And use bloglets for special one-of monetization opportunities that do not "deserve" a full web page.
Tip
-
There are all kinds of ways to use bloglets to add an extra dimension to your RSS feed. However...
Your bloglets must be consistent with the positioning you developed (above) for your Blog It! page -- remember that C
 T P M rules! And that "C" must have a voice, a spin... a consistent position.
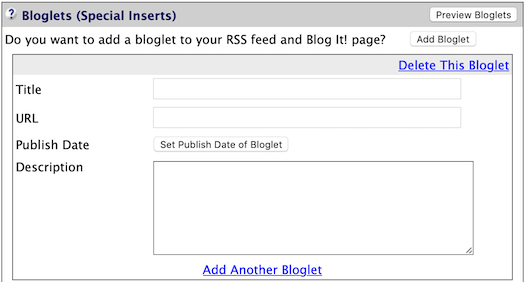
- Enter the Title for the bloglet.
- Enter the URL of the page the bloglet will link to (optional).
-
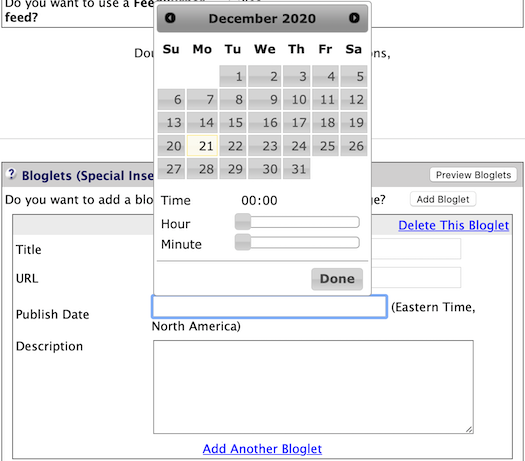
Click on the Set Publish Date of Bloglet button to schedule the bloglet. Click on a day from the calendar, then enter the time. Click Done to set the date and time.
Or publish it immediately by not clicking on the button. - Enter a Description, maximum 500 words.
- Click on the Preview Bloglets button to see what the bloglet will look like.
- Click on RSS/Blog It! to publish or schedule the bloglet.
Adding Bloglets
To add a bloglet, click on the Add Item button. A small section will appear.
Enter the Title, URL (if you have one), and Description of your item (a maximum of 500 words).
Very Important
The URL box is for URLs to your own site. If you enter a URL to another site, it will be replaced with a URL to your site's Blog It! page.
If you want to publish the bloglet immediately, skip the Publish Date option. If you want to schedule the bloglet for a future date and/or time, click on the Set Publish Date of Bloglet button. A calendar will appear. Select a date by clicking on the number for that day of the month. Click the right arrow to go to the next month. Select a time by clicking on the gray Hour and Minute sliders and dragging them to the hour and minute you want (00:00 is midnight; hours use military time, so 19 is 7pm, 23 is 11 pm).
Click a Preview Bloglets button to view what your Blog It! page will look like with the bloglet added.
Click on the RSS/Blog It! button to rebuild the Blog It! page with the new bloglet, or to schedule the bloglet.
Editing Bloglets
You can edit any bloglet that is still in the current RSS rotation. Just click the edit link and make your changes. This editing does not affect the RSS feed but does change the bloglet on the Blog It! page.
Click a Preview Bloglets button to view what your Blog It! page will look like with the bloglet added.
You can also change when you want a scheduled bloglet to be published. Click in the Publish Date text box and select a new date and/or time.
Click on an RSS/Blog It! button to rebuild the Blog It! page and your RSS feed with the new bloglet, or to schedule the bloglet.
Deleting Bloglets
Ditto for "delete." Bloglets basically delete themselves, as far as your visitors are concerned. They get pushed downward by newer web pages and bloglets until...
1) They don't show on your Blog It! page (according to how many items you have set to be shown).
2) They fall to #51, so are no longer in your RSS file. At that time, anyone who set his/her RSS reader to read 50 items (which is unusually high) would not see it either.
Tips
-
Don't want a bloglet to disappear? Turn it into a web page. That way the page stays on your site forever.
-
If you want a bloglet to disappear from your Blog page and off the RSS file sooner than its normal expiration rotation, eliminate it by clicking on the "delete" link.
-
Finished with a bloglet? If it's not visible anymore (#51 in your RSS feed), SBI! automatically deletes it.