
Site Navigation
You can reach the Site Navigation module from Site Central (the link just below the Site Designer link) or from the top right corner of Site Designer or BB2.
Once here, you'll see your site's navigation in a series of blocks. The block system here is based on BB2's system. Simply drop blocks from the palette, and drag blocks to re-order your navigation.
Important Reminder
When you're done setting your navigation order, click on the Build It! button. If you don't click on that button, your navigation changes will not be saved.
Nav Header Block
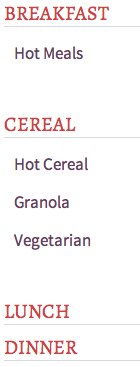
Nav Headers allow you to group your navigation links based on any criteria you choose. For example, a recipe site might separate Tier 2 links by Breakfast, Lunch and Dinner, or by Meat, Poultry, Seafood, Vegetables and Fruit groups.
Nav Headers help your visitors make quick sense of the content you have on your pages. Use them when you have more than 10 or more Tier 2 pages in your navigation.
Nav Headers appear differently in the two navigation types.
In a vertical NavBar, the headers appear as separate items, with related Tier 2 pages appearing below them.
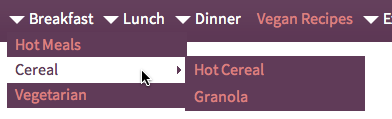
In a horizontal menu, they appear as menu items, similar to Tier 2 pages. However, hovering over a header reveals a submenu with the related Tier 2 pages.
Horizontal headers may also have a submenu indicator to help visitors know that there's more to see.
Adding a Nav Header
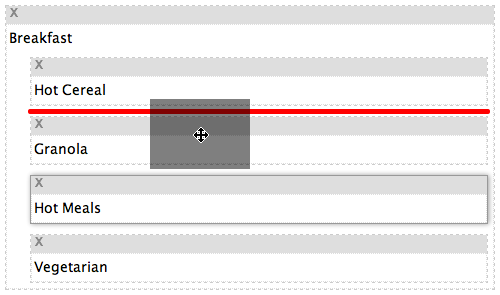
To add a Nav Header, click and hold on the Nav Header Block in the block palette.
Then drag the block to where you want it to display. When you see a red bar there, release the mouse click. You'll see the block appear on the page.
- Click and drag the Nav Header Block from the palette. Drop it where you want to add the header.
- Choose whether you want the Nav Header to show on Desktop only, Mobile only, or both (All).
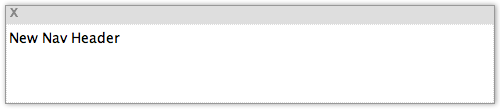
- Replace "New Nav Header" with the text you want to use for the header.
- Drag a Page Block, Custom URL Block or Subdomain Block onto the Nav Header Block to associate it with that header.
- To remove a Nav Header Block from the navigation order, click on the X at the left edge of the gray bar at the top of the block. Before you do that, remove any blocks inside it.
You can click on the gray bar at the top of the block to move it anywhere.
The toolbar presents two options.
Decide whether you want the Nav Header to appear when someone views your site on a smartphone.
The default is to show it on all devices (All). Select Desktop if you do not want it to show in mobile.

The block has the text "New Nav Header" pre-entered. Change that text to have the header say what you want (e.g., Dinner, or Poultry).
To associate pages with this new Nav Header, click on and hold the gray border of those page blocks. Drag the blocks inside the Nav Header's borders. When you see a red bar inside the block, release the click and drop the page's block.
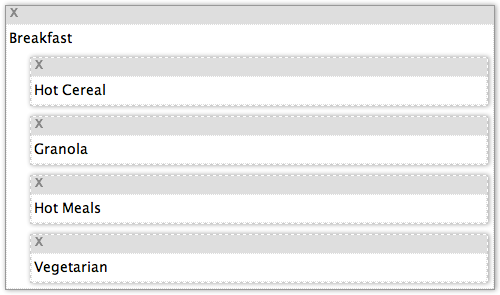
Repeat for each page you want to associate with that header. You can also change the page order by clicking and dragging blocks inside the Nav Header Block.
And you can nest a Nav Header inside a Nav Header, and add one or more Page blocks to it. This will create a sub-submenu if you chose to use horizontal navigation. For vertical navigation, it adds a "regular" Nav Header section to the navigation.
To remove a Nav Header Block from the navigation order, click on the X at the left edge of the gray bar at the top of the block. The Nav Header will no longer appear in the navigation on your site.
Important Note
If you delete a Nav Header Block with one or more Page Blocks, Custom URL Blocks or Subdomain Blocks inside it, each Page, Custom URL or Subdomain block will also be deleted from the navigation.
You'll have to add them back into the navigation manually. To avoid that work, drag each Page, Custom URL or Subdomain block out of the Nav Header Block before you delete the Nav Header Block.
Page Block
Each new Tier 2 page automatically appears in the navigation order, sitting at the bottom of the list. Its text comes from the button/menu text you typed in Page Information when you created the page and made it a Tier 2 page.
To determine each page's file name, hover over the block. A tooltip will appear, displaying the full URL of the page.
You can move each new page wherever you want in the navigation order by clicking and holding on the gray portion of that page's block, and dragging it to the new location.
- Click and drag the Page Block from the palette. Drop it where you want to add the page link.
- Choose whether you want the page link to Show in mobile. Remove the check if you do not want it to show.
- Choose whether you want the page link to Show Only in Table of Contents. Add a check if you do not want it to appear in the vertical or horizontal navigation.
- Replace the page link's text with the text you want to use for the link in the navigation.
- Drag the Page Block into a Nav Header Block to associate it with that header.
- Drag any existing blocks to other locations to reorganize your navigation.
- To remove a Page Block from the navigation order, click on the X at the left edge of the gray bar at the top of the block.
You can convert a Tier 3 page into a Tier 2 by dragging a Page Block to the navigation order.
When that happens, a page selector tool opens, displaying every page that's not currently in the navigation (in other words, every Tier 3 and every Tier 4 page). Select the Tier 3 page you want to convert to Tier 2.
Important Note
Do not convert a Tier 4 page to Tier 2 without edits to the page content. As is, the Tier 4 page will be too narrowly focused to make a good Tier 2.
You can confirm that the page is now a Tier 2 by editing the file and checking Page Information.
You'll see that the box to make it a Tier 2 page is now checked. (This will not happen, however, until you've saved the new Site Navigation settings.)
Click on any Page Block to activate the toolbar for that block.

You can have the page link show in the navigation for Desktop only, only for mobile phones, or for both (All).
The block has pre-entered text from the Title you gave the page in Page Information. Change that text to have the header say what you want (e.g., from Vegan Recipes to Vegan).

To associate the page links with a Nav Header, click on and hold the gray border of the Page Block.
Drag the block inside the Nav Header's borders. When you see a red bar inside the block, release the click and drop the Page Block.
In the horizontal navigation, any page link associated with a Nav Header becomes a submenu item. It will only be seen when a visitor hovers over the header text in the main menu.
Repeat for each page link you want to associate with that header. You can also change their order inside the header by clicking and dragging a Page Block inside the Nav Header Block.
You can also drag a Page Block anywhere else in the navigation order if you want to make some Tier 2 pages more important, or others less important.
If you find that some pages receive more clicks than others, move their links to the top of the order. If others near the top don't receive many clicks, move their links down the order.
To remove a Page Block from the navigation order, click on the X at the left edge of the gray bar at the top of the block. This Tier 2's link will no longer appear in the navigation on your site.
Custom URL Block
- Drop a Custom URL Block where you want it in your navigation.
- Drag a Custom URL Block to where you want it to reorganize your navigation.
- Or drag the block inside a Nav Header Block to add it to a horizontal navigation submenu.
Custom URLs are the third type of navigation item that can appear on your pages.
A custom URL is a link to another site (e.g., a store you have on Etsy) that you want to have appear in your navigation.
Drag one a Custom URL Block to anywhere in the navigation order. Or drag it into a Nav Header Block if you want it to appear in a horizontal navigation submenu instead of the main menu.
You can have the Custom URL link show in the navigation for Desktop only, only for mobile phones, or for both (All).
To associate a custom URL with a Nav Header, click on and hold the gray border of the URL's block.
Drag the block inside the Nav Header Block's borders. When you see a red bar inside the block, release the click and drop the Custom URL Block.
In the horizontal navigation, a custom URL associated with a Nav Header becomes a submenu item. It will only be seen when a visitor hovers over the header text in the main menu.
Repeat for each custom URL link you want to associate with that header. You can change their order inside the header by clicking and dragging a Custom URL Block inside the Nav Header.
You can also drag a Custom URL Block anywhere else in the navigation order if you want to make one link more important.
To remove a Custom URL Block from the navigation order, click on the X at the left edge of the gray bar at the top of the block. The URL will no longer appear in the navigation on your site.
Subdomain Block
- Drag a Subdomain Block to another location to reorganize your navigation.
- Or drag it inside a Nav Header Block to add it to a horizontal navigation submenu.
Subdomains are the fourth type of navigation item that can appear on your pages.
There's no block in the block palette for subdomains, as these are added automatically when you use Infin It! to link a blog, forum, or other external option to your site.
To determine each subdomain's URL, hover over the block. A tooltip will appear, displaying the full URL of the subdomain.
When you add a button name in Infin It!, that name appears here in Site Navigation automatically, in a Subdomain Block.
Drag one of these blocks to anywhere in the navigation order, or drag it into a Nav Header Block if you want it to appear in a horizontal navigation submenu instead of the main menu.
You can have the subdomain link show in the navigation for Desktop only, only for mobile phones, or for both (All).
To associate a subdomain with a Nav Header, click on and hold the gray border of the subdomain's block.
Drag the block inside the Nav Header Block's borders. When you see a red bar inside the block, release the click and drop the Subdomain Block.
In the horizontal navigation, a subdomain associated with a Nav Header becomes a submenu item. It will only be seen when a visitor hovers over the header text in the main menu.
Repeat for each subdomain link you want to associate with that header. You can also change their order inside the header by clicking and dragging a Subdomain Block inside the Nav Header.
You can also drag a Subdomain Block anywhere else in the navigation order if you want to make one link more important.
To remove a Subdomain Block from the navigation order, click on the X at the left edge of the gray bar at the top of the block. The subdomain will no longer appear in the navigation on your site.
If you no longer want the subdomain connected to your site, return to Infin It! and delete that subdomain.