
Subordinate Logins
Contents
Subordinate Logins
Subordinate logins are a tool you're not likely to use until your business has many pages, or requires regular attention (e.g., managing C2 submissions and comments).
On the other hand, you may have a business plan that requires growing beyond your own resources to accomplish, such as starting a second site, or developing a physical product to sell (see the Make It! series in MHQ).
Subordinate logins allow you to control who has access to certain parts of your site, to reduce the risk that any one person can damage your site (by accident or on purpose).
At this time, you can provide restricted access to the following parts of Site Central...
-
BlockBuilder and the various libraries, including the Content 2.0 Library
-
Upload Your Own HTML
Very Important
If you give someone access to one of the modules noted above, you give them access to all of that module.
Create New Subordinate User
- Click on Create New User to open the overlay to create a new account.
- In the overlay, enter a Description for this person (this will also be used for the Login name).
- Add checks to give access to some parts of Solo Build It! for this user.
- Click on the Add User button to create the account and close the overlay. Or click on Cancel to close the overlay without creating the account.
To create a subordinate login for an employee, virtual assistant (VA), or helpful family member, click on Create New User.
In the overlay that appears, enter some text in the Description text box.
Note: If you enter a Description word/name that has already been used, the system will append a number to the end of the Login name.
For example, if you type in "John," the system will make the Login name "john1" if yours is the second subordinate Description of "John" created by any SBIer.
Also note that while the Description will display on the Subordinate Login dashboard as John, the actual login name will always be lower case (john, or john1).
Add a check to give this user access to BlockBuilder, UYOH, or Content 2.0, or any combination of the three modules.
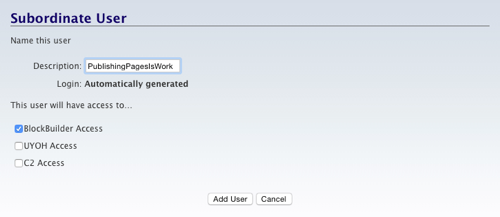
Click on the Add User button to create this subordinate user account.
The system will generate the password for any subordinate account you create here. So you must provide it to your worker exactly as it appears on the second overlay...

Copy the login name and the password (click in each box, press Ctrl-A/Command-A on your keyboard, then Ctrl-C/Command-C to copy the contents), then paste into a text document and save the doc.
Use this document as your master control for all of your subordinate logins.
After you create each account, log in as that user to ensure that each has only the access you want that person to have. The login URL is here...
https://sbiapps.sitesell.com/auth/subordinate_login
Subordinate Logins Dashboard
Once you have at least one subordinate account, you will see all of them in the Subordinate Logins dashboard page...
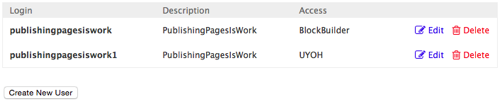
Note the two Descriptions, both the same, but with different Login names ("publishingpagesiswork" and "publishingpagesiswork1" -- all lowercase).
The Access column indicates the access you have given to each subordinate.
On the far right of each row are the Edit and Delete options.
Edit Subordinate User
- Click on the Edit to the right of the account you want to edit.
- In the overlay, change the Description, if desired.
- Click on Reset Password to change the password for this account. Confirm that you want to change it.
- Remove checks to remove access to some of the modules, or add checks to give new access to other modules.
- Click on the Save button to save the changes and close the overlay. Or click on Cancel to close the overlay without saving any changes (except the password reset).
You can change the Description you gave to a subordinate user.
Note, however, that this does not change the Login name. If you want to give the user a new Login name, delete the account first, then create a new one.
You can also reset the password by clicking on the Reset Password link. An overlay will appear, asking you if you're sure that you want to reset the password.
Click OK to reset the password, or Cancel to keep the existing password.
If you do change the password, remember to update your master list of Login names and passwords.
Once the password has been reset, the new password will display in a text box, ready for you to copy it. You'll also see a reminder to inform the subordinate user of this new password.
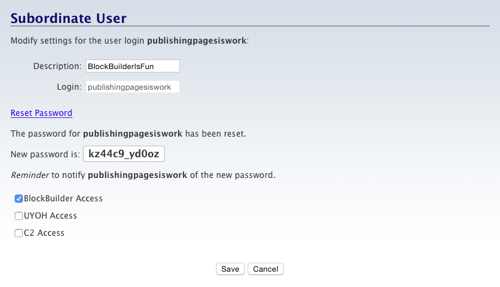
You can also change the access you give to a particular user. Remove a checkmark to remove access to a module, or add a check to give access to a module.
To save your changes (except for the password reset), click on the Save button. To cancel the changes (except the password reset), click Cancel.
After you edit an account (especially when resetting the password), log in as that user to ensure that everything still works, and the person has only the access you want him or her to have. The login URL is here...
https://sbiapps.sitesell.com/auth/subordinate_login
Delete Subordinate User
- Click on the red Delete to the right of the account you want to delete.
- In the small overlay, confirm that you want to delete the account.
If you no longer need a subordinate user account (you no longer use the services of that person), you can delete that account.
Click on the red Delete to the right of that account (if you have multiple accounts, ensure that you click on the correct Delete).
A small overlay will display, asking you to confirm that you want to delete this user. Click OK to delete, or Cancel to return to the dashboard without deleting the account.