
Build/Edit a Right Column
Contents
Build/Edit a Right Column
You must have activated the 3 column design in your L&F Selector before migrating over to BlockBuilder 2 if you want to continue using the same template, but with 3 colummns.
(This Right Column Builder tool is also used to edit existing right columns, with the headline Edit a Right Column.)
Before you begin building a right column, be clear on what you want to accomplish with it. For example...
-
Site navigation for important TIER 2 pages.
- Building credibility with testimonials or other content.
- Displaying site sponsorships and a link to more information about sponsorships. (See the top of the right column at www.anguilla-beaches.com for an example.)
-
Ads or links to products you sell, either your own or affiliate products.
(Think hard about putting AdSense ads there. Most SBIers with three columns don't earn much income from ads way over in that right column.)
Once you've decided how you want to use the content of this right column, you're ready to begin building it.
Important Reminder
You can have as many right columns as you want. For example, you may want a right column for each TIER 2 page, with thumbnail graphics about and links to its TIER 3 pages.
TIER 3 pages about a particular topic can have a right column that sells products related to that topic, while TIER 3 pages about a different topic can use the right column to sell different products.
And your home page can display testimonials, since it will receive the bulk of your site's per-page traffic.
Important Note
Pages that SBI! generates for you will not display your default right column. You will need to build a BB2 page and fill in one or more of the Extra Column's Sitewide Dots with the common content that you want to display on these SBI!-generated pages. These pages include...
- Blog It!
- Form Build It! thank you pages
- C2 submission, comments, thank you and comment-form pages
- MailOut Manager subscription and confirmation thank you pages, and the newsletter "traffic cop" back issues page
- Error pages
Individual templates for each of these types of pages will be available soon in BB2, to allow you to completely customize each one.
Right Column Name
- Choose a name for this right column, letters, numbers, _ and - only. No spaces and no punctuation.
- If editing a column, choose a new name if desired.
Choose a name for the right column that's unique and descriptive.
For example, the owner of anguilla-beaches.com might want a right column for her "5 Star Anguilla Hotels" TIER 2 section. A descriptive name would be 5StarHotels or 5-Star-Hotels-Nav.
If you want a right column to appear automatically on all BB1 pages, or on all BB1 pages without another column selected, you must name it default (all lowercase letters, exactly as shown here).
Remember, however, that the default column will appear on all your C2 pages as well, including its Thank You pages. This means that you cannot put AdSense ads in the default column, as that will be against the AdSense terms of use.
Headline Block
- Text: Enter the text for your headline here. Keep it short.
- Alignment: Select how you want the headline aligned on the page.
- Size: Choose #3 for this headline.
- Preview to ensure that the headline looks as you want it to.
Every page starts with a headline, but your right columns don't have to start with one.
If you use a headline, keep it as short as possible without sacrificing description or clarity. Remember that the headline has to fit into a narrow column.
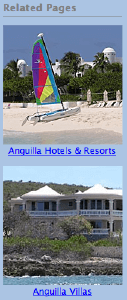
Simply describe what the visitor will find in that section of the right column (in the screenshot at the top of this page, the anguilla-beaches.com site navigation headline is "Related Pages."
Add line break tags (<br>) if the headline is longer than one line.
If you do start the right column with a headline, make sure that the font size is smaller than the main page headline. Otherwise, you risk distracting your visitors from the page content. It's best to always select #3 for the headline size.
Text Block
- Text: Enter the content for this part of your right column. Keep it short.
- Alignment: Select how you want the text aligned on the page.
In the content section of your page, Text Blocks "tell your story." The text blocks for the right column provide information that's relevant to that story, but not part of it.
For instance, you may want to use testimonials in the right column to build your credibility. Copy the text of each testimonial into a text block.
Keep the content of each Text Block as short as possible. Although you may want to use Center alignment occasionally for effect, Left alignment is easier to read.
Very Important
You can put any content you want in a right column, except for the column you name default. The default column will appear on all your Content 2.0 pages, including the Thank You pages. Putting AdSense ads on Thank You pages is against the AdSense terms of use, so be sure not to put them in the default right column.
The default column will also appear in the Blog It! page.
You can put them in any other right column. However, based on results from many Webmasters, you may find that they don't earn you much income.
Text Link Block
- Text: Enter the link text for this link.
- Alignment: Select how you want the link aligned on the page. Choose None to make it part of a sentence.
- Choose Link: Select the link you want to use from the Link Library. If the link is new, enter a Name for it, and then enter the URL.
- MouseOver Text: Enter the text to hide the link in the browser window's status bar.
- Open New Window?: Select Yes to open a new window.
Text links in the right column can be used for several different purposes. For example...
- More information about site sponsorships.
- Image captions for navigation thumbnail images.
- Links to product pages for your own or affiliate products.
See the right column at www.anguilla-beaches.com for examples of the site sponsorship text link and the caption links for thumbnail images.
If you choose to have links in the right column, make the link text compelling, so that you draw your visitors into clicking on the link.
But don't make them too compelling. You may risk having them ignore all of the valuable information that you're sharing on your pages. While a link to an affiliate sales pages could bring you some income, you also may lose the chance to develop a long-term repeat visitor.
Tip
- If you want to use a new link, one not already in the Link Library, copy the URL from the destination location, and paste it into the Text Link block to ensure the link is correct.
E-Mail Link Block
- Text: Enter the link text for this e-mail link.
- E-Mail Address: Type or paste in the e-mail address.
- Alignment: Select how you want the link aligned on the page. Choose None to make it part of a sentence.
- MouseOver Text: Enter the text to hide the link in the browser window's status bar.
Although this block gives you the option to place a live e-mail link in the right column, consider placing a link to a contact form instead.
Why? Spambots troll the Web, looking for e-mail addresses that they can harvest, add to a list, and then sell dozens, possibly hundreds, of times.
Using a contact form eliminates that possibility.
Graphic Block
- Choose Graphic: Select the graphic you want from the Image Library list in the menu.
- Alignment: Select how you want the image aligned on the page.
- Alt: Type in the text you want to use for the alt attribute.
- Choose Link: Select the link you want to use from the Link Library. If the link is new, enter a Name for it, and then enter the URL.
- MouseOver Text: Enter the text to hide the link in the browser window's status bar.
- Open New Window?: Select Yes to open a new window.
All graphics for the right column must be no wider than 160px. If you add a graphic wider than that, it will push all the content to the left, forcing the NavBar out beyond the left edge of your template.
Use images that explain what they're about. This is especially important if you'll be using them as navigation links.
Due to the narrow column, most images will not have room for text wrapped around them. So the default alignment is center. If you choose left or right alignment, preview the column to ensure that it displays properly.
Alt text is important for the Search Engines. Write some text that accurately describes the image, and it could be found in image searches, which can bring traffic to your site.
Alt text is also important for any visually impaired visitors your site may receive. Screenreaders will read the alt text and tell those visitors what the image is about.
The bottom half of the Graphic Block allows you to make the image a link. Use this for navigation, or for links to products you may be selling or promoting. It works the same way as the Text Link Block, except the graphic replaces the link text.
Divider Block
- Width: Select the width of your divider line. 100% is the full width of the column.
- Height: Select the thickness of your divider line.
- Alignment: Select how you want the divider aligned on the page.
Use Divider Blocks to separate sections of your right column, especially if you don't use headlines.
The dividers will make it easier for your visitors to know that one part of the right column content has ended and another part has started.
Line Break Block
- How Many?: Select the number of line breaks.
- Clear All?: Select Yes if you want any following text to not wrap around a left-aligned or right-aligned image.
You can add white space to the right column by adding line breaks. Selecting 1 will give the equivalent of one line of text as white space. You can increase it up to 5 "lines" of white space.
If you need more, add a second Line Break Block.
If you have a left-aligned or right-aligned image, text wraps around the image. However, with the narrow width of the right column, only one or two words may fit on each line.
It may be better to have text begin after the image. Do that by selecting Yes for the Clear All? question.
Opt-In E-zine Block
- Label for E-mail Address Entry Box: Enter the text you want for the E-mail entry box. It must end with the words "E-mail Address."
- Entry Box Above or Below?: Choose Below.
- Label for First Name Entry Box: Enter the text you want to use for the First Name entry box.
- Entry Box Above or Below?: Choose Below.
- Where on the Page: Choose the location for the opt-in box.
You can place your e-zine's opt-in form in the right column, instead of having it in the left column.
Due to the width of this column, Below is the only option that works for the location. If you choose "to the right," the box will extend past the edge of the template.
SiteSell Text Link
- Which Product?: Choose which SiteSell page you want to promote.
- Text: Enter the link text.
- Alignment: Select an alignment. None will put the link into a sentence.
- MouseOver Text: Enter the text that will hide the link in the status browser window's bar.
- Open New Window?: Select Yes to open a new window.
If you're a SiteSell Affiliate Program affiliate, you can promote SBI! in your right column. Complete the information here and a text link with your RR URL will be added to the column.
Simply choose which of the landing pages you'd like to link to, enter the clickable text of the link and any other choices. Once you build the page, the new link will appear in the right column.
SiteSell Graphic Block
- Which Product?: Choose which SiteSell page you want to promote.
- Choose Graphic: Select the graphic you want to use. Select from Small Banners, Postage Stamps, Buttons and any of the Other Graphics less than 235px wide.
- Alignment: Select an alignment for the image.
- Alt: Type some alt text for the image.
- MouseOver Text: Enter the text that will hide the link in the status browser window's bar.
- Open New Window?: Select Yes to open a new window.
As a SiteSell Affiliate Program affiliate, you can use a linked image to promote SBI! and earn a commission from each sale.
Only images 225px or narrower will fit in your right column. That means you can choose from Small Banners, Postage Stamps, Buttons and any of the narrow graphics in Other Graphics.