Graphic Library
Contents
Graphic Library
Selectively insert graphics on your pages where you feel they will enhance your content and your visitor's experience.
If you need to edit any of your images (resize, crop, add a watermark, etc.), Picmonkey is a free browser-based graphics system that lets you do just about anything you need to do to an image.
For instructions on using PicMonkey, see this TNT article...
https://sbitips.sitesell.com/picmonkey.html
Click here for help on using PicMonkey from the Graphic Library.
Upload Your Graphics
- The maximum size for any image file is 1 MB.
- Use only .jpg, .gif and .png formats. All file names and extensions must be in lowercase.
- Click on the Browse button (Choose File if using Safari) to find the graphic on your computer) that you want to upload.
- Insert an easy-to-remember name in the Describe Your Graphics entry box.
Tips
-
Use only high-quality graphics. Make a positive first impression.
-
File names and extensions (.jpg, .gif, .png) must be in lower case (no CAPS).
If your file has an upper case extension (e.g., .JPG), and you're using Internet Explorer or Firefox, browse to the file, make the extension lower case in the file path that's displayed, and then upload the image. Note that this does not work with Safari.
- Keep graphics as small as possible (under 50 KB is best, 20 KB is ideal), so your page loads fast.
- Give a graphic a library description that will help you identify it quickly. (For example, "view from window at Nat's" clearly jogs the memory of the owner of anguilla-beaches.com.) The more graphics you place in your Graphic Library, the more important "fast recognition" will become.
- You can upload a new graphic to the Library via SiteBuilder's Graphic Block during the process of building or editing a Tier 2 or 3 page. In general, though, make efficient use of your time. Plan ahead and upload several graphics (up to 10 at one time) to the Graphic Library before you begin building.
Optional Tips
-
Do you want to add an image or graphic to your home page? It's easy to do. Upload it to the Library and then add some simple HTML in the Body Block wherever you'd like your graphic to appear. Click here for the complete explanation, including an example.
-
If your site's theme (e.g., a travel site) lends itself to people searching for images, optimize for Google's Image Search by using one of your keywords in the image's file name. See this article about Image Search for more information.
Graphic Manager
Graphic Manager allows you to manage the images you store in the Graphic Library more efficiently...
- Create "virtual" folders, into which you place images (e.g., one folder for each Tier 2 topic).
- Edit the description, preview or delete each image with ease.
- Show, select, view, and sort image file names and descriptions any way you want.

Folders

Use Graphic Manager to create folders for convenient filing of your Graphic Library images.
When you create a folder, you do not create a "real" folder on your website. These are "virtual" folders, for visual organization only, to help you work with smaller, related groups of images (rather than one long list of all your images). Images do not "really" go into a folder.
If you upload your own HTML, do not change how you organize your images and work locally. Graphic Manager folders are simply organizational aids for people using SiteBuilder and the Graphic Library.
Folder Rules
-
Create one word names only (no spaces).
-
Use only alphanumeric characters (a-z and 0-9) and underscores.
-
Use a maximum of 30 characters (fewer recommended).
-
You cannot delete a folder that contains an image (all images must be deleted from that folder first, or they must be moved to another folder).
-
Folders don't move -- no folders inside folders.
- Click on the New text link in the Folders section.
- Enter a name using only letters, numbers and underscores.
- Click on Create New Folder.
- Click on an image icon in the Graphics section to select that image. Then click and drag the icon to the folder where you want to store the image.
Let's Make Folders and Move Some Images!
When you first start building your site, a list of 5, 10, even 20 images is manageable. But it becomes hard to deal with increasing numbers of images. So use folders to divide your images into groups of related images.

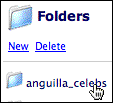
For example, the owner of anguilla-beaches.com has 10 images related to "Anguilla celebrities." Let's see how she creates the first folder...
The owner clicks on the New link. She names it "anguilla_celebs."
And then she moves all "anguilla celebrities" related images into this folder.
The process for moving an image into a folder is simple...
1) Click on the image icon.
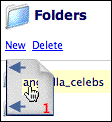
2) Drag the selected image into the folder of your choice as illustrated below...

This image "anguilla-brad-pitt-jennifer.jpg" is about to be dragged into the "anguilla_celebs" folder...
Tips

-
To select more than one image, use Alt-click (Option-click on a Mac) as you click on each image icon.
Note that as you drag, an image icon with a small window in the middle will move with your pointer (see the screenshot to the left). This icon displays the number of images (in red) you're moving. When the correct folder (highlighted in yellow) appears in the small window, release your mouse. The image(s) will move into that folder.

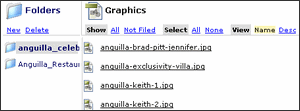
Keep moving related images into the appropriate folder. Continue until all related images have been dragged into the folder (e.g., all celebs-related images are in the "anguilla_celebs" folder -- see the screenshot to the right).
Here's a good tip for doing this quickly...
-
Click on the Not Filed link. This shows you all images not yet filed into folders. Then find image file names containing a certain word by pressing Control-F (Command-F on a Mac).
You might find it easier to decide where images belong if you choose to view them by Desc (description you gave each image) rather than by Name.
Continue by creating more folders, naming according to major categories or "sub-themes" of your site (e.g., "food," "real estate," "tours" and "hotels"). As you do this, the list of folders grows (listed alphabetically, A to Z).
-
You can also use the drag feature to move images from one folder to another.
How many folders should you have? As many as you need to work comfortably, allowing room for site growth, but no more! Keeping the number of folders down will cut down on the length of the folder list (reducing the amount of scrolling).
More on Folder Organization
You may want to create a folder for each Tier 2 topic, one for your admin pages (About Us, Contact Us, Privacy, etc.) if you have images on them, and some for any other content-based categories that will help you organize your images. And you may want to create one for images that you have not yet added to any page.
- You cannot rename a folder. Instead, create a new folder, giving it the new name you want. Then click on the old folder. Select all images in that folder by alt-clicking on each one (or by clicking on Select All), and move them into the new folder. Then delete the old folder. Have some images that just don't fit neatly into a group? Leave them as "Not Filed." It's better to have 15 or 20 "miscellaneous" images as Not Filed than to expand your folder list by 10.
Graphics
Work with your images in this section, where you see the image file names or descriptions displayed...

-
Show Choose which images to display in the Graphics section. Select All to see all your images, both filed and not filed. Select Not Filed to view only those images that you have not yet moved to folders.
When you select a folder, you automatically see all images (displayed in the Graphics section) that are in that folder. Clicking to Show All always displays all images from all folders, even when a folder is selected (it becomes de-selected).
When you upload a new image, it will be Not Filed until you move it into a folder.
-
Select Select or de-select a group of images. Click on All to select all the images that are currently displayed. That may be All your images (if you had clicked to Show All), or it may be all the images displayed in a selected folder.
For example, if you have 100 images on your site, clicking to Select All will select all 100 if you are also currently Showing All. But if you had selected a folder containing 24 images, Select All will highlight only the 24 in that folder.
Click on None to de-select all highlighted images.
-
View See your images by their file Name (e.g., anguilla-brad-pitt-jennifer.jpg) or by their Desc -- the description you gave each image (e.g., Brad and Jennifer).
-
Sort Display your images alphabetically from A to z, from Z to a, or by the date Last UL (last uploaded). Last UL displays the most recently uploaded images at the top of the list.
Tips
-
Can't remember in which folder an image resides? Click on Show All and scroll down to the image. Hover your mouse over the image file name or title. The associated folder will highlight.
-
When viewing by file Name, hovering your mouse over the name will display a tool tip window with the image's Desc. And vice-versa.
-
To select most of the images in a folder, click on Select All, then use Alt-click to de-select the ones you don't want.
Edit, Preview, and Delete
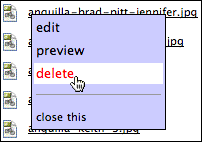
Click on the image's file Name or Description to edit, preview or delete it. A small blue menu will open to choose your action...

-
edit This opens the Modify Graphic Name tool page. Change the description you gave the image and click on the Save Change button.
-
preview Open a new window to preview the image.
-
delete Delete the selected image.
-
close this Close the blue menu, canceling it. You can also close it by clicking elsewhere in Graphic Manager.
Tips
-
The top edge of the menu always aligns with the image Name or Description you selected, giving you a visual cue about the image you've chosen (especially important if you're deleting images).
-
Clicking on another image moves the blue menu to that image.
-
If you delete an image that you currently have on a page, check the page for possible formatting problems. Edit if necessary and rebuild the page.
