
Connected Services
Connected Services allows you connect certain third-party services to your Solo Build It! (SBI!) account, so that you can use that service from within SBI!.
You don't have to log in at the third party to use its services after you connect to it.
Currently, Mailchimp and AWeber email services are available to connect to your SBI! account.
You can also connect Google's reCAPTCHA to use with FBI! forms, C2 forms and invitations, and newsletter opt-in forms.
And you can connect to your Google Analytics account to show traffic and other stats inside Site Central.
Mailchimp
You can connect your Mailchimp account (free or paid) here. This will allow you to use BB2's Newsletter Form Block to add your Mailchimp opt-in to your pages (individually, or in a Sitewide Dot).
Note: If you use Mailchimp, you cannot also use MailOut Manager.
- Log in to Mailchimp. If you don't yet have an account, create one.
- After confirming your signup, complete the Let's Get Started page.
- On the next page, click on your name at the top of the page, and click on Account. Click on Extras and select API keys (do not click on Create A Mandrill API Key).
- Click on the Create A Key button. The page will refresh, showing you your new key.
- Click in the box. The key will highlight. Copy the highlighted text.
- Return to Connected Services and paste the key text into the API KEY text box. Click on Test and Save. If the API connected to Mailchimp, the page will refresh and you'll see a checkmark next to the word "Connected" for Mailchimp.
- To edit or disconnect the API key, click on Edit.
- Replace the existing key text with the new key text.
- Click on the Disconnect button if you want to change mail services (e.g., to MailOut Manager or AWeber).
To connect your Mailchimp account with SBI!, start by logging in to Mailchimp. If you don't yet have an account, create one.
Complete the Let's Get Started page after you confirm your account creation. (You cannot complete the form without answering the Organization Information questions.)
On the next page, click on your name. Then click on Account. Click on Extras then select API keys. Do not click on the Create A Mandrill API Key option.
Click on the Create a Key button. The page will refresh. You'll see your new API key in a text box.
Click in the box to highlight all the characters. Copy the characters.
Back in SBI!'s Connected Services, paste the key characters into the API KEY text box. Click on Test and Save.
If the test is successful (the API connected to Mailchimp, the page will display a checkmark next to the word "Connected."
It's possible that the test will fail. If that happens, check that you didn't copy an extra space at the beginning and/or end of the API key's character string.
If you determine that extra characters aren't the problem, you may have disabled your API key in Mailchimp. Activate it again, then do the test again in Connected Services.
Congratulations! You've connected your Mailchimp account to your SBI! account. Now it's time to add the Newsletter Form Block to your pages. Note, however, that you'll need to create at least one list in Mailchimp before you can add the block to your pages.
So head over to Mailchimp, create your list (if you don't have one already), and then return to BlockBuilder and add the block to your pages (or to a Sitewide Dot).
Editing and Disconnecting an API Key
You can switch Mailchimp accounts by changing the API Key. Or you can disconnect the service and switch to MailOut Manager or AWeber.
Click on the Edit link to change the API or disconnect the API.
Click on Close when done, or click on the Site Central link in the top right to return to Site Central.
If you do decide to disconnect from Mailchimp, remember to replace the Newsletter Block on all of your pages (or the Sitewide Dot) with a new one, then select a MailOut Manager or AWeber option (horizontal or vertical).
AWeber
You can connect your AWeber account here. This will allow you to use BB2's Newsletter Form Block to add your AWeber opt-in to your pages (individually, or in a Sitewide Dot).
Note: If you use AWeber, you cannot also use MailOut Manager.
- Log in to AWeber. If you don't yet have an account, create one.
- Watch the overview video, then click on the Let's Get Started button.
- On the next page, fill in any missing information, or change anything you want, including your business name and the address you want to appear in every email. Also change the email address if you used a Gmail, Outlook.com, Yahoo! Mail or other free email address when you signed up.
- Click on the Next Step button to save the changes and continue.
- On the next page, name your first list and add a description.
- Click on the Next Step button to save the changes and continue.
- On the next page, customize the confirmation message subscribers will see.
- Click on the Approve Message & Create List button to save the changes and continue.
- Build your form, which you can use on social platforms and other locations (you'll use the Newsletter Form Block on your SBI! pages.
- Return to Connected Services and click Connect.
- You'll be taken to AWeber to enter your AWeber login name and password. Click the Allow Access button. You'll return to Connected Services, where you'll see a checkmark next to the word "Connected" for AWeber.
- To disconnect from AWeber, click on Edit.
- Click on the Disconnect button if you want to switch to MailOut Manager or Mailchimp.
You can connect your AWeber account here. This will allow you to use BB2's Newsletter Form Block to add your AWeber opt-in to your pages (individually, or in a Sitewide Dot).
To connect your AWeber account with SBI!, start by logging in to AWeber. If you don't yet have an account, create one.
Watch the video on the next page for an overview of what you'll be doing to set up your account. Then click on the Let's Get Started button.
On the next page, fill in any information not already pre-filled. You may want to use your website name as your Company Name.
And if you don't want your home address entered into the address fields, use one that you're comfortable having appear in every email you send.
At the bottom of the page, the Sender Email box will have the email address you used to sign up for AWeber.
Be sure to use an email address from your domain name (e.g., [email protected]). Do not use a Gmail, Yahoo! Mail, Outlook.com or other free email address).
Click on Next Step to save the changes and continue.
On the next page, name your first list. Then add a brief description (max 400 characters). No one will see this unless they decide to unsubscribe. A very descriptive note about the newsletter might cause a few people to reconsider their unsubscribe intentions.
Click on Next Step to save the changes and continue.
On the next page, you'll customize your confirmation message that subscribers will see after signing up.
Select your type of message from the menu. We recommend using the one that includes the subscriber's name in the subject line, as having the name in the subject helps with message open rates.
You can create your own, but you must request approval for it from AWeber. Click on the link between the menu and the edit box to make your request.
You can edit either part of the message that has the blue edit button.
When you're done, click on the Approve Message & Create List button.
The next step is to build your form. Although you will not use this form on your site (you'll use the Newsletter Form Block), you can use a form you create on your Facebook page and other social platforms. Watch the video for an overview.
Back in Connected Services, click on the Connect button. You'll be taken to an AWeber page, where you'll connect the two by entering your AWeber username (Login Name) and password.
Click on the Allow Access button to connect them. You'll be returned to Connected Services, where you'll see a checkmark with the word Connected next to AWeber.
In 30-120 minutes, you'll receive an email from AWeber, confirming that you connected SBI! to your AWeber account.
Disconnecting From AWeber
You can switch AWeber accounts by disconnecting from the first and connecting to the second. Or you can disconnect the service and switch to MailOut Manager or Mailchimp.
Click on the Edit link to change the API or disconnect.
Click on Close when done, or click on the Site Central link in the top right to return to Site Central.
If you do decide to disconnect from AWeber, remember to replace the Newsletter Block on all of your pages (or the Sitewide Dot) with a new one, then select a MailOut Manager or Mailchimp option (horizontal or vertical).
reCAPTCHA
- Go to Google's reCAPTCHA (you must be logged into a Google account).
- Select Version 2 of reCAPTCHA.
- Type or paste in the domain name (no https://www).
- Add any other owners you want by entering their email addresses.
- Accept the Terms of Service. Remove the check if you do not want alerts.
- Click on the Submit button to save the changes and continue.
- Click the COPY SITE KEY button and paste the character string into the Site Key box in Connected Services. Next, click the COPY SECRET KEY button and paste the into the Secret Key box.
- In Connected Services, add a check if you want reCAPTCHA added to your newsletter opt-in forms.
- Click on the Connect button to save the keys and connect to reCAPTCHA.
- Click on the Disconnect button if you want to stop using reCAPTCHA.
If your FBI! forms or Content 2.0 invitations or newsletter opt-in forms receive a lot of spam, you can increase their security by using Google's reCAPTCHA instead of the built-in challenge graphic.
To do that, you need to set things up at reCAPTCHA and then connect to it using SBI!'s Connected Services.
To use reCAPTCHA, you need a Google account.
-
Click here to go to reCAPTCHA. Log in to your Google account.
-
You need to add each site you own to reCAPTCHA. Start by giving your site a Label.
It can be the site's name, or the initial of each word in the domain name. Whatever you want to use to easily identify that site.
-
Select Version 2 (do not use Version 3).
-
Next type or paste in (recommended) the site's domain name, without https://www.
-
Add additional owner email addresses, if desired.
-
Remove the check if you do not want to receive alerts (not recommended).
-
Add the site to the reCAPTCHA list by clicking on Submit.
That will take you to a new page.
-
Click the COPY SITE KEY button and paste the character string into the Site Key box in Connected Services. Next, click the COPY SECRET KEY button and paste the into the Secret Key box.
-
Click on the Connect button.
All of your existing FBI! forms that have the graphic challenge activated will be rebuilt. Whenever someone submits a form, they will now have to use the reCAPTCHA challenge instead.
All C2 invitations will automatically start using reCAPTCHA, since a challenge graphic is built in.
And each newsletter opt-in form (for MailOut Manager, or Mailchimp or AWeber if you set up either one in Connected Services) will start displaying the reCAPTCHA (if you selected that option).
If you ever want to stop using Google's reCAPTCHA, return to Connected Services, click on the Edit link to the right of reCAPTCHA, and click on the Disconnect button.
Note: If you preview a form, you may see a red error message in the reCAPTCHA. This is because your keys are for your domain name, but the preview page is on the sitesell.com domain name. You can ignore this warning message.
Google Analytics
Before you can use Connected Services, you need to set up your Google Analytics account, and create a property for your website.
Log in to Analytics here.
Setting Up a New Google Analytics Account and Property
Once logged in, click on the blue Create Account button in the top left.
After clicking the button, you land on this page to create your property.
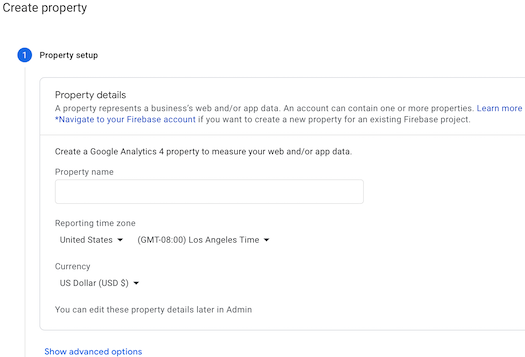
Give your property a Property name. Set your Reporting time zone (and Country if you're not in the US) and Currency, if you need to make changes to them.
Click the blue Next button when you've completed the steps above.
Enter your Industry category, select a Business size, and indicate how you intend to use Google Analytics with your business.
Click on the blue Create button.
Click on the Web button. In the large overlay that slides in, enter your site's domain name, starting with www. It should already be set to https://. Give this new data stream a Stream Name.
Click on Create Stream to complete the stream setup.
In the next large overlay, highlight and copy your GA4 ID. It begins with G-. Paste it into a text document and save it for your records (in case something goes wrong later in the process).
Click the X in the top left corner of the overlay to close it. Click the next X to close that overlay.
In the left column, below the blue button, click on Data Settings, then on Data Retention.
Click on the menu and select 14 months. Leave Reset user data active (the default).
You're now ready to connect to your account via Connected Services.
The Setup Assistant Page
This section is only for SBIers who have an older UA property and need to set up a GA4 property for the same website. If your site is new, skip to the next section.
On the Setup Assistant page, read through the information for Data Collection, then click on the arrow to the right. Click on Mark as complete.
Read through the information for Property Settings. You'll want to activate Google signals. Click on the arrow to the right, then select Manage Google Signals.
Read everything on that screen, including the information you'll see by clicking the down arrows on the right. If you've set up your GDPR widget and have a privacy policy that discusses Google Analytics data collection, click on the blue I Acknowledge button in the User Data Collection Acknowledgement section.
Go back to the top of the page and click the blue Get Started button.
On the new page, read the text, then click Continue. You can also learn more about Google Signals before you proceed by clicking the link just above the button.
Read the text on the new page, then click the blue Activate button if you want to use Google Signals. Click on Decide Later if you don't want to activate it now.
In the left column, Data Collection is red. Click on Data Retention just below it. Choose your Event data retention (14 months is better) and whether to Reset user data on new activity. Click Save if you made any changes.
Click on Data Filters in the left column. If you see the Internal Traffic filter, you can move on. If there's no filter there, click on Create Filter in the top right. Hover over Internal Traffic and click on Choose.
Click on the three vertical dots and activate the filter. The Current state will change from Testing to Active. If GA seems to hang (the operation doesn't complete), click on the page, then on the right arrow next to the three dots.
In the overlay, click on Active at the bottom, then click on Save in the top right corner. In the small overlay that appears, click on Activate Filter.
You're now ready to connect to your account via Connected Services.
Choose Your GA Account and Property in Connected Services
- In Site Central's Connected Services, click on Begin Setup.
- Click on Sign in with Google. A small Google overlay will open. Log in to the Google account you used to set up/access Analytics.
- Grant access to sitesell.com. Continuing clicking blue buttons in the overlay until you complete the process.
To begin the connection setup for Google Analytics, click on Begin Setup. A gray box will appear.
Click on Sign in with Google to begin the connection process. A small overlay window will appear.
Log in to your GA account and click on the blue Allow button to give SiteSell permission to access your account. Continue clicking on the blue buttons until the connection process completes in the overlay. The Google overlay will then close.
Once connected, the Choose Your GA Account and Property overlay will appear and the Connected Services page below it will turn gray.
- In the small SBI! overlay that opens, select your GA Account.
- Select your GA Property.
- Add a check to Add GA code to all my pages to add the GA code snippet to all of your site's pages.
- Click on Select to save the settings.
Now that you've connected to Google Analytics, it's time to connect to your property.
Select your account. If you have more than one, each one will appear here. Select the one that holds the property for your site.
Next, select your site's property. If you have more than one website set up under your GA account, each one will appear here. Choose the correct one!
The SBI! system will, if desired, add the most recent GA code to all of your site's pages. If you want it to, add a check to Add GA code to all my pages.
Click Select to save the settings.
Important Note
If you select this option, the system will scan all of your pages, looking for any older code on your pages. If it does find some, it will report that fact to you and ask if you want to replace it with this current version.
We recommend that you let the system replace the old code. Doing so will let you access future enhancements we plan to introduce regarding Google Analytics tracking.
Disconnect
Once your site is connected to GA and you've added the code to your site, you'll see a Disconnect button (plus a Save Changes button if you want to make any changes to the setup).
If you disconnect your site, the GA code will be removed from every page of your site.
This means that your site will have no Google Analytics tracking code. You will then only be able to use SBI!'s built-in Traffic Stats reporting system.
Be certain you want to disconnect before completing this action.