
Page Manager
Contents
Page Manager
Download, Edit, Preview, Delete and Clone
Page Manager allows you to build your pages and then manage them efficiently...
-
Create "virtual" folders, including subfolders, into which you place pages (e.g., one folder for each Tier 2 topic, a "To Improve" folder, etc.).
-
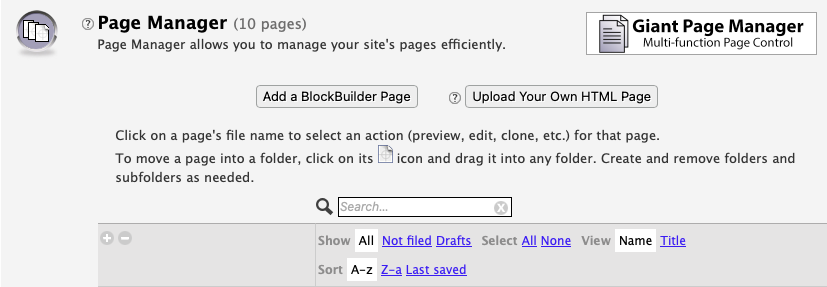
Show, select, view, and sort pages any way you want.
- Edit a page saved as a draft (unpublished page).
-
Edit, preview or delete each published page. Delete a page and create a 301 redirect for it.
Edit a published page and save it as a revision, discard an unpublished revision, or preview a revision. Delete the page, or preview the published version of the page.
Clone a BB2 page to have the same format as that page (this is a great way to create one or more BB2 templates). Or clone a revision.
Or download any UYOH-built page.
You can also convert a BB1 page to BB2.
Page Manager also lets you know how many pages you've built and/or uploaded. One of those pages is called no-such-url.html (BB2).
Solo Build It! (SBI!) builds that page for you, for those times when visitors land on a page that doesn't exist. You cannot delete this "404" page, but you can customize the message on that page.
After you build your first Form Build It! form, another SBI!-built page appears in Page Manager -- FBI! Thank You Pages. This one allows you to edit the common content that will appear on the thank you page that every visitor who completes a form will see.
Once you set up your newsletter, you'll find another SBI!-built page in Page Manager -- MailOut Manager Pages. This one allows you to customize the Subscription and Confirmation Thank You Pages, and the newsletter back issues page.
And after you've set up your first C2 invitation, you'll find three more SBI!-built pages in Page Manager -- C2 Submissions Pages, C2 Standalone Comments Pages, and C2 Thank You / Comment-Form Pages.
Remember to remove anything (e.g., AdSense ads, Facebook comments and social media buttons) that should not be in the template for form Thank You pages, MailOut Manager pages, and on C2 comment-form pages.
Important Note
If you upload your pages, you'll need to create and upload template files for the FBI!, MailOut Manager and C2 templates discussed above. If you don't upload these templates, SBI! will use the BB2 version of the templates, which may not match your uploaded site design.
The number of pages listed in Page Manager is different from what you see in the Traffic Stats section of the TrafficCenter.
The Traffic Stats number of pages includes your RSS feed file, your sitemap file, and Content 2.0 submission and comment-form pages, plus comment pages, if you have any.
If you use Connected Services to connect a Google Analytics GA4 property to your site, scroll to the bottom of that GA Traffic Stat page to reach the SBI! Traffic Stats page.
Add a BlockBuilder Page
To build a new page, click on the Add a BlockBuilder Page button. This will open the BlockBuilder tool, displaying your site's template with some default text.
Upload Your Own HTML Page
If you want to upload your pages, click on the Upload Your Own HTML Page button. This will open the UYOH tool page, where you'll upload your file, plus any other files associated with the page.
Filter Tool
Just above Page Manager, there's a text box with a magnifying glass beside it...

As you add letters and/or numbers to the text box, Page Manager presents only the pages that contain that text string. The more characters you add, the fewer pages will display in Page Manager, making it easy and fast to locate the page you want.
The filter works on both file names (Name) and titles (Title). See the Pages section below for more about names and titles.
Folders
Use Page Manager to create folders for convenient filing of your pages. When you create a folder, you do not create a "real" folder on your website.
These are "virtual" folders, for visual organization only, to help you work with smaller, related groups of pages (rather than one long list of all your pages). Pages do not "really" go into a folder...
So the URL of your page does not change. That means you can re-organize your Page Manager folders at any time, without fear of changing the URL of any page.
If you upload your own HTML, do not change how you organize your files and work locally. Page Manager folders are simply organizational aids in Site Central.
Folder Rules
-
You cannot delete a folder that contains a page. All pages must be moved to another folder first.
-
Folders don't move. You can create a subfolder, but you cannot drag one folder inside another one.
Making Folders
When you first start building your site, a list of 5, 10, even 50 pages is manageable. But it becomes hard to deal with increasing numbers of pages.
![]() So use folders to divide your pages into groups of related pages. For example, the owner of anguilla-beaches.com has many pages related to "Anguilla villas." So let's create our first folder...
So use folders to divide your pages into groups of related pages. For example, the owner of anguilla-beaches.com has many pages related to "Anguilla villas." So let's create our first folder...
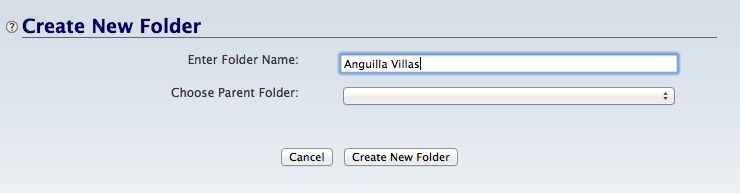
Click on the + icon in the left column, just above --Empty--. In the screenshot below, the owner names the folder "Anguilla Villas." The folder appears in the left section, with (0) to the right of the name.
She then moves all "anguilla villa"-related pages into this folder.
To move a page into a folder, first click on that page's icon or name/title.

And then...
Drag the selected page into the folder of your choice. In the screenshot above, "no-such-url.html" is about to be dropped into the "Admin" folder.
Move multiple pages to one folder by holding down the Alt key (Windows) or Option key (Mac) and clicking on each file you want to move.
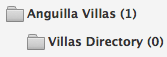
Make subfolders the same way. The Anguilla Villas page has a link to a directory (a Tier 3 page), so she could make a subfolder called Villas Directory...

Each subfolder appears indented below its parent folder...
Tips
-
Click on the Not Filed link at the top of the list of pages. This shows you all pages not yet filed into folders. Then use the filter feature (the text box next to the magnifying glass) to quickly find all files with a certain text string (e.g., "villa").
You might also find it easier to decide where pages belong if you choose to view them by Title rather than by Name (more on them below).
Continue by creating more folders and subfolders, naming them according to major categories of your site (e.g., "Food" and "Real Estate" and "Tours" and "Hotels"). As you do this, the list of folders grows (listed alphabetically, A to Z).
-
Use the drag feature to move pages from one folder to another folder or subfolder.
How many folders should you have? As many as you need to work comfortably, allowing room for site growth, but no more! Keeping the number of folders down will cut down on the length of the folder list (reducing the amount of scrolling).
More on Folder Organization
You may want to create a folder for each Tier 2 topic, one for your admin pages (About Us, Contact Us, Privacy, etc.), and some for any other content-based categories that will help you organize your pages. You may also want to create a "To Improve" folder for pages that you plan to improve or update.
System-generated pages go into the System folder automatically. Click on it to edit any of those pages.
If you plan to use the Save as Draft feature of BB2, create a "Drafts" folder as well, and store them all in there after saving them as drafts. When you finally publish a draft as a live page on the Web, remember to move the file from the Drafts folder and into another folder.
You can rename a folder, if desired. Double-click on its name, delete the old name from the text box, and type in the new one.
Do you have some pages that just don't fit neatly into a group? Leave them as "Not Filed." It's better to have 10 or 20 "miscellaneous" pages as Not Filed than to expand your folder list by 10.
Pages
Work with your pages in this section, where you see them displayed...

Page Manager tells you how each page was built. Block-built pages say either (BB2) for BlockBuilder 2 or (BB1) for BlockBuilder 1. If you upload your pages, they say either (Uploaded) or (UL).
Published pages display a page icon next to the file name or title. Pages saved as a draft have a page icon with the word DRAFT on it in the same location. Pages saved as a revision show an orange dot that changes to a red dot then no dot, over and over.
You can sort and filter your pages using the tools at the top of the list (shown in the screenshot above).
-
Show Click on All to see all your pages, both filed and not filed. Click on Not Filed to view only those pages that you have not yet moved to folders. Click on Drafts to see only pages that you saved as drafts (ones that are not yet published live to the Web).
When you select a folder, you automatically see all pages in that folder. Clicking to Show All always displays all pages from all folders, even when a folder is selected (it becomes de-selected).
When you create a new page, it will be in Not Filed or Drafts until you move it into a folder.
-
Select Select or deselect a group of pages. Click on All to select all the pages that are currently displayed. That may be all your pages (if you had clicked to Show All), or it may be all the pages displayed in a selected folder.
For example, if you have 100 pages on your site, clicking to Select All will select all 100 if you are also currently Showing All. But if you had selected a folder containing 24 pages, Select All will highlight all 24.
Click on None to deselect all highlighted pages.
-
View See your pages by their file Name (e.g., anguilla-videos-blW.html), which is the default, or by their Title (e.g., Anguilla Video Tour - Blowing Point West).
-
Sort Display your pages alphabetically from A to z, from Z to a, or by the date Last saved. Last saved displays the most recently saved (as draft) pages, the most recently built pages, or the most recently revised (and not yet republished) pages at the top of the list.
You can also use the filter tool (the text box next to the magnifying glass) to quickly reduce the number of files you see. Each letter or number you type in the box reduces the number of files displayed, until you see only a few, the ones that have the text string in the Name or Title.
Tips
-
Can't remember which folder a page resides in? Click on Show All and scroll down to the page. Hover your mouse over the page. The associated folder will highlight.
-
When viewing by file Name, hovering your mouse over the name will display a tooltip with the page's Title. And vice-versa.
-
If you want a full list of every page on your site (including C2 submission pages), use this URL, replacing domainname.com with your site's domain name...
https://www.domainname.com/urllist.txt
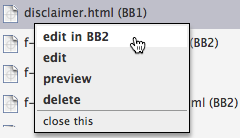
Download, Edit, Search Intent, Preview, Delete and Clone
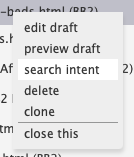
Click on any page's file Name or Title to edit, preview, delete or clone it (if you uploaded the page, you will also see a download option, but no clone option). You can also check the search intent for the page's Specific Keyword. A small gray menu will open to choose your action...
-
download You will only see this option if you uploaded the page. This feature will download the page file to your desktop, letting you edit the file from any computer in the world.
-
edit If you built the page using BlockBuilder, the menu shows the option to edit it in BB1 or in BB2. If you uploaded this page, it opens the Upload Your Own HTML module.
-
search intent If you want to improve the page, check the search intent before beginning your rewrite. This ensures that the intent in the page matches the intent people have when using that keyword.
Clicking opens the Search Intent Report (SIR) Tai Agent, which will give you the search intent of the keyword.
-
preview Open a new window to preview the page.
-
delete Delete the selected page (after you confirm) or delete and redirect it.
Note that if you delete an Upload Your Own HTML home page ("index.html"), a BlockBuilder-built version will automatically replace it. If you have never built a home page using BlockBuilder, a blank "Under Construction" page appears...
So do be careful not to delete your uploaded home page!
When you delete a page, you will receive a warning about other pages that will be affected (pages that have a link on them to the page you're about to delete). Make a list of those pages so that you can edit them after you delete the page.
Note: This only works for links you added from the My Pages section of the Link Selector. If you added internal links to the Link Library, this warning feature will not work. Do not add internal page links to the Link Library. SBI! automatically adds a link to every new page to My Pages.
Tip: Keep a list of the file names of deleted pages if you don't redirect them now (discussed next). You can redirect them at a later date, but only if you have the exact file names.
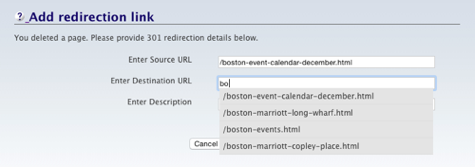
You may prefer to delete the page and redirect it to another page of your site (or a page on another site). If you choose that option, an overlay will appear. The file name is already entered.
Type or paste (recommended) the file name of the page on your site (or the entire URL of the destination site's page) into the Destination URL text box. (The destination page is the one where the redirect will go to). Then give the redirect a description and save.
If you type in the file name, the system will "type ahead" for you, displaying all the file names that start with the letters you have already typed into the box. See the screenshot below...
-
clone Create an exact duplicate of the BB2 page.
Why would you want to clone a page? Perhaps you've created an elaborate photo gallery (3 images across by 4 images down). Why go through the work of adding all the columns in a new page with a gallery?
Clone the page, change the page information and content, and build your new page.
Or you may have a Tier 2 page layout and a Tier 3 page layout. Clone an existing page to use that tier's layout.
Or create a template with no content in it at all. Save it as template.html. Then clone it each time you want to create a new page with the same layout.
When the page opens, enter the file name, title, keywords and description. Then review the remaining Page Info options (including Advanced Options) to ensure that your new page has all the settings you want it to have.
-
close this Close the gray menu. You can also close it by clicking elsewhere in Site Central.
Tips
-
The page file name's background will always change to a dark gray when you click on it and open the menu, giving you a visual cue about the page you chose (which is especially important if you're deleting pages).
-
Clicking on another page Name or Title moves the gray background and menu to that page.
-
Some system-generated files can only be edited. You cannot delete, redirect or clone them. This includes the privacy page you create, once you connect it to the GDPR Cookie Consent Widget.
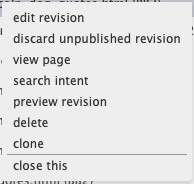
Edit, Discard, View, Search Intent, Preview, Delete, Clone
Click on any revised page's file Name or Title to edit, discard the unpublished revision, view the currently published page, preview the revised page, delete or clone it. A small gray menu will open to choose your action...
-
edit revision If you did not rebuild the page after revising it, you can continue with edits.
-
discard unpublished revision Permanently discard the revision without changing the currently published page.
-
view page Opens a window or tab to view the published page.
-
search intent If you want to improve the page, check the search intent before beginning your rewrite. This ensures that the intent in the page matches the intent people have when using that keyword.
Clicking opens the Search Intent Report (SIR) Tai Agent, which will give you the search intent of the keyword.
-
preview revision Open a new window to preview the revisions that you saved the last time you worked on the page and saved those changes.
-
delete Delete the selected page (after you confirm) or delete and redirect it.
When you delete a page, you will receive a warning about other pages that will be affected (pages that have a link on them to the page you're about to delete). Make a list of those pages so that you can edit them after you delete the page.
Note: This only works for links you added from the My Pages section of the Link Selector. If you added internal links to the Link Library, this warning feature will not work. Do not add internal page links to the Link Library. SBI! automatically adds a link to every new page to My Pages.
Tip: Keep a list of the file names of deleted pages if you don't redirect them now (discussed next). You can redirect them at a later date, but only if you have the exact file names.
You may prefer to delete the page and redirect it to another page of your site (or a page on another site). If you choose that option, an overlay will appear. The file name is already entered.
Type or paste (recommended) the file name of the page on your site (or the entire URL of the destination site's page) into the Destination URL text box. (The destination page is the one where the redirect will go to). Then give the redirect a description and save.
If you type in the file name, the system will "type ahead" for you, displaying all the file names that start with the letters you have already typed into the box. See the screenshot below...
-
clone Create an exact duplicate of the BB2 page.
-
close this Close the gray menu. You can also close it by clicking elsewhere in Site Central.
Tips
-
The page file name's background will always change to a dark gray when you click on it and open the menu, giving you a visual cue about the page you chose (which is especially important if you're deleting pages).
-
Clicking on another page Name or Title moves the gray background and menu to that page.
-
Some system-generated files can only be edited. You cannot delete, redirect or clone them. This includes the privacy page you create, once you connect it to the GDPR Cookie Consent Widget.
BB1 to BB2 Conversion Helper
Click on any BB1 page's file Name or Title to edit it in BB2.
Click on edit in BB2. This will open the BB2 editor, with the content (text, images, HTML, etc.) available for you to edit.
If you want to edit it in BB1, click on the edit menu option.
See this help page for details on using the BB1 to BB2 Conversion Helper.