
Master Keyword List
Contents
Brainstorm It! - The Big Picture
Master Keyword List
After you perform a Brainstormer query, you end up at the Master Keyword List (MKL), which contains all the keywords brought back by the query.
The MKL also hosts a set of tools that let you filter, sort, evaluate and delete keywords.
Other features allow you to...
-
export all or some of your keywords to your desktop to print and study offline
-
use those exported keywords with Google Ads (to import data from it)
-
create online notes about content or monetization ideas
And you can send those keywords to Blueprint It! to plan your Content Blueprint.
DAYs 2-4 of the Action Guide (AG) show you how to effectively use the Master Keyword List and Blueprint It! to determine and refine your Site Concept, build your Content Blueprint, and find ways to monetize your niche.
Your DAY 2 goal is to choose your best Site Concept. Your DAY 3 goals are to build out your list of keywords related to that Site Concept, and to build your site's Content Blueprint.
In this help, we discuss how to use the MKL's tools to achieve your goals.
The MKL might look overwhelming, especially when it's filled with hundreds of keywords.
In reality, the basic tools are simple to use. After you've used them a bit, they'll become second nature to you.
Before we get started, here's an important piece of advice...
Manage your MKL immediately after each brainstorm query...
Delete useless keywords using...
-
one-by-one review when determining your Site Concept (see DAY 2 of the Action Guide), or
-
filtering and sorting after expanding your keyword list (see DAY 3 of the AG).
Important: Keep your MKL "neat." It's tedious, but working with a tight set of useful keywords in your MKL pays high-yield dividends. After all, "diamonds are forever." 💎 💎 💎
Do a Quick Self-Directed Tour
Before getting into the detailed help below, orient yourself with a quick tour of all the functionality packed into the toolbar on the left of your MKL page. Here's how...
Hover over any tool in the toolbar, or over any of the column headers (white text on the blue background) in the MKL to display a tooltip with a brief description of that tool.
This tooltip also has a link ("More") to the related help, which brings you back to a specific part of this help file.
Here's an example...
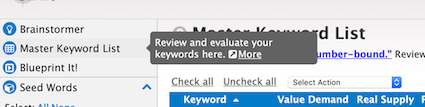
Click on each heading after reading the tooltip. Click on those with a blue V to reveal further functionality. Hovering over those delivers more tooltip bubbles (with "More" links to help).
Now that you've done your self-tour of the MKL's toolbar, you may be getting excited about the amount of site-building power there is. And you probably only scratched the surface.
Let's get into some detail now! We'll work our way from top to bottom. You've already used the top of the toolbar, Brainstormer. Clicking on it brings up the "Brainstormer" functionality, which we've covered. So we start at...
Seed Words
Seed Words are the foundation of your MKL. Every new word or phrase that you run a Vertical or Lateral brainstorm on becomes a Seed Word, and appears in this list.
Any word or term that you enter into Brainstormer when performing a query is a "Seed Word" (it "seeds" a storm of keywords). Initially, think of them as potential Site Concept Keywords.
After you've chosen your Site Concept and deleted any other potential Site Concepts, you'll add new Seeds (Vertical Brainstorms for important subsections of your site), and "expand" highly specific terms (Lateral Brainstorms).
Getting Started
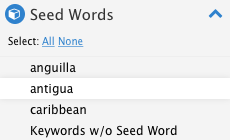
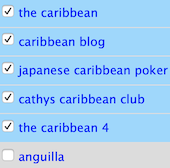
Click on the down-pointing arrow to open the list of Seed Words that have been brainstormed. Click on any Seed Word to display the list of keywords generated for that brainstorm (the Seed Word's background turns white to indicate that its keywords are displaying in the table).
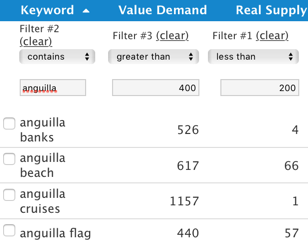
Note: "Seed Words" is always "open" after you run a new brainstorm, with that newest Seed Word having a white background. For example, this SBIer has just performed a brainstorm on "Antigua"...
Except for your initial evaluations in DAY 2, select a Seed Word as your first action whenever you visit the MKL. If all keywords are not shown, click All (or None) and then proceed...
Select the Seed Word you want to study (e.g., "anguilla") by clicking on it with your mouse. Only the keywords generated by that Seed Word will appear in the MKL.
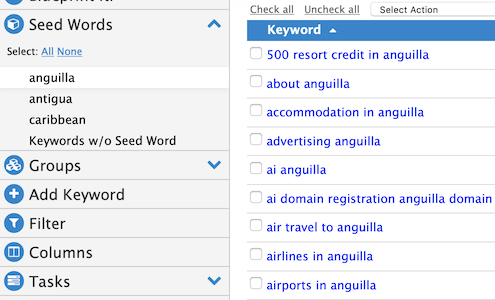
All functions in the MKL are based on, and affect, only the keywords for the Seed Word(s) you select. Those functions include all preset tasks, filtering, sorting and deleting.
Other Terms You Might See in Seed Words
1) Potential Site Concepts If you used the Seed Generator brainstorm, you'll find the term "Potential Site Concepts" listed here. If you used the Seed Generator for your first brainstorm, that's all you'll find in the Seed Words section...
You will not find the word you used in the Seed Generator. Instead, you'll see all the potential Seed Words (the results of the Seed Generator brainstorm). The generic word used for the Seed Generator is unimportant (it was never intended to be a potential Site Concept).
Note: If you already know the three niche ideas that appeal to you, but have not yet used the Site Concept Finder brainstorm, return to Brainstormer, then run that brainstorm function to start the research process to find your best niche/business prospects.
2) Keywords w/o Seed Word You'll also find "Keywords w/o Seed Word," for keywords that you add to your MKL one by one and don't assign to a Seed Word (more on this a bit later).
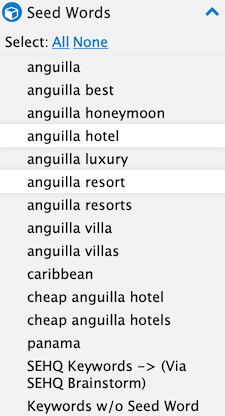
All or None?
Clicking the small "All" or "None" (see the top left in the screenshot below, under "Seed Words") selects all the Seed Words or none of them. Both eliminate previous Seed Word selections, bringing all the keywords back into play.
The only difference is that "All" selects all Seed Words, while "None" selects none of them, making it one click easier to select a single Seed Word.
Once you've selected a Seed Word, the simplest way to de-select it is to click on it again. Or click None.
If you Ctrl-click/Command-click on more than one Seed Word, you'll select more than one, displaying all of their keywords in your MKL. All filtering or sorting will be done on every keyword for each of the Seed Words you selected.
Click on All if you want subsequent filters to work on all the keywords generated by your Seed Words. If you want to work on one or more Seeds, click on None and then select the Seeds.
To remove a Seed Word, you must delete all the keywords associated with that Seed Word.
Deleting has the added precaution of requiring that keywords have a check before you can delete them. Deleting keywords is covered later in this help.
How to "Wipe the Slate Clean"
It's easy to forget that you're working on one or more Seed Words. Ditto after using some filters (discussed below). When the MKL does not "behave" properly, look near the top of your MKL. If you see something like "71 out of 1878 keywords"...
... here's how to get back your full set of keywords, wiping the slate clean so you can start over with a new idea.
You could work your way through the toolbar and find each function that has brought you to this confused point. Then you'd individually reverse the chosen Seed Words, tasks and/or filters.
If you want to wipe the slate and examine all of your MKL keywords again, it's a lot easier to...
-
Click on Seed Words to open it. Click on None to restore all seeds-generated keywords into your MKL.
-
Click on Tasks on the left to open that section. Then click on All Keywords. That clears all filters, sorts, tasks, etc., which returns the full set of keywords for the selected Seed Word(s).
Groups
 Click on the down-pointing arrow to open "Groups." This tool automatically groups keywords that share words in common.
Most "groups" will be single words, with a few 2-word groups (e.g., "calling card," "car rental"). Each group name does not contain the Site Concept Keyword.
The number at the far left (3 in the animated gif example on the right) is the size of the smallest group that has a common word. The smallest possible group size is 3 keywords.
The number at the far right of the slider (58 here) is the size of the largest group ("hotels").
The "Min. group size" is the smallest group size where the slider is currently located. All groups are that size or bigger.
Important: Groups work best when you have only quality keywords in your MKL. If you have not been pruning regularly, then too many junky, useless and/or nonsense words can ruin the group patterns that a well-managed MKL generates.
Prune your MKL before evaluating groups.
Let's take a small tour to demonstrate the site-organizing usefulness of this tool. Follow each of the steps shown in the animated gif above...
Step 1
Slowly scroll the right-hand, vertical scrollbar in Groups (if there is one) to see all the groups. You'll get an idea of how your niche divides up.
Even at this granular level, some of the words will pop out at you as keywords that could make good Tier 2 pages in your site...
The Groups functionality excludes your Seed Word. So you'll add that back onto the words identified in Groups (if you select that Seed Word as your Site Concept Keyword).
For example, add "Anguilla" onto "villas" -- you can be pretty sure that "Anguilla villas" will make an excellent Tier 2. Ditto for "Anguilla hotels."
OK, do you have a lay of the keyword landscape? The next action starts the magic of Groups (each Step is shown in the animation above)...
Step 2
 Slowly drag the slider right. This shows you a decreasing number of larger groups.
When you have reduced down to 10-12 larger groups (see right), you should have an even better sense of what your Tier 2 groups will be about.
In the example, "beach," "flights," "hotels," "resort," and "villa" give you a strong start on what your Tier 2s will be about. What about the others in that list?
Your knowledge of your niche will give some useful information even if some groups don't "work" as Tier 2s...
-
"Cheap" adds valuable info. Although Anguilla is known as high-end, there are price-conscious searches. You may want to divide "restaurants," "hotels," and "villas" according to "luxury" (a word you saw in the more granular groups) and "cheap."
-
"Island" is a subject that does not sub-divide into Tier 3 topics. But, since it appears so often, writing a page about "Life on The Island of Anguilla," and what that means for tourists and residents, is a good idea.
-
"Rentals" and "travel" are general keywords, too much so to do much with. It doesn't make sense to divide the site according to these as Tier 2s.
But remember to figure out how to work these into relevant topics (so they have a chance to be found for "word combos" (e.g., "+Anguilla +rentals").
Bottom line: At this level, assuming you have 500 or more quality keywords in your MKL, "Groups" is a huge help for planning Tier 2 pages and their related Tier 3 pages.
Note: Watch for the vertical scroll bar (right edge of the Groups tool). When you see it, there are more Groups to be seen. As you drag the top, horizontal "grouping" bar farther to the right, the vertical scrollbar will disappear. Speaking of which...
Step 3
Keep sliding to the right until you only have 4-8 groups left. You now see all the groups at this "big group" level.
This is an effective way to find your site's "core" topics, some of which will make strong Tier 2s (see the Action Guide for more on Tier 2s).
The words of each group are generic (e.g., "hotels," "resort"). You'll combine those with the Site Concept Keyword to get actual Tier 2 groups (e.g., "Anguilla hotels"). Not all will apply (e.g., "bay" would not make sense as a Tier 2 for "Anguilla")....
But you're sure off to a confident start on how your niche "slices" up.
What's Next?
Drag the slider slowly to the left until a few more Groups appear. These are the next largest, but a little smaller than where you were (far right).
Click on each group word. Its background color will change to white. You'll now see only the keywords that contain that group word. Study those keywords.
Repeat the process, scrolling a bit to the left, with progressively smaller groups until you can't find any that you could turn into a Tier 2 mini-site.
A mini-site is a portion of your site containing pages that are all tightly related. The top is a Tier 2 page, which links to several Tier 3 pages about that specific topic.
The Tier 3 pages could all link to each other using the Related Pages Block in BB2, making it easy for your visitors to continue exploring that topic.
Tips
-
View the keywords in multiple groups (e.g., "cheap flights" and "flights") at one time by holding down the Ctrl/Command key while clicking additional group(s). This is useful if two keywords are really part of the same Tier 2 (e.g., "hotel" and "hotels."
-
You can also view All groups (all the keywords, with every group selected) by clicking All. Or view all of the keywords, with no group selected, by clicking on None -- then select one Group keyword to see its keywords in the MKL table.
Note: As you do this, enter "Tier 2" into the Notepad for each keyword that will make a suitable Tier 2 page.
Later, you'll filter the Notepads for "Tier 2" and move all of those keywords to Blueprint It!, where you'll make them Tier 2 keywords. (More details in the Blueprint It! help.)
You may get creative with all these "prime keywords" rolling up and down (it's hypnotic!). For example, you might consider doing an entire website/business about "Anguilla on the Cheap." There are only 9 keywords, though, and not enough Demand to sustain a site.
Instead, you could create sections of a larger site for price-sensitive visitors. A section for "Cheap Anguilla Hotels" could be subdivided in a different way. There are enough good, inexpensive hotels in Anguilla to make this work.
Note: This level of decision-making depends on your niche knowledge and a solid idea of who your visitors are, supplemented by research, as needed.
This could be a winning idea. On an island that's perceived as "high-end," you figure that some visitors would surely be interested to learn that they could visit on a budget. Thank "Groups" for the inspiration!
Why Is Groups So Important?
Why not just use the Filter tool (discussed below) to find those common words? You could, but it would be tedious trial-and-error work. In fact, you can have the best of both worlds, using the Filter tool after you identify high-potential Tier 2s...
Check the number of keywords by filtering the Keyword column of your entire MKL (i.e., "All" Seed Words with no filters) for the group name. For example, enter "flight" into the Keyword column filter to see the 9 keywords that contain "flight" (which includes "flights")...
Think about each keyword in the group. The ones that make sense as Tier 2s (e.g., "beach," "cheap," "flights," "hotels," "resort") will reveal loads of good, relevant Tier 3 topics to write about for each of "Anguilla beaches," "Anguilla hotels," and so forth.
Remember, a Tier 2 is a natural sub-category of your Site Concept Keyword (your home page keyword). Each Tier 2 can be thought of as having enough content to support a mini-site of Tier 3s. So...
Is there a good Tier 2 "mini-site" collection of Tier 3 keywords? If there is, put a brief note in the Notepad for each keyword in the group (that matches the Group name -- for example, "flights Tier 3") for future reference.
Later, you'll filter for the terms you entered into the Notepads, move those keywords to Blueprint It!, and make them Tier 3 keywords under their associated Tier 2 keywords. (Again, more details in the Blueprint It! help.)
If you're using Groups after selecting your Site Concept Keyword (you're in DAY 3 of the Action Guide), simply move the keywords over to Blueprint It! rather than adding a note to each Notepad.
Basically, this Tier 2 becomes the "home page" for a mini-site of the identified Tier 3 pages. Add Tier 3 keywords (aka "topics") and any extra thoughts (e.g., "Cover each of the cheap oceanfront hotels for the Tier 3s of this Tier 2").
Wrapping Up Groups
In short, Groups helps you figure out your site's optimal 3-tier structure....
-
The slider helps you see groups of keywords that could form your Tier 2 mini-sites, starting on the far right and moving slowly left.
-
Clicking on the group names shows each group's possible Tier 3s. This assures you that you have plenty of relevant Tier 3s related to the Tier 2, simply by reviewing the MKL list.
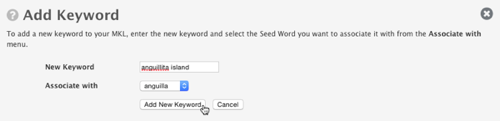
Add Keyword Tool
- Click on Add Keyword.
- Type the keyword in the New Keyword text box, without quotes.
- Choose a Seed Word in the Associate with menu.
- Click on Add New Keyword.
- Click on the white X (on gray background) to close the overlay, or click on Cancel.
The Add Keyword tool lets you add keywords to your MKL, one at a time, without making them Seed Words.
Brainstorm It! delivers the keyword's Value Demand and Real Supply (and calculates the resulting Profitability).
Adding a keyword does not cost you a brainstorming credit (more on credits in the Brainstormer help).
Click on Add Keyword (screenshot above) to open the Add Keyword overlay (screenshot below), where you can associate the new keyword to an existing Seed Word, or leave it unassociated. For example, add "anguillita island" as part of the "anguilla" Seed Word.
Click on Cancel, or on the white X on the gray circle in the top right corner, to close the overlay.
Important Note
If you add a keyword and see no Value Demand, Real Supply or Profitability numbers, that means that our keyword data supplier has no numbers available for that keyword.
Tips
-
The new keyword will appear at the top of your MKL, in blue.
-
If you add a keyword using the Add Keyword tool, and don't associate it with an existing Seed Word, you'll find that keyword in your MKL by selecting Keywords w/o Seed Word in the Seed Words section.
Find any added keywords that you associated with a Seed Word by selecting that Seed Word in the Seed Words section.
-
If you add the keyword to the wrong Seed Word, delete it from the MKL, enter the keyword again, and associate it with another Seed Word.
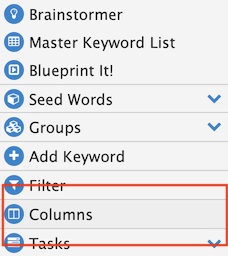
Columns
We'll skip farther down the toolbar now, to discuss Columns. Many of the tools use columns, so let's cover that now.
1) Column Group #1 (The Starters)
The default or starter columns (those that exist when you first start) are with you from the beginning of your business-growing efforts...
-
Checkbox -- Add a check to a keyword (or uncheck it). You can also "Check all" or "Uncheck all."
Once you have checked a bunch of keywords scattered throughout your MKL, you can sort by checked/unchecked keywords by clicking on the blue bar to the left of the Keyword column.
-
Keyword -- each keyword returned by a brainstorm is listed here, up to 5,000 of them
-
Value Demand -- the demand number for each keyword, calculated by Brainstorm It!
-
Real Supply -- the true competition number for each keyword, calculated by Brainstorm It!
-
Profitability -- the demand/supply ratio, multiplied by 1,000 to give a whole number
-
Notepad -- a window that opens to let you store some notes about any aspect of each keyword (more details below). Hover over a notepad with some content to view the content without opening the notepad
-
WWW -- a window that opens to show the current rankings at either Google or Bing for each keyword (more details below)
-
Site Info -- a window that opens to show the competition for that keyword (more details below)
-
Search It! -- direct links to various searches in Search It! (more details below)
Many of these columns are described more completely in the Action Guide. They should all, though, be self-evident. Try each now.
2) Column Group #2 ($ Values)
After you use Get Google $ (discussed below), which you'll do in DAY 4, you'll see three new columns...
-
PCDM -- the number of clicks that Google Ads thinks an ad using that keyword will receive each month
-
CPC -- Google's estimate of an advertiser's click cost for an ad using that keyword
-
Keyworth -- a number calculated by Brainstorm It!, indicating the value of a keyword based on the Value Demand, Real Supply, PCDM and CPC
These are also discussed in the appropriate spots in the Action Guide.
3) Column Group #3 (Keyword Values)
After you have 30 published pages, update your two Search Engine HQ reports -- Keyword Ranking Report and Keyword Searches Report. This will activate the SEHQ Brainstorm in Brainstormer, add new keywords to your MKL, and add three new columns to it...
-
# Pages -- the number of pages you've published that use the keyword as the Specific Keyword. Each number is a link to a new window listing each page, where it ranks at Google, Bing and Yahoo!, and the the number of visitors the page has received.
-
# SE Visitors -- the number of visitors landing on your site after searching using that keyword. Each number is a link to a new window listing the pages they landed on, each page's Specific Keyword, and the number of visitors.
-
Best Rank -- the page of your site using that keyword, where it ranks at Google, Bing and Yahoo!, and the number of visitors.
4) Column Group #4 (only in Blueprint It!)
When you switch to Blueprint It! by clicking on the link near the top of the toolbar, you'll see a different set of columns. The old regulars -- Keyword, Value Demand, Real Supply, Profitability and Notepad -- are standard in Blueprint It!.
You'll now see a new column -- Headline Ideas. Each row has an Edit link. Click on it to open an overlay where you can add ideas you have for headlines. Focus on H1 (main page headlines), but if you think of a headline for an H2 or H3 subheading, add it here as well.
5) The Pages Column
Both the MKL and Blueprint It! have a Pages column (not to be confused with the # Pages column, which you'll see after running the SEHQ Brainstorm once you've published 30 pages.
The Pages column indicates which keywords you've used to create pages on your site. An icon of a single page means you've used that keyword on one page. An icon of two pages, one on top of the other, means you've used that keyword on two or more pages of your site.
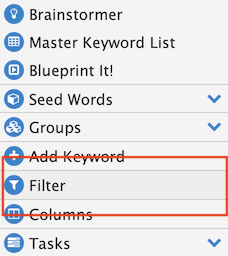
Filter
Several hundred keywords can be an overwhelming number to evaluate. But you can quickly slim down that number by applying filters, temporarily hiding the words you don't want to study.
The Filter tool lets you quickly find and display subgroups of keywords in your MKL. Your filtering options include...
-
an alphanumeric filter, used in the Keyword and Notepad columns.
This lets you filter keywords and notepads to include or exclude certain words or numbers (e.g., find every Notepad that contains the word "villas," or every Notepad that contains the word "Tier 2" or "monetization opportunity").
Important: Notepads can be very useful if you keep a list of terms that you enter into them. For example, if you've added "Tier 2" to the Notepads of possible Tier 2 pages, enter "Tier 2" as a search term in a log or diary (for future reference).
-
a numeric filter, used in the Value Demand, Real Supply and Profitability columns (and the PCDM, CPC, Keyworth, # Pages, # SE Visitors and Best Rank columns).
This lets you search for certain numeric values (e.g., all keywords with Value Demand greater than 2,000).
There are 6 functions you can choose from...
Greater than presents all keywords greater than a certain number -- e.g., Value Demand greater than 5000 brings back every keyword with Demand from 5001 and up.
Less than gives you all keywords less than a certain number -- e.g., Real Supply less than 501 returns every keyword with Supply from 1 to 500.
Range returns all keywords that fall within the range that you specify -- e.g., a Real Supply "from" 100 and "to" 4500 returns all keywords that have a Supply of at least 100 and no greater than 4,500.
Highest x% gives you that percentage of the keywords that have the highest numbers -- e.g., "highest 25%" of Demand of 500 keywords will return 125 keywords (500 x .25).
Lowest x% provides that percentage of the keywords that have the lowest numbers -- e.g., "lowest 25%" of Real Supply of 500 keywords will return the 125 with the lowest Supply (500 x .25).
Percent range will bring back that percentage of the keywords in the range you enter -- e.g., "25% to 75%" of Profitability of 500 keywords returns the 250 with the intermediate Profitability that you enter (500 x (.75 - .25) = 500 x .5).
Filtering does not delete any of your keywords. It simply hides words temporarily (those that do not match the filter's settings), while you study the remaining keywords. Only you can delete keywords (when you choose to).
You'll see the keywords that meet the conditions set by your filter(s). The others are still there, and can be brought back for review by undoing the filter(s) or by clicking on All Keywords in Basic Tasks, which is explained below.
Clicking on Filter (shown in the screenshot above) displays the filter options inside the MKL table. Text boxes appear below the label of each column (see the screenshot below).
Pick a function (e.g., "greater than" or "less than" for numerical columns, then enter the number(s), or "contains" or "excludes," then enter the word(s) you want to filter). The MKL adjusts automatically to meet what you enter.
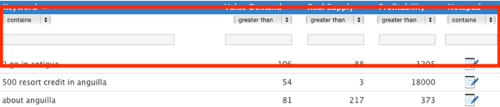
Filtering occurs immediately as you enter a word or number, so there's nothing to click.
Tips for Using Any Filter, Including Preset and Custom Tasks
-
After applying a filter or a preset task to a Seed Word, you can select a different Seed Word. The same filter or task applies to it. Eliminate filters or a task by clicking on All Keywords in Basic Tasks.
If you want to eliminate a Seed Word selection, either click on it or click on Seed Words in the toolbar and then click None, which de-selects all of the Seeds.
-
Click on Filter in the toolbar. You can change the functions and criteria to obtain different results for this MKL session only. You can also save those revised criteria by creating a custom task (discussed below).
-
Click on All Keywords to clear the slate and start over with a new sequence of filters, etc.
-
If you clicked on Filter in the toolbar to view the filtering functions, click on it again to hide them.
Important Note About Filtering (and Tasks)
Filtering and tasks work on all the keywords brought back by a Seed Word.
If your Seed Word brought back a lot of valuable keywords, then the results returned by any filter or task will resemble the keywords you'll see in the screenshots in DAYs 2 and 3 of the Action Guide.
However, if the Seed Word brought back a lot of low-value keywords, then many of the tasks will return poor keywords.
This is especially true for the Solid Potential task (discussed below). If the keywords being filtered are all low-value keywords, Solid Potential will bring back the best of those low-value keywords.
Remember this phrase when using filters and tasks...
Garbage in. Garbage out.
If you start with junk, filtering and tasks will only provide a smaller list of junk!
Now we'll discuss how to use each filter...
Keyword Filter
- Select the Seed Word you want to filter.
- Click on Filter to open the filtering tool.
- Select contains, excludes or starts with for the Keyword filter. Enter the word or phrase to filter for.
- Delete the word/phrase if you want to change it. Click the clear link if you want to remove the filtering completely.
The Keyword filter is especially useful after running a Lateral Brainstormer query.
If you had 387 keywords from a Vertical brainstorm before running the Lateral brainstorm, and now you have 925, use this filter to hide (exclude) all the keywords that have the Seed Word in them.
This lets you study and evaluate only the newly brainstormed words, even though they have the same Seed Word.
For example, for the Seed Word "anguilla," use the excludes function to hide all the keywords that have "anguilla" in them (all the Vertical keywords).
"Contains" and "excludes" work with single words, or multiple words. If you enter two or more words, the filter will find and display (or hide) all keywords that contain both filter words, including those with a third word between the filter words.
"Starts with" brings back a continuously smaller set of words as you type each new letter in the filter box. For example, typing "a" immediately brings back all words starting with "a." If you then type an "n," all words starting with "an" are returned.
Value Demand Filter
Here's what the 6 functions mean when filtering Value Demand. (If you want to review the definitions of these functions first, click here.)
- Select the Seed Word you want to filter.
- Click on Filter to open the filtering tool.
- Select your filter function.
- Enter the number (or numbers if you selected a range function) to filter for.
- Delete the number if you want to change it. Click the clear link if you want to remove the filtering completely.
-
Greater than -- Since higher Demand is better than lower Demand (more people are searching for this keyword), filtering Value Demand with this function brings back keywords that you'll want to write about (if Supply is low).
-
Less than -- Using this function shows keywords that you may want to delete, or postpone writing about.
-
Range -- This function is good for hiding the extremes (very high and very low) of Demand.
-
Highest x% -- This function, like greater than, brings back the best keywords in terms of Demand, ones you'll want to write about).
-
Lowest x% -- This function, like less than, brings back the worst keywords in terms of Demand, ones that you may want to delete or postpone writing about.
-
Percent range -- This function is good for hiding the extremes of Demand (for example, the lowest 25% and the highest 10%).
For example, you'll use the Value Demand filter when studying the Overall Demand ("greater than" 1,000) for your three potential Site Concepts and again when looking at Demand Depth ("greater than" 500), both discussed in DAY 2 of the Action Guide.
Real Supply Filter
This is what the 6 functions mean when filtering Real Supply.
- Select the Seed Word you want to filter.
- Click on Filter to open the filtering tool.
- Select your filter function.
- Enter the number (or numbers if you selected a range function) to filter for.
- Delete the number if you want to change it. Click the clear link if you want to remove the filtering completely.
-
Greater than -- This function returns words you may want to delete, or postpone writing about, due to high competition. Or they may make good Tier 2 pages.
-
Less than -- Since lower Supply is better than higher Supply (there are fewer web pages vying for people's attention), filtering with this function brings back keywords that are more likely to make it into the Top 30 at the search engines.
These are the ones you'll want to write about first (if Value Demand is high).
-
Range -- This function is good for hiding the extremes of Supply (words with too much competition, or that may have little value in terms of monetization).
-
Highest x% -- This function, like greater than, finds keywords you may want to delete, postpone writing about (due to very high competition), or turn into more general Tier 2 pages.
-
Lowest x% -- This function, like less than, brings back words you'll want to write about first (if Demand is high), since competition is low.
-
Percent range -- This function is good for hiding the extremes of Supply, leaving you with words that are popular with other webmasters, but not too popular.
For example, you'll use the Real Supply filter when looking at the Winnable Depth of your three potential niches.
Profitability Filter
What the 6 functions mean when filtering Profitability...
- Select the Seed Word you want to filter.
- Click on Filter to open the filtering tool.
- Select your filter function.
- Enter the number (or numbers if you selected a range function) to filter for.
- Delete the number if you want to change it. Click the clear link if you want to remove the filtering completely.
-
Greater than -- This function brings back keywords that you'll want to write about first.
-
Less than -- This function gives you keywords that you may want to postpone writing about (or even delete, if Value Demand is very low).
-
Range -- This function is good for hiding the extremes of Profitability.
-
Highest x% -- This function, like greater than, brings back the best keywords in terms of Profitability, ones you'll want to write about.
-
Lowest x% -- This function, like less than, brings back the worst keywords in terms of Profitability, ones that you may want to delete or postpone writing about.
-
Percent range -- This function is good for hiding the extremes of Profitability.
Notepad Filter
- Select the Seed Word you want to filter.
- Click on Filter to open the filtering tool.
- Select contains, excludes or starts with for the Notepad column. Enter the word or phrase to filter for.
- Delete the word/phrase if you want to change it. Click the clear link if you want to remove the filtering completely.
The Notepad filter works the same way as the Keyword filter. If you have notes for a lot of keywords, search for (or exclude) a particular word or phrase, or number.
For example, if you've entered notes in several notepads using the phrase "monetization option," you can filter for that phrase and return every keyword with that phrase in the notepad.
Earlier, we mentioned how useful it is to label certain keywords as potential "Tier 2s." Searching on this filter for that finds them all.
If you have many "special words" in your keyword Notepads, keep a list of them in a simple text document. Use this log or diary for easy future reference...
It makes finding them easy. For example, "Tier 2" in your log file reminds you that Notepads with that term indicate which keywords are future Tier 2s (for which you have also entered some of its possible Tier 3s, as described earlier).
PCDM Filter
What the 7 functions mean when filtering PCDM (Predicted Click Demand per Month)...
- Select the Seed Word you want to filter.
- Click on Filter to open the filtering tool.
- Select your filter function.
- Enter the number (or numbers if you selected a range function) to filter for.
- Delete the number if you want to change it. Click the clear link if you want to remove the filtering completely.
-
Greater than -- This function brings back keywords that Google Ads predicts will receive higher numbers of clicks per month.
All things being equal (see above and below), you'll want to write about these keywords before writing about keywords with lower PCDM.
Also look at the number of keywords returned. The more that you see returned by this filter, the more likely you are to earn a good income from AdSense.
-
Less than -- This function brings back keywords that Google Ads predicts will receive lower numbers of clicks per month. You may want to hold off on writing about those topics, other things being equal (see above and below).
-
Range -- This function is good for hiding the extremes of PCDM.
-
Highest x% -- This function, like greater than, brings back the best keywords in terms of the number of clicks that Google Ads predicts they'll receive, keywords you'll want to write about.
-
Lowest x% -- This function, like less than, brings back the worst keywords in terms of the number of clicks that Google Ads predicts they'll receive, keywords that you may want to delete or postpone writing about.
-
Percent range -- This function is good for hiding the extremes of PCDM.
-
" - " -- This function brings back only the keywords with no PCDM number (Google Ads has no PCDM data for this keyword). This means that Google Ads has had no experience with this keyword, and so can't predict how many clicks it will receive each month.
Important Point to Remember
No Value Is an Island
No value can work in isolation. For example, a keyword with a high PCDM value is tempting, but what if the Supply was sky-high? Or what if the CPC was near $0.00? Not so interesting now, right? You have to deal with that...
So, after filtering for the highest 20% PCDM, add a second filter, this time selecting the bottom 30% of Real Supply. Sort it by Keyworth to bring the keywords with the most winnable, high-value PCDM keywords to the top!
If you like the results, save it as a custom task.
Because order counts so much, think carefully when creating a set of filters. The power in your hands is tremendous, if you use these tools well.
CPC Filter
What the 7 functions mean when filtering CPC (Cost-Per-Click)...
- Select the Seed Word you want to filter.
- Click on Filter to open the filtering tool.
- Select your filter function.
- Enter the number (or numbers if you selected a range function) to filter for.
- Delete the number if you want to change it. Click the clear link if you want to remove the filtering completely.
-
Greater than -- This function brings back keywords that are worth more to you in AdSense revenue.
A click on an ad with this CPC is what the advertiser will pay (remember, this tool is for advertisers, not you, the publisher). Google will pay a share of this amount to you.
The higher the CPC, the more this keyword is worth to you. All things being equal (see above and below and remember that "no value can work in isolation"), you'll want to write about these keywords before writing about keywords with lower CPC.
Also look at the number of keywords returned. The more that you see, the more likely you are to earn a good income from AdSense.
-
Less than -- This function brings back keywords that are worth less to you in AdSense. You may want to hold off on writing about those topics, other things being equal (see above and below).
-
Range -- This function is good for hiding the extremes of CPC. Mid-range CPC with lowish Supply but good Value Demand and PCDM will form a solid foundation of winnable keywords that pay.
-
Highest x% -- This function, like greater than, brings back the best keywords in terms of the income you'll likely receive per click, keywords you'll want to write about.
-
Lowest x% -- This function, like less than, brings back the worst keywords in terms of the income you'll likely receive per click, keywords that you may want to delete or postpone writing about.
-
Percent range -- This function is good for hiding the extremes of CPC.
-
" - " -- This function brings back only the keywords with no CPC number (Google Ads has no CPC data for this keyword). This means that no advertisers are paying for ads based on this keyword.
Keyworth Filter
The Keyworth of a keyword is the single best indicator of what a keyword is worth. It takes every important value of a keyword into account... Value Demand, Real Supply, CPC, PCDM.
Even with Keyworth, though, you must use your own human judgment, applying the numbers to the situation and comparing one Keyworth to another by also considering the other individual values and your particular circumstances (e.g., you're starting out with Solo Build It! or you're a veteran who already wins for tough keywords).
What the 7 functions mean when filtering Keyworth...
- Select the Seed Word you want to filter.
- Click on Filter to open the filtering tool.
- Select your filter function.
- Enter the number (or numbers if you selected a range function) to filter for.
- Delete the number if you want to change it. Click the clear link if you want to remove the filtering completely.
-
Greater than -- This function brings back keywords with a high value (a high "Keyworth") to you. The higher the number, the more valuable the keyword is to you.
-
Less than -- This function brings back keywords with a low value to you. These keywords may not earn you much AdSense or other income, but they'll be good for filling out your site, giving your visitors the information they're looking for.
-
Range -- This function is good for hiding the extremes of Keyworth values.
-
Highest x% -- This function, like greater than, brings back the best keywords in terms of the value of those keywords to you, ones you'll want to write about).
-
Lowest x% -- This function, like less than, brings back the worst keywords in terms of the value of those keywords to you, ones that you may want to delete or postpone writing about.
-
Percent range -- This function is good for hiding the extremes of Keyworth values.
-
" - " -- This function brings back only the keywords with no Keyworth number (there is either no PCDM or no CPC data for these keywords).
If this filter brings back a large percentage of your keywords, you may have problems earning a decent income from AdSense, and possibly from other monetization options. Use the Ad Value preset tasks (discussed below) to give you a better sense of this.
Multiple Column Filtering, and How It Works
You can use just one filter, or turn up the power by filtering the results of a filter, which is the basis for tasks (more on this after Sorting) and custom tasks (discussed later).
Step-by-step, add a sequence of filters, sorts and columns. Multiple column filtering is about to become one of your most powerful tools...
Multiple column filtering for the numerical columns is sequential and cumulative. In other words, filtering for A and then B may not bring back the same results as filtering for B and then A.
You'll usually receive the same number of keywords, but the keywords in the list will be different, based on the functions and criteria you used in your filters.
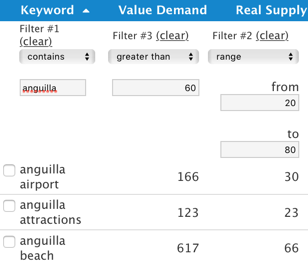
On the other hand, it does matter when you filter on the Keyword column. If you do it last, your filters first work on all the keywords. A different number of "Anguilla"-filtered keywords will likely remain than if you had used Anguilla as your first filter.
That leaves us with these general rules...
-
Know what you're filtering -- all keywords or a keyword-filtered subset. If you're most interested in a specific subset of keywords that contain a specific word, make that your first filter.
-
Know the difference between filtering greater than 60 (see screenshot) and the highest 60%. Ditto for range vs. percent range. You may find it easier to think of setting filters in absolute numbers at first, but percentages generally give you more meaningful results. Think it through.
In the screenshot above, the Supply filters between 20 and 60. That gives you a small list of relatively easy-to-win keywords. If those were percentages, you would get a much larger subset (40% of your keywords). Some would be even easier-to-win keywords (do some trial-and-error testing to fully understand your MKL).
-
Understand that filtering for the lowest (i.e., best) 40% Supply, followed by the highest (best) 25% Demand will cherry pick strong keywords. So will doing the same in the reverse order (i.e., do Demand first).
The first is Supply-driven. If you reversed the order of those two filters, the latter is Demand-driven (i.e., you start with the best Demand-keywords). Either way delivers good keywords. Experiment to understand these concepts.
Play with these rules until you understand each. For example, if you have 330 keywords for "anguilla" and 660 non-anguilla keywords, filtering for keywords that contain "Anguilla" eliminates the 660. The remaining filters work on a much smaller, anguilla-specific subset of the whole MKL. Once you understand that...
Try those two filters, getting more extreme with both, using both absolute and percentage numbers, until you see the difference.
On the other hand, if you've done a good job of pruning / polishing your keywords, there may be diamonds in the other 660. Experiment with the same Supply and Demand filters, except after you first filter to exclude "Anguilla."
Let's summarize the filter in the screenshot...
-
It selects only the keywords containing "Anguilla."
-
It then selects a narrow range of fairly easy-to-win keywords, eliminating a bunch of easier keywords that would be found with the same numbers used as percentages (in the 5-20 range).
-
Next, it wants a Demand > 60. That is going to find good demand keywords, and may even find some high-value, easy-to-win keywords.
The result will be a small number of useful keywords.
Even though % values are likely to be more meaningful, you can't go totally wrong, either way. Understand that...
-
searching for high-demand, low-supply keywords is going to deliver good keyword opportunities
-
percent ranges give you a better example of how good or bad you want each parameter to be.
-
similar principles apply to other numeric columns. Experiment with trial and error to fully understand what you're doing.
This is especially true after you've added the Ad Value columns (Get Google $) and the Keyword Value columns (after reaching the 30-page milestone). The power of this much flexibility can only be fully appreciated by reaching those milestones!
Important Point to Remember
Avoid Accidental Reordering
Given that "order counts," it's important not to accidentally re-order. Let's take the example in #1 above. You like the results, but want to experiment to see if you could do better...
"What would happen," you wonder, "if I went after the highest 10% of PCDM instead of 20%?" That would bring back even higher PCDM keywords, the best half of your original top 20% high-PCDM keywords.
You could just replace "20" with "10" in the PCDM column. But removing the first number (20%) changes the filter order, so then typing in "10" will give different results.
Order counts. Don't mess it up by accident! It's best to always click on All Keywords and create the filters from scratch.
Let's do one!
After you choose your Seed Word (or select all of them), clear all filters by clicking on All Keywords (or All Keywords Ad$ if you're examining Google Ads numbers).
Then add your first filter (e.g., Real Supply "less than" 200). It immediately brings back the subset of keywords (e.g., keywords with Supply less than 200). This is marked as Filter #1 right under the column heading.
So now, you're thinking... "OK, I've found low-supply keywords. Now let's focus on Anguilla by filtering on it."
That's OK. However, filtering on Anguilla first, if that was going to be your focus, would have been a stronger sequence.
Why not select "Anguilla" as your Seed Word and skip the keyword filter? If you use the Seed Word method, it will include any laterally brainstormed keywords that do not contain Anguilla. So you would still need to filter to only show keywords with "anguilla" in them.
Filtering keywords for "anguilla" (as Filter #1) will bring back only those keywords that contain "anguilla."
There's no point in doing both, but recognize that these two options ("Anguilla" as Seed Word vs. Keyword column as the first filter) are not the same. The difference is the non-Anguilla keywords brought back by "Anguilla" as Seed Word.
So... do one or the other, not both.
Finally, find the highest-Demand of these low-Supply keywords. Add a third filter, this time for Value Demand, choosing "greater than" and entering 400 (marked as Filter #3 right under the Value Demand heading, as shown in the screenshot below).
But what if there aren't many "Anguilla keywords" with Demand >400? If you had translated that into a percentage (e.g., "I want the highest 20% keywords"), you would receive a more meaningful set of more keywords.
Finally, when you do find a solid, high-yield "multiple filter," save it as a Custom Task (discussed below).
Customize Columns
The Customize Columns tool allows you to display only the columns you want to look at. Combine this with Save Custom Task to create tasks that hide particular columns when you only want to study certain information.
Reminder
The columns are removed from the MKL's display only. None of your data is lost. You can add those columns back into the MKL at any time, and all the current data will appear again.
- Click on the Columns button to open the Customize Columns tool.
- Add a check to any column that you want to display in the MKL.
- Uncheck any column that you do not want to display in the MKL.
- Click on the white X on the gray circle to close the overlay. Or click on Cancel to close it without saving any changes.
To open the tool, click on Columns in the toolbar.
A new overlay opens, revealing which columns are currently showing in the MKL...

There's no option to hide the Keyword column because all work in the MKL is done based on your keywords. The default is to display all columns except for PCDM, CPC ($) and Keyworth (and # Pages, # SE Visitors, and Best Rank). If you want to remove some of the columns from the display, uncheck them.
If you later decide that you'd like to display any of the hidden columns, click on Columns and add checks to those columns.
Below is a screenshot with only the Value Demand, Real Supply, Profitability and Notepad columns showing, along with the Keyword column...

Blueprint It! has its own Columns tool.
When you're finished, click on the white X on the gray circle to close the overlay. Or click on the word Cancel to close the overlay without saving your changes.
Tips
-
Column options remain "alive" for the current Brainstorm It! session only, or until you click on All Keywords or All Keywords Ad$. Use either as the fast way to display some of the "hidden" columns.
-
If you want to work with only certain columns, create custom tasks that include just your column selections. See Save Custom Task, below, for more information.
Sorting
The Sorting feature "lives" in the blue column headers at the top of the keyword table. The columns you can sort are discussed below.
We cover sorting now because it combines with filtering (discussed above) as an important part of "Tasks" (discussed a bit farther down).
Sorting is a very important tool for understanding each keyword in relation to the others in your MKL. Keep this perspective in mind when you're comparing one keyword with another.
For example, you can do a simple sort to quickly see which keywords have the best Demand (high numbers), the best Supply (low numbers) and the highest Profitability (high numbers). Sorting also occurs automatically after tasks run.
An up arrow (the white triangle in the screenshot below, on the left) sorts text A-Z and numbers from smallest to largest; a down arrow (in the screenshot below, on the right) sorts text Z-A and numbers from largest to smallest.


Sorting works on every keyword on every page at once. You do not have to sort each page individually.
If you just added new keywords to your MKL, the blue words are sorted as a group, and the black words are sorted as a group. To combine all the words before sorting, click on All Keywords.
1) Column Group #1 (The Starters)
Of the default ("Starter") columns, eight are sortable.
Keyword Column
Click on the Keyword Column blue header (which is always the default sort) to sort by A-Z. Click again to sort Z-A to the top.
Value Demand Column
Click on the Value Demand Column blue header to sort by highest Value Demand. Click again to sort lowest Demand to the top.
Real Supply Column
Click on the Real Supply Column blue header to sort by lowest Real Supply. Click again to sort highest Supply to the top.
Profitability Column
Click on the Profitability Column blue header to sort by highest Profitability. Click again to sort lowest Profitability to the top.
Notepad Column
Click on the Notepad Column blue header to sort notepads with saved text to the top. Click again to sort those without saved text to the top.
Pages Column
Click on the Pages Column blue header to sort keywords with published pages to the top. Click again to sort those without published pages to the top.
If a keyword has one page published, you'll see a page icon. If it has more than one published page, you'll see a multiple page icon. Sorting places keywords with more than one page at the top, followed by those with only one published page.
Site Info Column
Click on the Site Info Column blue header to sort by keywords that have saved information. Click again to sort those without saved information to the top.
Checks Column
Sort the checks in the checkbox column (to the left of the Keyword column). To do this, click the far left end of the blue header, to the left of "Keyword") to sort checked keywords to the top. Click again to sort unchecked keywords to the top.
2) Column Group #2 ($ Values)
Once you've used Get Google $, you can use and sort the PCDM, CPC and Keyworth columns...
PCDM Column
Click on the PCDM Column blue header to sort by highest PCDM. Click again to sort the lowest PCDM to the top.
CPC Column
Click on the CPC Column blue header to sort by highest CPC. Click again to sort the lowest CPC to the top.
Keyworth Column
Click on the Keyworth Column blue header to sort by highest Keyworth. Click again to sort the lowest Keyworth to the top.
3) Column Group #3 (Keyword Values)
Once you've published 30 pages, updated your Search Engine HQ reports, and run the SEHQ Brainstorm, you can use and sort the # Pages, # SE Visitors, and Best Rank columns...
# Pages Column
Click on the # Pages Column blue header to sort by highest number of pages. Click again to sort by lowest number of pages.
# SE Visitors Column
Click on the # SE Visitors Column blue header to sort by highest number of visitors. Click again to sort by lowest number of visitors.
Best Rank Column
Click on the # Best Rank blue header to sort by lowest (best) rank. Click again to sort by highest (worst) rank.
Sorting During Manual Filtering
If you do any manual filtering, only the default Keyword A-Z sort is applied to the results. After running your filter, click on any column heading to sort by that column for the info that you most want.
Tips
-
If you want to delete keywords by scanning the MKL and deleting the unwanted, ugly or nonsensical from your entire MKL, set your MKL to show 1,000 rows/page (see top or bottom right for that setting).
Scan and check those that don't belong. Then sort the checked keywords to the top of the first page.
Do a final review of all checked keywords before deletion to ensure that you're not deleting any keywords you want to keep.
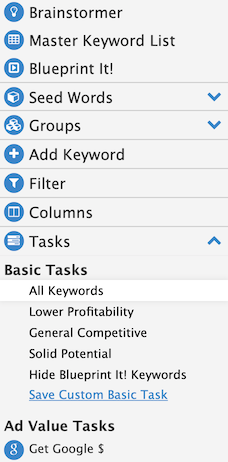
Tasks (Including Get Google $)
Tasks are programmed shortcuts that allow you to evaluate keywords based on certain criteria. Tasks are grouped into the Basic Tasks, the Ad Value Tasks, and the Keyword Value Tasks. The latter two appear at certain milestones...
The Ad Value Tasks are not visible until you've used Get Google $ (DAY 4 of the Action Guide). The Keyword Value Tasks are not visible until you've run the SEHQ Brainstorm after you've published 30 content pages.
In addition to the preset tasks, the three task sections of the toolbar also hold any custom tasks you might create. We discuss custom tasks below.
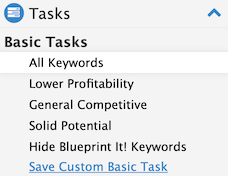
Basic Tasks
All Keywords Task
All Keywords is a task that lets you quickly clear all filters, sorts and columns that you may have applied, whether you set them manually, used one of the preset tasks discussed below, or created a custom task.
Clicking on All Keywords clears everything and returns all the keywords for the selected Seed Word(s) or the entire MKL (if all the Seeds -- or none of them -- are selected). It also switches to the default sort, Keyword A-Z.
Before clicking on All Keywords, if you find a combination of filters, sorts and columns to be especially useful, save it as a Custom Task.
Other Basic Tasks
There are four Basic Tasks (including All Keywords). You'll use All Keywords regularly (a useful "eraser" to start over with a clean slate). You'll find value in the other three tasks in DAY 3, after you've selected your Site Concept and are developing your site's Content Blueprint, as well as periodically after that.
Clicking on any task button immediately runs the filters for that task, then sorts the remaining keywords. Each filter works on whichever Seed Word(s) you've selected. So make that selection before running tasks.
To understand exactly what each task does, click on it after clicking on Filter. This will show you which filters are used along with their settings, and in which order they're set ("Filter #1," "Filter #2," etc). It will also show you which column is being sorted, and in what direction.
You can change the preset filtering numbers in each task. Type in the new number, then delete the pre-entered number. This ensures that the filter order does not change.
Lower Profitability Task
Lower Profitability (selected in the screenshot above) shows you all keywords that are at the low end of profitability. This means words that have a high Supply and a low Demand, as seen here...

The results of this task are sorted by Profitability, lowest at the top. As you move down this list, the profitability gets higher.
If you find any keywords in this filtered list that you think will make good content (based on your knowledge of your visitors' needs), consider using them as the focus of Tier 3 pages after you've created the more profitable pages on your site.
The rest of the words are ones that you'll likely want to delete. Add a check to each of them, then sort them to the top.
Review the checked words to ensure that you're not going to delete any keepers. Then choose Delete Checked from the Select Action menu.
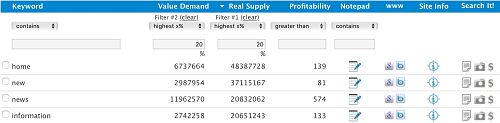
General Competitive Task
General Competitive displays all keywords that have a very high Supply (competition from other websites), and thus are very hard to win, and high Demand. These are usually very general keywords.
For example, you could delete the first three of these one-word keywords -- "home," "news," "information," and "travel" -- in the screenshot below.
For a niche like Anguilla, it may be worth hanging on to "travel" to remind you to include "travel" on the home page or a Tier 2 page to have chances for being found for word combos such as "+Anguilla +travel."
Do not apply this task to your Seed Words individually unless it's just out of curiosity. If you apply it to your Site Concept Seed Word (e.g., "anguilla") in DAY 3, it will find the most general, hard-to-win keywords of your niche (usually your home page and toughest-to-win Tier 2s).
Important: That does not mean to delete those keywords. They'll usually be among the last pages to rank highly, but also your most important (even when they aren't winning direct search traffic).

Just to be clear...
The results of this task are sorted by Real Supply, with highest Supply numbers at the top. This task, if applied to all your keywords, will generally find really generic keywords that should probably be deleted.
It will also show your hardest-to-win, but most important (and profitable), keywords (if used on your Site Concept Keyword in DAY 3). You will not win at the search engines for those keywords for quite a while, but they're still important cornerstones. Do not delete these.
You'll still receive visitors to these pages through...
-
normal site exploration -- these pages are popular, core, navigational pages
-
searches for other keywords or keyword combinations that "accidentally" find these pages, especially for long-tail keywords.
Traffic to your site first starts arriving from searches for keywords that you did not even anticipate. These "one-of" types of keywords are also known as "long-tail" keywords.
As you add some links and content, you start getting found for Tier 3 pages, then Tier 2. The last keyword you'll usually generate search traffic for is your Site Concept Keyword (your home page) since it usually has the highest competition.
When you do start ranking well for your home page, it may ultimately be your most important traffic-builder. Even then, though, your Tier 2 and 3 pages will add up to way more traffic than your home page has.
In the screenshot above, "anguilla hotels" is a competitive term, but would make for a valuable Tier 2 page with Tier 3 pages about specific hotels on Anguilla.
Your best plan? Create pages for the harder-to-win Tier 3 keywords after you've written your Tier 2 pages and your Tier 3 pages with lower Supply.
Delete any keywords that are clearly not relevant to your Site Concept, or would not become part of a keyword combo with your Site Concept Keyword (e.g., "+Anguilla +travel").
Solid Potential Task
Solid Potential gives keywords that have mid-range Supply (not too much competition, but enough to tell you that the keyword is popular), and have high Demand.
High Demand and mid-range Supply keywords are the ones with solid potential, the ones you'll want to focus your site on.

Results of this task are sorted by Profitability, highest at the top. Unlike keywords found by the General Competitive task, pages about keywords in this list should be found sooner by people searching for these terms.
Since Demand is high, these pages should add up over time to deliver a solid amount of traffic. If they have commercial value (i.e., high Keyworth), all the better!
So write pages about these keywords first (Tier 2, then Tier 3), before writing about competitive Tier 3 keywords or relevant Lower Profitability keywords.
A few of these pages will make great monetizable Tier 2 pages, while others will make very good Tier 2 hub or interlink pages. And the rest will make excellent Tier 3 content pages with good monetization potential.
The Lower Profitability task is preset to bring back the 50% of keywords with the highest Supply. It then filters those keywords to bring back the 30% with the lowest Demand. You end up with 15% of the original number of keywords (.5 x .3 = .15), all with high Supply and low Demand (which equals low Profitability).
You can change the filtering functions (e.g., from lowest x% to percent range) or the criteria (numbers). You can also change the filter order. If you want to save the changes, create a Custom Task with the new settings.
The General Competitive task is preset to bring back the 20% of keywords with the highest Supply. It then filters those keywords to bring back the 20% with the highest Demand. You end up with 4% of the original number of keywords (.2 x .2 = .04), all with very high Supply and very high Demand.
You can change the filtering functions (e.g., from highest x% to percent range) or the criteria (numbers). You can also change the filter order. If you want to save the changes, create a Custom Task with the new settings.
The Solid Potential task is preset to exclude the top and bottom 20% of Supply, leaving only keywords in the 20% to 80% range. It then filters those words, returning only the ones with the highest 60% of Demand. You end up with 36% of the original number of keywords (.6 x .6 = .36), all with higher Demand and mid-range Supply.
You can change the filtering functions (e.g., from percent range to highest x%) or the criteria (numbers). You can also change the filter order. If you want to save the changes, create a Custom Task with the new settings.
Important Option
If you're using 2 or more filters (with a preset task or custom task, or manually), you can remove one of the filters with a single click.
Click on any clear link to the right of "Filter #" (see the screenshot below) to remove that filter from the process.
If you were using two filters, only one would remain. If you were using three filters, you would have only two after the click.

If you want to keep the filter but change the number (or word), click in the box and delete the existing characters. Then add the new ones.
Note that the filter order will change. If you want the same filter order, type in the new characters, then delete the old characters, so that the box is never empty.
You may find that some keywords appear in the results of both the Lower Profitability task and the Solid Potential task. Why? Because of the overlap in the percentages used in these preset tasks.
Since Lower Profitability finds the 50% with the highest Supply, and Solid Potential finds the mid-range Supply (20% to 80%), the same keywords appear in the 50% to 80% range.
Important Note About Deleting Keywords While Using Filters and Tasks
With absolute number filters, whenever you delete a keyword, the remaining keywords in the filtered set will drop by one. There are no others that match your absolute number criteria.
Percentage filters are constantly "working."
For example, when you use one or more "manual" percentage filters or when you use any of the three tasks (which all use percentage filters), then delete keywords, you'll see other keywords replace the ones you deleted (to keep the filter's % figure constant).
Depending on the nature of what you're doing, the replacements will be borderline keywords that "just missed" making it the first time around. This way, you have a constant set of keywords to work with.
The number will go down slowly as you start deleting more and more keywords from that subset. Continue keeping the good ones and deleting the bad ones. Stop when only good ones are left.
If you like, repeat the filter, "widening" it a bit to increase the number of keywords, and start filtering again.
Continue to get more skilled with filters, even after you've picked your niche and fully brainstormed it. Mix "absolute number" filters with "percentage" figures to build new filtered sets.
At some point, it will stop making sense to do this work, until you do a new brainstorm. When new brainstorming brings back fewer than 100 words, it's easier to just review the 100 by eye, manually sorting by various columns (e.g., Real Supply, Profitability, CPC).
Do it right after your brainstorm, before mixing them into the "general population" of your MKL.
Hide Blueprint It! Keywords Task
Hide Blueprint It! Keywords hides all the keywords in the MKL that you have already sent to Blueprint It! (BPI!). This reduces the size of your MKL, making it easier to work with as you evaluate keywords for your Content Blueprint.
After you move keywords to BPI!, if you haven't hidden them in the MKL, they will appear with a light gray background. This also tells you which keywords you've moved to BPI!.
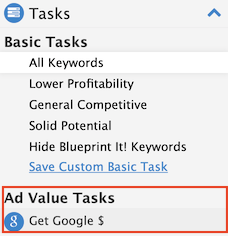
Ad Value Tasks
Get Google $ Task
Important
If you find yourself here in DAY 2 or 3, skip this section and anything to do with Google AdSense (PCDM, CPC and Keyworth, and the Ad Value Tasks) until you have chosen your Site Concept Keyword, have completed your DAY 3 work, and are in DAY 4.
If you're still unsure of which niche to choose after DAY 3, you can "do" DAY 4 before making a final decision. In general, though, it's best to make a decision by the end of DAY 2 (DAY 3 at the latest), based on the criteria outlined there.
The goal of DAY 4 is to ensure that you selected a niche that can be monetized well in the short, medium and long term.
If your chosen niche fails DAY 4, you can always refine it or go back to your second-place finisher and see how it does in terms of monetization potential.
The Get Google $ tool retrieves PCDM (Predicted Click Demand per Month) and CPC (Cost-Per-Click) numbers for each keyword from Google Ads.
It then calculates the Keyworth of each keyword. The Keyworth of a keyword is the single best indicator of what a keyword is worth.
Clicking on Get Google $ (screenshot above) opens the overlay (screenshot below). Click on Cancel, or on the white X on the gray circle, to close the overlay.
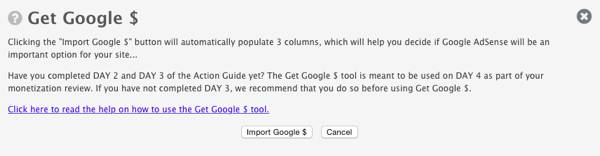
Click on the "Click here to read the help" link to read this help.
After you import the file from Google into the MKL, it displays the new numbers (from Google) in new columns -- PCDM and CPC ($), along with Keyworth. A new set of tasks, the Ad Value Tasks, appears below the Basic Tasks.
Predicted Click Demand per Month is a number that Google provides. This number is an indication of the number of clicks that Google thinks an ad using a particular keyword will receive in one month. For example, if the PCDM is 240, Google is saying that it thinks this keyword will receive 240 ad clicks in the current month.
The PCDM numbers increase by multiples of 30.
Note: All numbers are based on exact match keywords, e.g., if your keyword is "anguilla hotels," this tool brings back click demand for "anguilla hotels" and excludes click demand for "hotels anguilla."
If Google has no PCDM number for that keyword, a " - " displays in the PCDM column.
Cost-Per-Click (CPC) is the Google Ads maximum price that advertisers must pay to have an ad appear in the top three positions in Google search results or on a web page displaying AdSense ads. For example, if the CPC is 1.50, then an advertiser will pay up to $1.50 (it may be less) to have an ad appear in one of the top three positions.
Note: This number is an estimate from Google. All prices are based on exact match keywords, e.g., if your keyword is "anguilla hotels," this tool brings back prices for "anguilla hotels" and excludes prices for "hotels anguilla."
If Google has no CPC number for that keyword, a " - " displays in the CPC ($) column.
Important
The CPC is what an advertiser may pay, not what you receive from Google if someone clicks on an ad on one of your pages. You receive a share of what the advertiser pays, in the 67%-70% range (at this time).
The Keyworth of a keyword is derived from an algorithm that takes into account the Value Demand, Real Supply, Profitability, CPC and PCDM of that keyword.
If Google has no CPC number or PCDM number for that keyword, a " - " displays in the Keyworth column. If Google's PCDM number equals 0, a Keyworth number is calculated and displays in the Keyworth column.
Important Note
If you do not already have a Google Ads account, you will be asked to create one.
You may need to have a website. Since you're in DAY 4 and have not yet registered a domain name, you don't have a URL. So use Google Sites to create a free site (no strings attached) with any name you want to use.
Go to this URL to create your new "site"...
Note: Google Ads may require that you set up an ad campaign and fund it. If that happens, add a small amount ($5) and create your campaign. But you do not have to run any ads at this time.
Save the campaign until after your site is set up, then use the campaign to drive some traffic to your site in the early days.
Copy the URL of your Google Sites site, and then paste it into the Google Ad account setup page.
Set up your account in USD (US dollars). While Brainstorm It!'s Get Google $ may accept file uploads using other currencies, if you use the USD, you will not have to worry about whether the file will upload.
If you already have an account in another currency, set up a second account using another Gmail address.
Steps to Retrieve and Import Google Data
- Eliminate generic words, nonsense words, etc. in your MKL.
- Click on the Select Action menu and select Export All (kw only). Locate the CSV file in your downloads location.
- Go to Google Ads.
- Click on Get search volume and forecasts.
- In the Get search volume and forecasts section, upload the CSV file from your downloads location.
- Click on Get Started.
- Click on the Download (down-pointing) icon to the left of Create campaign in the top right.
- Click on the Plan forecasts (.csv) option. The file will download to your default location.
- Click on Get Google $ in your MKL.
- Click on the Import Google $ button to import your Google Ads file. The file ends with .csv.
-
Begin by honing down your MKL to the best set of keywords possible. Eliminate generic keywords, nonsense keywords, and so on.
-
Click on the Select Action menu and choose Export All (kw only).
The file (called all-keywords.csv) will download to your computer.
-
Locate the file in your downloads location.
-
Click on this link to go to Google Ads. You must have a Google account, and a Google Ads account. If you don't have a Google Ads account, see the setup instructions, above.
-
In the Keyword Planner, click on Get search volume and forecasts.
-
In the Get search volume and forecasts section, upload the CSV file from your downloads location.
-
Click on the Get Started button.
-
Click on the Download (down-pointing arrow) icon to the left of Create campaign in the top right. Select the Plan forecasts (.csv) option. Save the file to your default downloads location.
-
Open the Get Google $ tool in your MKL if it's not already open. Then click on Import Google $. Browse to the downloaded file. The name will look something like this...
Keyword Forecasts 2023-07-18 at 06_14_11.csv
If you can't find it, use your computer's Find feature and enter "csv" (without quotes), which should find all the files that contain csv in their names. Select the file you want to upload.
-
Upload the file.
How to Use the Data From Google Ads
The obvious use of this data is for determining how well AdSense should pay. For example, the combination of CPC (cost per click) and PCDM (clicks per month) is a good indicator of how much each topic is "worth." Multiply the two to get a relative indication of how much is paid out per month for that keyword, compared to other keywords.
Google is going to pay out a percentage of that amount. It doesn't matter who receives it, but it matters to you! So you also have to factor in Supply and Demand, the ratio of which (Profitability) affects how much of the payout you're likely to earn. For example...
If Supply (competition) is low, you're more likely to get a piece of that. A high Value Demand is also a good thing for you. That's why Keyworth is so useful. This calculation turns all factors into a number that indicates your AdSense potential, relative to other keywords in your MKL.
Sorting by Keyworth gives you a rough idea of your best opportunities for AdSense income. It's rough because Google's algorithms are complex. But it's a reasonable measure of where to put your effort into collecting AdSense income from your keywords. However, the data Google gives us tells us much more than that...
This data is also an excellent, indirect indicator of "monetizability." Consider this...
The keywords that have high CPC and PCDM values are not just a reflection of what Google pays out! Google only pays out $X if it took in, let's say, 30% more than $X from advertisers. Right? OK, let's continue that thought...
Why would advertisers be willing to pay that to Google? Because they're able to make even more by selling a product or service related to those keywords! And here comes the beauty of the Internet...
 In the pre-Internet days of TV advertising, the chronic complaint of advertisers was widespread (see the graphic on the right). They just didn't know how well and which ads worked.
They do with the Internet!
That brings us to the final important question and conclusion...
What does that mean?
Advertisers are making money from the products and services they sell.
And that fact, finally, leads to you!
You, too, could be selling your own goods or services related to those keywords! How?
Start by examining your MKL for hints...
Click on All Keywords Ad$ so you can see Value Demand, Real Supply, Profitability, PCDM, CPC and Keyworth. Those are your "money columns."
Start by sorting on Keyworth (highest to the top). What does the owner of anguilla-beaches.com see? Summarizing/grouping them, in order of importance, she notes the following...
-
Hotels (both specific ones and keywords like "anguilla hotels")
-
Resorts and villas (both specific resorts and "anguilla resorts" / "Anguilla villas"
-
Generic ("Anguilla vacations" and "Anguilla beaches")
-
Flights ("flight to Anguilla" and "Anguilla flights")
-
"Cheap" turns up twice
-
Anguilla snorkeling, golf and nightlife
-
Accommodations, car rentals
Next sort by CPC. Who will spend the most per click? Specific hotels and "car rental in Anguilla" (non-specific). And "Anguilla all inclusive" is interesting -- that does not exist in Anguilla, but people search for it and someone's paying for that term! Keep going down the list for ideas.
Sorting by PCDM gives more generic terms, which makes sense. The ads that cost less are going to get more clicks -- the owner of anguilla-beaches.com notes "anguilla all inclusive" again and "best hotels in anguilla." "Shoal Bay Anguilla" (the most well-known tourist beach) is there, as are generic searches for hotels, flights, etc.
Continue sorting and interpreting.
By now, anguilla-beaches.com, a mature site with strong traffic and even stronger branding (grown through social media) is ready for something bigger. The owner has progressed from passive monetization to maxxed out site sponsorships and a popular discount card...
"The Anguilla Card" capitalizes upon "cheap" and all the things that visitors pay for by giving them 10% off. It was a hunch four years ago, but this data would have given her strong confirmation. It might even have given her the idea.
Where to now? She's experimenting with booking.com as an affiliate, so far failing with it. If a model can't earn her $1,000 per month, she's wasting time and ad space.
And she'll never go back to AdSense.
She has reached the stage where solopreneur may be ready to turn into entrepreneur. She had been considering the purchase of a small hotel with a low vacancy rate (she could fill it up) or an Anguilla-inspired fashion line of summer/tropical wear.
The latter is clearly much more risky. No one is searching for clothes. But no one has a reason to. Could she bring her many thousands of faithful fans into a related but different niche?
A quick look at the Get Google $ data has given her some valuable information. It's time to go deeper, into the specific tasks that we've set up.
Working With Ad Value Tasks
To work with the numbers that this tool retrieves, click on any of the Ad Value Tasks (see below for how to best use these tasks). DAY 4 discusses what to look for from each task.
The data is also useful for someone with hundreds of pages and a ton of traffic. Interpret this data in light of your "advanced DAY 10 results" (Best Rank, # SE Visitors, etc.), and how far you've progressed.
This points the way to progress from low-paying passive monetization to higher-paying, more active forms of income. When does this happen?
As your business matures, as time prioritization moves toward active monetization, and as you have the cash flow to bring a virtual assistant, part-timer or even full-timer onboard to free you up for what's most important.
But we'll back up for a moment to DAY 4, where folks are at the planning stage.
Work with the four Ad Value Tasks only when you reach DAY 4, after you've selected your Site Concept and developed your site's Content Blueprint, and are studying the monetization potential and options of your site.
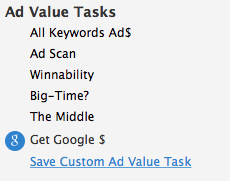
Ad Value Tasks do not appear until after you have imported data from Google Ads for the first time.
The Ad Value Tasks are...
All Keywords Ad$ Task
The All Keywords Ad$ task returns all the keywords, displaying only the ad-related columns noted above.
Use All Keywords Ad$ to clear all filtering and/or sorting you may have applied to the keywords of a particular Seed Word, or to the entire MKL. This function works for any manual filtering you set yourself, and for the other four Ad Value tasks.
This task works by Seed Word. If all Seed Words are selected, then every keyword is returned with the relevant ad numbers. If "anguilla" is the only selected Seed Word, then only the keywords attached to "anguilla" appear.
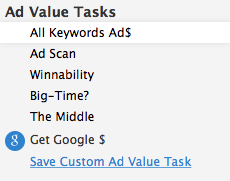
It clears the filtering, and returns all the keywords for the selected Seed Word(s) (or the entire MKL). It also switches to the default sort, which is Keyworth, highest to lowest.
Note 1: It's also useful for switching over to Ad Value tasks from any of the Basic tasks, clearing everything as usual, and showing you the default set of columns for working with Ad Value Tasks.
Note 2: Neither the All Keywords Ad$ nor its cousin in Basic Tasks, All Keywords, clears the selected Seed Word(s). To clear them, click on Seed Words to view them and then click on All (or None).
Other Ad Value Tasks
There are four other Ad Value tasks that have preset filters and sorts (to see the task functions, click on Filter in the toolbar)...
-
Ad Scan shows you keywords with a Keyworth greater than 0. This means that both CPC and PCDM have a value. There's money to be made on these keywords.
Add Demand, Supply and Profitability columns and sort this "Ad Scanned" set of keywords by each column. This is an excellent monetization brainstormer. Ask yourself the following...
"Aside from ads (which are OK), how could I really monetize the potential that I've found here?"
-
Winnability returns all keywords with a good correlation between Value Demand and PCDM, as well as reasonably winnable Supply. This means that Value Demand and PCDM are telling you roughly the same thing, that there's sufficient demand for this keyword, with Supply being, well, winnable!
-
Big Time? gives you the keywords that are good money-makers, including "big-money" keywords (words with a high CPC and a good PCDM value). It also returns high competition (high Real Supply) keywords.
-
The Middle returns the "heart" of your MKL in terms of the "monetizability" of the topics of your site. In other words, pages that are likely to do very well with AdSense ads placed on them, or topics with "money in them" for which you could create your own product or service.
Clicking on any task immediately runs the preset filters for that task.
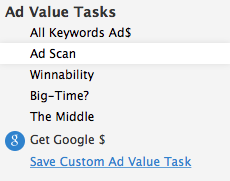
Ad Scan Task
The Ad Scan task returns all keywords with a Keyworth greater than 0. In other words, it returns all keywords that are "worth something." It enables you to do a high-level scan for "ad value" (or more broadly, topics that could monetize well).
In truth, almost all keywords are "worth something" since Google will usually be able to place a generic ad that's vaguely related to something on each page! It's just that keywords with a Keyworth greater than 0 are usually worth "something more."

The results of this task are sorted by Keyworth, highest values to lowest values.
The more keywords listed by this task, the higher your income level is likely to be. The more keywords with high Keyworth numbers, the more valuable each of your visitors to those keywords' pages become.
See DAY 4 of the Action Guide for general numeric guidelines.
The Ad Scan task is preset to bring back all the keywords that have a Keyworth greater than 0. In order to have Keyworth greater than 0, a keyword must have a CPC greater than $0.00 and a PCDM greater than 0, since Keyworth values depend on CPC and PCDM values. Therefore, this task lets you do a high-level scan for keywords with "ad value" or, more broadly, topics that could monetize well.
This task shows only the Keyword, PCDM, CPC, Keyworth and Notepad columns, sorted by Keyworth.
You can change the filtering function (e.g., from greater than to percent range) or the criteria (numbers) from 0 to a larger number.
Winnability Task
The Winnability task gives you all keywords with CPC greater than $0.50 with lowish competition (less than 500), and that also have a strong correlation between Brainstorm It! and Google Ads that these keywords are in demand.
They have good Value Demand and PCDM (greater than 149 and 29, respectively) that confirm there are people searching for these keywords, and clicking on ads for/buying products for them.

The results of this task are sorted by PCDM, highest to lowest.
Think of it as "Quality Winnability"... keywords that pay and are winnable.
Use this task to find keywords that will be relatively easy to win, have some demand, and have a reasonable cost per click (at least 50 cents -- you earn a portion of the CPC, so the higher the CPC, the more you're likely to earn)... and they get the click.
Again, the fact that there's Google Ads money in a keyword shows that advertisers are making money from selling their products and services. If they are doing that, you could make money by selling a product or service based on that keyword, too!
See DAY 4 of the Action Guide for general numeric guidelines.
The Winnability task is preset to display all keywords that have a CPC greater than 0.5 (greater than 50 cents), Value Demand greater than 149, PCDM greater than 29, and Real Supply less than 500.
In other words, these are keywords that have a proven record of paying ad money to publishers (or earning income for product creators), and they're relatively easy to rank for.
This task shows the Keyword, Value Demand, Real Supply, PCDM, CPC, Keyworth and Notepad columns, sorted by PCDM.
You can change any of the filtering functions (e.g., from greater than to percent range) or the criteria (numbers).
You can also change the filter order of the task. If you make any changes to the task, and want to save them, create a Custom Task for your new filter set.
Big-Time? Task
The Big-Time? task provides keywords that can be your big money-making keywords. If there's money to be made with AdSense, you know that these are popular and monetizable keywords. You also know that much better money can be made by becoming one of the product sellers yourself.
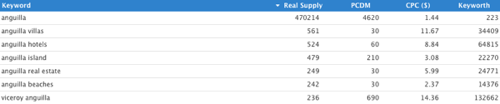
The task filters for keywords that have CPC over $1 and PCDM greater than 29. The results of the task are sorted by Real Supply, highest to lowest.
Use this task to find big-money keywords with reasonable competition. You'll most likely find the best of these keywords about 1/3 of the way down this list, when the Supply becomes more winnable.
See DAY 4 of the Action Guide for general numeric guidelines.
The Big Time? task displays all keywords that have a PCDM greater than 29 and a CPC greater than 1 ($1.00). The words it returns are ones with reasonable to high competition.
This task shows the Keyword, Real Supply, PCDM, CPC, Keyworth and Notepad columns, sorted by Real Supply.
You can change any of the filtering functions (e.g., from greater than to percent range) or the criteria (numbers).
You can also change the filter order of the task. If you make any changes to the task, and want to save them, create a Custom Task for your new filter set.
The Middle Task
The The Middle task shows you those keywords that make up the heart of your AdSense monetization, what we call the "AdSensibility" of the topics that you write about.
Equally, it shows you those keywords with money in them more generally. Why settle for low $-per-visitor ads for someone else's products when you can sell a product of your own?
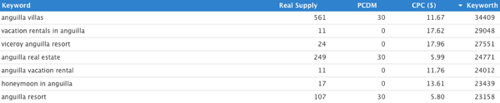
The task filters on the middle 50% by Keyworth, then filters for keywords with CPC greater than $0. The results of this task are sorted by Keyworth, highest value to lowest.
Use this task to decide if there's a sufficient number of mid-range keywords to make this niche a worthwhile investment of your time. For example, if few keywords appear after running this task, there may not be much monetizable depth to this niche.
The more keywords there are here, and the higher the Keyworth numbers in the midrange, the easier it will be to earn an income from your site.
See DAY 4 of the Action Guide for general numeric guidelines.
The Middle task displays all keywords that have a CPC greater than 0 ($0.00) and a Keyworth in the 25%-75% range. In other words, the heart of all the money-earning keywords.
This task shows the Keyword, Real Supply, PCDM, CPC, Keyworth and Notepad columns, sorted by Keyworth.
You can change either of the filtering functions (e.g., from greater than to percent range) or the criteria (numbers).
You can also change the filter order of the task. If you make any changes to the task, and want to save them, create a Custom Task for your new filter set.
Tip
-
Try sorting this list by highest CPC to the top. Are most of the numbers well above $1.00, or are most below $1.00. The more that are higher than $1.00, the better.
Keyword Value Tasks
There are eight preset Keyword Value Tasks. You'll have access to them after you reach the 30-page milestone, update the reports in Search Engine HQ, and run the SEHQ Brainstorm.
The SEHQ Brainstorm adds all the keywords people used at Bing and Yahoo! to visit your site, and will add three new columns and these eight tasks to your MKL.
Five of the tasks will help you generate more traffic to your site. The other three will help you earn more money from the pages using those keywords.
Clicking on any task button immediately runs the filters for that task.
To understand exactly what each task does, click on it after clicking on Filter. This will show you which filters are used, along with their settings, and in which order they're set ("Filter #1," "Filter #2," etc).
The preset filtering numbers in each task can be changed. Delete the pre-entered number and type in the number you want to use.
Where's the Traffic? Task
Where's the Traffic? is a task that works on keywords that you've already written about. Based on your keyword research, they're receiving less traffic than the numbers indicated. The filtering displays all keywords that have at least one page and also have fewer than 10 visitors. The results are then sorted by Profitability.
Review these pages to see what you can do to improve them (including adding synonyms so they're found for more keywords). Focus on improving the title and description, which appear in search results. And combine "thin" pages (ones with little content) to create a more substantial and valuable page.
Can Rank Higher Task
Can Rank Higher is another task that works on keywords that you've already written about. It returns all the keywords that have at least one page, and the best rank for the keyword is 11 or worse. These are sorted by the Best Rank, worst rank at the top.
What can you do to help these pages improve their ranking in the search results? Perhaps you can improve the title and description. If both are already good, you may need more links in to the page from other sites, especially blogs and sites that already rank well.
More Traffic Task
More Traffic is a task that works on keywords that have no pages written about them. They also have a Real Supply greater than 5, and a profitability greater than 10,000. In other words, these are high value keywords (low supply and high demand) that you haven't written about yet. They're sorted by Real Supply, lowest at the top.
The best plan is to publish a new page for each of these keywords. Since the supply is low, you have a good chance of ranking high in search results, which will bring traffic to your site. If these keywords don't fit into your blueprint, then add them to relevant existing pages, so that you have a chance at collecting some traffic for them.
Quality Traffic Task
Quality Traffic uses the same filters as More Traffic. However, it sorts by highest Value Demand. This gives you keywords that you have not yet written about yet have high traffic numbers to other pages of your site.
After publishing or consolidating pages for More Traffic, publish some for these keywords, since they have high demand numbers.
Overused Keywords Task
Overused Keywords reveals keywords that you've used to create too many pages. In other words, you're missing out on opportunities to rank for other keywords.
This task filters for more than 10 pages with the same keyword, sorted by the highest number of pages.
Click on the link to see which pages use the same keyword. Then determine whether you can change the Specific Keyword for any of them. (If you do, you may have to tweak the content to make it relevant to this slightly different keyword.)
More Money Task
More Money is the first of the tasks that can help you earn more money. It filters first by # Pages (pages using the keyword), then by CPC (greater than 0), then by PCDM (also greater than 0). It then sorts the keywords by Value Demand, highest at the top.
Since these are keywords already sending traffic to your site, create pages about them to collect some of that income.
Easy Money Task
Easy Money uses the same filters as More Money. However, it sorts by lowest Real Supply. These are keywords to write about that you can rank well for and earn an income.
The income potential per page will be lower than with More Money. More traffic will come to these pages though, so you'll be able to "make it up on volume."
Most Money Task
Most Money also uses the same filters as More Money, and Easy Money. It sorts by Keyworth, however. So these are the highest value keywords.
They could be the most difficult to rank for in search results. When they do, since their income value is higher, they will earn you more income.
Save Custom Task
- Set filters, sorts and columns the way you want them. Or change a preset task.
- Click on Save Custom Basic Task or Save Custom Keyword Value Task or Save Custom Ad Value Task to open the tool.
- Enter a New Task Name.
- Enter a New Task Description (optional).
- Click on Save New Task.
- Click on the white X on gray circle to close the tool. Click on Cancel if you don't want to save the custom task.
The Save Custom Basic Task, Save Custom Keyword Value Task and Save Custom Ad Value Task tools allow you to build and save your own tasks.
Want to view keywords with a different sort or sort order? Want to show a different set of columns? Want to change the criteria in one of the preset tasks?
Create a custom task with a combination of filters, sorts, and columns.
If you like what a custom task does, click on Save Custom Basic Task or Save Custom Keyword Value Task or Save Custom Ad Value Task (depending on the columns you want to display), name it so you won't forget what it does, and save it.
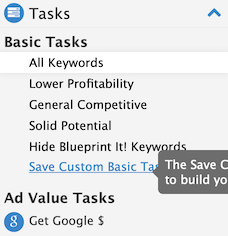
Your descriptive name can be a maximum of 25 characters (letters and numbers, periods and commas, < and > only).
The optional description (recommended) can be a maximum of 150 characters (letters and numbers, periods and commas, < and > only). The description you type here becomes the tooltip text when you hover over the task in the toolbar.
After clicking on the Save New Task button, your new custom task appears with the name you gave it below Solid Potential or Hide Blueprint It! Keywords in Basic Tasks, below Most Money in Keyword Value Tasks, or below The Middle in Ad Value Tasks...
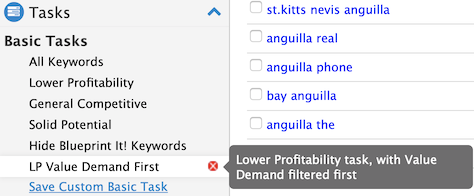
To add more tasks, repeat the process above. Each new task will appear below the last task in the relevant set.
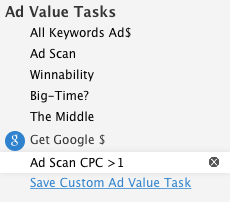
To delete a custom task, click on the light gray X on the darker gray circle, to the right of the task name. When you hover over the X, the gray circle turns red...
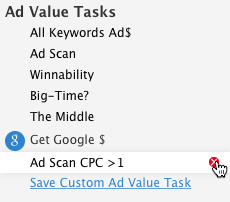
You'll be asked to confirm deletion of the task. Click OK to delete it.
Tips
-
You can switch between Seed Words while using the same custom task, just as you would with a preset task. You can also change any of the settings in your task, for this session only. If you want to keep the new settings, create a new custom task.
-
Use All Keywords or All Keywords Ad$ to restore all your keywords (based on Seed Word selection) and remove any custom task filtering, including any hidden columns or columns you added to the MKL.
-
If you want to always work without extra columns displaying in your MKL, create a task that lets you quickly switch to the hidden column view. Click on the Columns button and uncheck those columns you don't want to use. Then save the custom task, giving it a name and description.
Improving a Preset or Custom Task
The next time you run a preset task, you may decide to "loosen" the values.
-
This time, you know to start with "Anguilla" as the Seed Word.
-
Supply that's less than a higher number (say, 400) brings back more keywords than the original choice (200).
-
Demand greater than 300 (instead of 400) brings backs more, too.
-
Note: In each case, there are more words now, some of which are not as favorable. But overall, they're still relatively easy to win.
-
You also choose to show the CPC column and add an extra filter for CPC "greater than" 0, as a final filter.
-
And you decide to sort by Keyworth (a good overall measure of monetizability), highest to the top.
Your logic?
"Loosening" Supply and Demand will bring back more keywords. There will be more keywords, but overall not as favorable. The upside is that it gives you more keywords for the CPC filter to work on. You might not have been left with many keywords if you had not created more space for this new filter.
This new filter, complete with a monetary element, delivers a still relatively easy-to-win set of keywords with good-enough demand. This time, they also have a CPC (most keywords are not bid upon, so they don't have a CPC), a strong indicator for monetizability.
Your final decision is to sort highest Keyworth to the top (after experimenting with PCDM, a factor that's independent of CPC).
Let's save this new set of filters as a custom task with a shorthand name that you can you make sense of...
S<400:D>300:CPC>0:Kworth^
Can you make sense of that that name? Good! It shows the order in which they're performed, the values for each, and finally the sort factor and direction (^).
We suggest you use this format so that everyone in the forums can "speak the same language," for when you want to share or discuss information about a task.
Get used to "coding" your name for each custom task identically, every time. It'll make your life easy when you have a bunch of tasks and can't remember exactly what a simpler name means. You have a limit of 25 characters, so you may have to get creative!
Delete the first custom task if the new one gives you superior results (you can't delete preset tasks). Or keep both custom tasks if the first one gives you a very different set of keywords and both are worth creating content, albeit for different reasons.
Through trial-and-error such as this, you'll hone your skills with this tool.
Important: You can do more than use multiple column filtering to find and keep excellent keywords. Use it to find poor keywords, too. Delete those that would never belong in your site or are just too low-value to ever bother about.
Using Custom Tasks
To use a custom task, click on its name in the toolbar. All the settings saved with that task (filters, sort and columns) will immediately take effect.
Restore all the keywords and columns by clicking on All Keywords or All Keywords Ad$.
Check All/Uncheck All
The top left corner of the keyword table has several keyword management tools...

To delete any keyword, or to export checked keywords, or to send checked keywords to Blueprint It!, click on the checkbox beside each keyword (more on these actions in a moment). The entire row for each checked keyword turns blue...
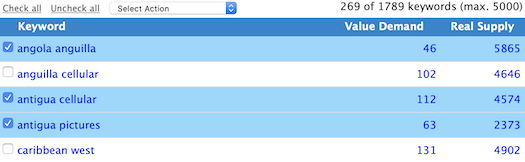
You can add checks individually, or click on Check all to check every keyword on the page. Uncheck all removes all the checks on the page.
When you Check all, SBI! checks only the keywords in the current set of keywords, shown on the page.
For example, if you checked all the keywords generated by the Seed Word "caribbean," no other keywords are checked (e.g., those generated by "anguilla" are left unchecked). Unchecked words are not affected by any further actions.
Checking and unchecking must be done on each page of keywords. There's no function that adds and removes checks across all MKL pages at once. However, as you advance from page to page, your checks (and unchecks) from previous pages are remembered.
To quickly delete most of the keywords on a page, use Check all to check all of them, then uncheck the ones you want to keep. Delete the ones with checks.
Select Action, Delete, Export, Send to Blueprint It!
Select Action
The Select Action drop-down menu contains eight tools that let you decide what to do with your keywords.
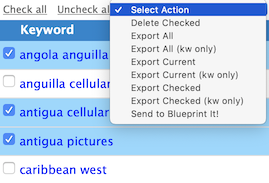
Delete Checked
To prevent accidental deletion of all your keywords, there's no Delete All function. You can delete only keywords that you've given a check. And Check all works page-by-page only, also to protect you from deleting keywords that you may not yet have studied.
If you add a check to individual keywords, sort them to the top to ensure you checked only those keywords you want to delete.
Deleting all the keywords associated with a Seed Word is the only way to remove that Seed Word from the menu.
Export
There are several export options, starting with the fastest and simplest...
-
Export All (with the associated data for each keyword, or without -- kw only). One click and you've exported all your keywords as a .csv file. You'll receive them sorted alphabetically. If you want them sorted in a different order (e.g., by Profitability), use your spreadsheet's sort feature to sort them by the applicable column.
If you plan on using the exported keyword only list with the Get Google $ tool, you can choose to have the keywords ready for copying and pasting into Google Ads.
You'll be asked whether you'll be uploading the keywords to Google Ads. Agree and you'll receive a slightly modified .csv file. Open it, highlight all the keywords, and copy them.
-
Export Current All the keywords currently displaying in the MKL will be exported, with or without the data. Simply select a Seed Word and/or use a filter or task. Then export the keywords that appear, including ones on additional pages.
You'll receive a .csv file, with the keywords sorted alphabetically. If you want them sorted in a different order (e.g., by Real Supply), use your spreadsheet's sort feature to sort them by the applicable column.
If you plan on using the exported keyword only list with the Get Google $ tool, you can choose to have the keywords ready for copying and pasting into Google Ads.
You'll be asked whether you'll be uploading the keywords to Google Ads. Agree and you'll receive a slightly modified .csv file. Open it, highlight all the keywords, and copy them.
-
Export Checked Add a check to each keyword you want to export, with or without the data. If you use this option, sort all the checked keywords to the top to ensure you checked only those keywords you want to export.
You'll receive the keywords sorted alphabetically. If you want them sorted in a different order (e.g., by Value Demand), use your spreadsheet's sort feature to sort them by the applicable column.
If you plan on using this exported keyword only list with the Get Google $ tool, you can choose to have the keywords ready for copying and pasting into Google Ads.
You'll be asked whether you'll be uploading the keywords to Google Ads. Agree and you'll receive a slightly modified .csv file. Open it, highlight all the keywords, and copy them.
All keywords are exported alphabetically, A to Z, regardless of any sorting you may have done in the MKL prior to the export.
Note: The Export function exports only the keyword and its numbers. It does not export its Notepad notes or Site Info information.
Send to Blueprint It!
To create and manage your Content Blueprint, you must first add some or all of the keywords in your MKL to Blueprint It!. You do that with Send to Blueprint It!.
Any keywords that you have checked (and now have a blue background) can be sent to Blueprint It!.
You will remain on the MKL tab, and all keywords that you just sent over now have a darker gray background. You can then hide those keywords using the Hide Blueprint It! Keywords task in the set of Basic Tasks (discussed above).
If you want to work on the blueprint, click on the Blueprint It! link near the top of the toolbar on the left.
The recommended first set to send over? What you selected as your Tier 1 keyword (which is normally your Site Concept Keyword), 2-3 keywords that you want to make Tier 2 keywords, and 2-3 Tier 3 keywords for each of the Tier 2 keywords. This will allow you to see how Blueprint It! works without having too many keywords to manipulate.
Number of Keywords, Page Navigation, Rows/Page
At the top of the MKL table is the number of keywords, page navigation and a menu to choose the number of rows to show per page. Page navigation is dependent on the number of rows per page and the number of keywords you have.
Number of Keywords
The MKL always tells you how many keywords you're currently seeing in your list. The message you see will be similar to the screenshot below...

... which indicates that this particular list is showing 120 words out of a total of 332, and that the maximum allowed is 5,000.
When you select a Seed Word or a Group, or run a task, the number of keywords displayed in the MKL is reduced. The message that you see will then change from the total number of keywords to a smaller number, as shown in the screenshot above.
Page Navigation
The minimum number of pages you can have in your MKL is 1 (if it's empty, you'll see the page with no keywords), and the maximum is 100 (5,000 keywords divided by 50 rows per page).
You'll always see the first and last page number. And every number is a link to that particular page. Where applicable, you'll also see Previous and Next links.
To reach pages where you only see "...," click on Previous or Next until you reach the page you want.
The screenshot below shows the number 1 in bold. This indicates that page 1 is the current page. The last number is 4, which indicates that there are 4 pages of keywords. And the rows per page is currently set to 100.
This indicates that there are currently at least 301 keywords in the MKL. (Since rows per page is 100, 4 pages indicates that there are at least 301 keywords, but no more than 400.)
Rows/Page
You can select to show 50 rows per page, 100, 250 or 1,000.
Selecting 50 means you have fewer keywords per page to scroll through, but more pages of keywords to look at (as many as 100, if you have 5,000 keywords in your MKL). Selecting 1,000 per page makes each page longer, but reduces the number of pages.
Play around with the number of rows until you find the number that you prefer to work with.
The MKL Table
Now we come to the MKL table itself, which displays your keywords and their data. We discussed these columns earlier. Here we go into more detail.
As discussed earlier, you can display any columns you want by checking and unchecking options in the Columns overlay.
Keyword Column
The MKL has three different keyword presentations...
-
After your very first brainstorm, all the keywords (and their numbers) appear in blue, sorted alphabetically A-Z.
-
After your next query, the new keywords are in blue, above all the keywords previously brainstormed, which are now black. Each group is sorted alphabetically, A-Z.
-
When you log into Brainstorm It! again, all of your keywords are black, and they're all sorted alphabetically, A-Z.
For a discussion of the Keywords column in Blueprint It!, refer to its help.
Direct Link to BB2
Click on a keyword to open a small overlay with a direct link to BlockBuilder.
BB2 will open. The new page's Page Information overlay will already have the keyword entered into the Keyword box.
Value Demand, Real Supply and Profitability Columns
These three columns display numbers generated by your Brainstormer queries.
The higher the Value Demand, the better the keyword.
The opposite is true for Real Supply -- the lower the supply, the better the keyword. However, if the Real Supply is too low for a particular keyword, it may not be monetizable.
Profitability, which is determined by dividing Value Demand by Real Supply and multiplying that number by 1,000, is best when it's highest.
Notepad Column
The Notepad is a useful place to store your ideas.
A click on the white Notepad icon opens a new window with a text box to enter your notes for that keyword (maximum 1,024 characters).
When finished, click on the Save Notes button to save your notes and close the window, leaving you back at your MKL.
This notepad's icon will now be yellow, with a check instead of a pen. This indicates that you have notes saved here. Click on the yellow notepad at any time to review these notes or add to/modify them.
Enter all of your great ideas for content or monetization for each keyword into its notepad. You'll have ideas to enter into your notepads...
-
from reviewing and thinking about your MKL or...
-
by visiting sites in the course of your research (see Site Info, below) or...
-
during the normal day-to-day process of building your site and thinking about your business.
You can sort completed notepads to the top of the MKL table to make it easy to review all of them.
If the notepad icon is yellow, hover over the icon to see a tooltip with the text of the note you created for the keyword.
WWW Column
Click on either the g button or the b button for a particular keyword to open a new browser window. Brainstorm It! retrieves the first search engine results page from Google or Bing, and displays the results in a new window.
The purpose? There are several reasons...
-
Competition -- See who ranks in the Top 10. Don't be intimidated by a few big names. The key question is, "Is this a site that humans will value highly?"
If you see lots of great content sites being found for all of your most important planned keywords, think twice about choosing this Site Concept.
-
Monetization -- Take a quick peek to see how many advertisers there are at the top of the search results, who they are, and how targeted the ads are.
Many targeted advertisers is a great sign. Most companies aren't able to do what you'll be doing (building your own traffic). They're delighted to pay you for ad space on your site (e.g., Google AdSense).
-
PPC-Buying -- If you're planning to buy PPC (pay-per-click -- for example, Google Ads) advertising (not something most SBIers need to do), look for a lack of competition and a lack of advertisers instead!
Site Info
![]() Site Info returns a lot of valuable information for the top 10 sites about a particular keyword. It also provides information about up to 10 more sites that are related to each of the top 10.
Site Info returns a lot of valuable information for the top 10 sites about a particular keyword. It also provides information about up to 10 more sites that are related to each of the top 10.
![]() Clicking on the Site Info icon opens a new window. Brainstorm It! then collects and displays the information for each of the 10 sites. This information includes...
Clicking on the Site Info icon opens a new window. Brainstorm It! then collects and displays the information for each of the 10 sites. This information includes...
-
The Title of the home page
-
Contact information for the webmaster
-
The URL of that page as a live link that will take you to the page
-
The SimilarWeb Rank
-
Links to PAGE, a MajesticSEO search that shows the top 5 inbound links to the page
-
Links to SITE, a MajesticSEO search that shows the top 5 inbound links for the site (links that point to all the pages of the site)
-
Links FROM Site, a Bing search that shows links from that site to other sites
-
The Description of the page
-
Information about each of up to 10 pages related to this site
If you want the full MajesticSEO report on links to the site, you must sign up for a free account.
What do you do with this information? Follow the links, investigating the sites and their pages, and their inbound and outbound links. Make notes in the keyword's notepad (Site Info also opens a new window, which lets you open Notepad at the same time).
Studying the Site Info delivered for each keyword, you'll notice two very different types of sites...
-
Content sites are competitors. They're in the same business as you (i.e., providing content), so they have already followed paths that now provide good content and monetization ideas for you (e.g., found a great affiliate program!).
-
Merchant sites get your brain churning with new monetization ideas. Each of these could be some kind of monetization opportunity for you.
See also the discussion about Site Info in DAY 4 of the Action Guide.
Tips
-
The Links To PAGE results give you an idea of how tough it will be to beat that page. It also gives you suggestions for pages on other sites that might link to your similar page -- if the webmaster linked to your competitor's page, he may link to yours. Ask for and secure that link.
-
Site Info is one of the most useful, and one of the most under-used, Brainstorm It! tools. At the very least, use it for your Site Concept Keyword. Once you know this tool, you'll want to use it again for a number of your highest Demand keywords. It takes work, yes, but it's more than worth it!
-
This TNT HQ article will help you get more out of Site Info...
-
Running Site Info for a keyword turns the Site Info icon yellow. You can then sort by these yellow icons, pulling them all together at the top of the MKL table for easy review.
Search It!
![]() The Search It! tool lets you perform keyword-related searches directly from your MKL. When you click on any of the icons for a particular keyword, Search It! opens in a new window, with that keyword already entered.
The Search It! tool lets you perform keyword-related searches directly from your MKL. When you click on any of the icons for a particular keyword, Search It! opens in a new window, with that keyword already entered.
The Search It! tools available in the MKL are...
-
Wikipedia -- If you find a keyword that you think will add value to your site, but you don't know what to write about it, click on the Wikipedia page icon to do some research on this keyword.
-
Flickr -- Some keywords are more "photogenic." Images and graphics are a natural fit with these words. If you don't have any images, use the Flickr camera icon to find images that are tagged with this keyword.
-
KeywordSpy Keyword Estimator -- Get a sense of or confirm the monetization value of a keyword (check the CPC value of a keyword, the number of advertisers for it and its PPC competitors, and even see sample ads). Click on the $ icon to begin.
Important Note About KeywordSpy
KeywordSpy restricts access to IP addresses in the US. If you're outside the US, use a VPN (virtual private network) to select an IP address in the US, then use this tool in the MKL. Proton VPN is a high quality VPN.
Important Reminder
The cost of Google Ads ads is not what you will earn per click if you put AdSense on your site. It's an estimate of the cost-per-click that an advertiser would pay. You receive a portion of that cost.
However, a high cost-per-click means an in-demand keyword, so any monetization related to that keyword should earn you a good income once you have sufficient traffic.
Pages Column
The Pages column displays which keywords you have used as the Specific Keyword on published pages.
Sort used keywords to the top, or sort the keywords you have yet to use to the top.
PCDM, CPC ($) and Keyworth Columns
The first two of these columns display numbers provided by Google Ads (PCDM and CPC), which you collect via the Get Google $ and Export features of Brainstorm It!.
The third number (Keyworth) is calculated using a combination of MKL and Google data, delivering an all-encompassing value of a keyword.
The higher the value in these three columns, the better the keyword is in terms of monetization potential (all else being equal).
# Pages, # SE Visitors and Best Rank Columns
The # Pages column displays the number of pages that you have published using that particular keyword as the Specific Keyword. Any number except 0 is clickable, to view more information about those pages.
The # Visitors column displays the number of visits to all pages of your site using that particular keyword. Any number is clickable, to view more information about that traffic.
The Best Rank column displays the best rank from Google, Bing or Yahoo! for that particular keyword. Each number is clickable, to view more information about the page that received that rank, and also the rank at each engine.