
301 Redirects Library
The 301 Library allows you to redirect a page of your site to another page of your site.
Why would you want to do that? There are two reasons.
-
You may decide at some point that you want to take the content in a slightly different direction, and think that a new file name will be better.
If the existing file name is relevant, do the redirect. This will ensure that any inbound links the existing page earned will not be lost.
Only do it if the existing page is receiving a fair bit of traffic. If its traffic is at or near zero, publish the new version and then delete the old one.
-
Other webmasters will want to link to your quality content. However, many will type in your page's URL rather than copying it and pasting it in. So the URL might have a typo, or it might end in .htm rather than .html.
Google Search Console will report on each of these that it finds. In the navigation on the left, click on Crawl > Crawl Errors and review all the URLs at the bottom of the page. GSC will report up to 1,000. Don't bother redirecting even fifty if you don't receive any traffic from them.
-
You might have a need to redirect a single page on your site to a page on another site.
Add Link to Your Redirect Library
Use this tool to add redirects. Each one you add here will appear in the Manage 301 Redirect Links section, below. (All redirects you create when deleting pages from Page Manager will also appear in Manage 301 Redirect Links.)
- Type or paste (recommended) the file name of the page to be redirected into the Enter Source URL text box.
- Type and select the file name for a page on your site, or type/paste the full URL (including http://www. or https://www.) of another site's page, into the Enter Destination URL text box.
- Type or paste a description into the Enter Description text box.
- Click on the Add Redirect button to create the redirect link.
Pasting in the URLs is always the best method of adding them. But do ensure that you copy the entire URL, with no spaces before or after the URL.
If you're fixing broken links you found in Google Search Console, copy the entire file name displayed there.
If you want to change a file name, view the existing page, then copy either the full URL or just the file name from the address bar at the top of the browser window.
Type or paste (recommended) the file name into the Source URL text box. If the page still exists, you'll see an overlay with a warning message.
Confirm that you do want the redirect. If you want to redirect a deleted page, you will not see a warning message.
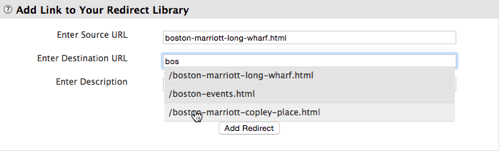
Next, type and select (the system will "type ahead" and find all pages that start with the letters you type in) the file name for a page on your site, or type/paste the full URL (including http://www. or https://www.) of the page on another site, into the Destination URL text box. (The destination is where a visitor will end up if she clicks on a link with the old URL.)
Below is a screenshot of the type ahead display after the letters "bos" are typed into the box.
Then add a description for this redirect in the Description text box. Make it descriptive enough that you understand what it's for or where it came from.
For example, you might give a redirect for a broken link you found in Google Search Console the name GSC [file name], where [file name] is the actual file name you pasted into the Source URL box.
For internal redirects, you might list them with Content [file name] for ones you redirect because of minor changes in the content of the page (large rewrites are better off in a new page with no redirect).
Why describe them this way? In the management tool (discussed next), you can sort the redirects by the Description you give them. You can group them into categories if you give related ones a common first word.
Manage 301 Redirect Links
This is where you'll manage all your redirects, including modifying them or deleting them (removing the redirect from one page to another).
Filter Tool
On the right side of the library, there's a text box with a magnifying glass beside it...
![]()
As you add letters and/or numbers to the text box, the library manager presents only the redirects that contain that text string. The more characters you add, the fewer redirects will display in the manager, making it easy and fast to locate the redirect you want.
The filter works on both file names (Name) and descriptions (Description). See the Pages section below for more about names and titles.
Redirected Links Manager
Work with your redirects in this section.
The manager tells you the source URL (the first URL) and then the destination URL, which can be either an internal URL or one on another site.
You can sort and filter your redirects using the tools at the top of the list.
-
View Click on Name to see all your redirects by their source and destination file names. Click on Description to see them all by their descriptions.
-
Sort Display your redirects alphabetically (based on the first letter of the Source URL's file name) from A to z (the default), from Z to a, or by the date Last built. Last built displays the most recent redirects at the top of the list.
You can also use the filter tool (the text box next to the magnifying glass) to quickly reduce the number of redirects you see. Each letter or number you type in the box reduces the number of redirects displayed, until you see only a few, the ones that have the text string in the Name or Description.
Tip
-
When viewing by redirect Name, hovering your mouse over the name will display a tooltip with the redirect's Description. And vice-versa.
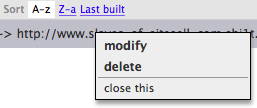
Modify, Delete
Click anywhere on a redirect Name (source or destination) or Description to modify or delete the redirect. A small gray menu will open to choose your action...
-
modify Click on this to modify the Source URL, the Destination URL, or the Description. Click on Modify This Link to complete the process and close the overlay.
-
delete Remove the selected redirect (after you confirm). Click on Delete This Redirection Link to remove the redirect.
Very Important
Deleting the redirect means one of two things...
-
If you created the redirect in the 301 Library, the redirect is removed and the page appears again in Page Manager, and is live on the Web again.
-
If you deleted and redirected the file from Page Manager, the redirect is removed and the page is lost forever, since you deleted it.
So be absolutely certain which type of redirect you're deleting, as this cannot be undone.
Tips
-
The page file name's background will change to a dark gray when you click on it and open the menu, giving you a visual cue about the redirect you chose.
-
Clicking on another page Name or Description moves the gray background and menu to that redirect.
Bulk Delete
You can also bulk delete 301 redirects. To do that, click on a redirect URL that you want to delete. The URL will now have a gray background. Ctrl-click/Command-click on another URL to highlight it. Or use Shift-click to highlight all the URLs from the first click to the cursor's location.
Once two or more URLs are selected, the column headers bar (Select All, None, etc.) will have a gray background. To the far right, a Delete button displays.
Click on the Delete button to delete all the highlighted URLs. An overlay will appear, listing the descriptive name of all the URLs that will be deleted. Click on Delete These 301 Redirects to make the final deletion.
Important
If you created a 301 redirect at the time you deleted a page file in Page Manager, the redirect and the page will both be gone. Be certain that you no longer need the redirect before deleting it.
-